Did you know that over 75% of home bakers prefer no-bake desserts during summer months? You'll understand why when you discover Strawberry Cheesecake Truffles, a clever fusion that transforms traditional cheesecake into portable, party-perfect bites. While classic cheesecake has graced dessert tables since ancient Greece, these modern truffles have streamlined the experience into something you can create without ever turning on your oven. If you're wondering how these bite-sized confections manage to capture the perfect balance of tangy cream cheese, sweet berries, and rich white chocolate, you're in for an enlightening journey.
Key Takeaways
- No-bake dessert combining cream cheese, graham crackers, and freeze-dried strawberries, coated in white chocolate for a bite-sized treat.
- Mix room-temperature cream cheese with crushed graham crackers and freeze-dried strawberries until well combined, then shape into balls.
- Freeze truffle balls for 30 minutes before dipping in melted white chocolate mixed with vegetable oil for smooth coating.
- Store finished truffles in an airtight container in the refrigerator for up to one week.
- Decorate with drizzled chocolate or crushed freeze-dried strawberries while coating is wet for added visual appeal.
History
The origins of cheesecake truffles can be traced to the early 2000s when pastry chefs began experimenting with ways to transform traditional cheesecake into portable desserts.
You'll find that these innovative confections emerged as part of the broader trend toward miniaturized desserts, which gained popularity during upscale catering events and wedding receptions.
As you explore the evolution of these treats, you'll discover that the combination of cream cheese and chocolate coating wasn't entirely new.
Cream cheese-based candies had existed since the early 20th century, but the specific incorporation of graham crackers and freeze-dried fruit marked a distinct departure from earlier recipes.
The addition of strawberry flavor became particularly popular around 2010, when social media platforms began showcasing these eye-catching pink-speckled treats.
You'll notice that professional bakeries quickly adopted these truffles into their regular offerings, while home bakers embraced them for their make-ahead convenience and impressive presentation.
The modern version you're familiar with today, featuring freeze-dried strawberries instead of fresh fruit, was refined through years of experimentation to achieve the perfect balance of flavor and stability.
Recipe
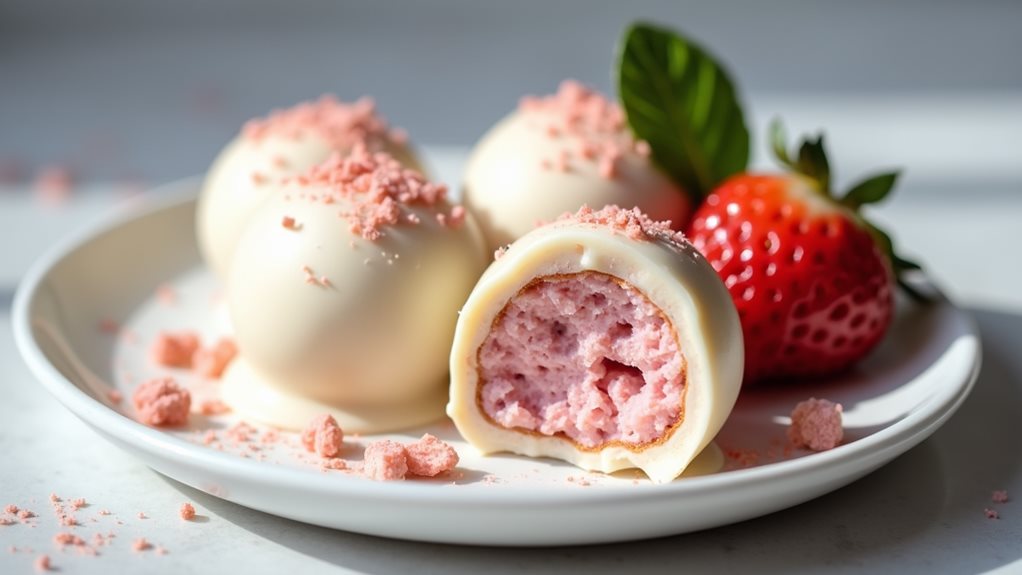
Strawberry Cheesecake Truffles are elegant, bite-sized desserts that combine the rich, creamy texture of cheesecake with the sweet flavor of strawberries. These no-bake treats transform traditional cheesecake into portable confections perfect for parties, gifting, or simply indulging in a delightful dessert.
These truffles feature a smooth cream cheese center studded with crushed graham crackers and freeze-dried strawberries, all enrobed in a silky white chocolate coating. The result is a perfectly balanced treat that captures the essence of summer berries while maintaining the decadent nature of classic cheesecake.
Ingredients:
- 8 oz (225g) cream cheese, softened
- 1½ cups (150g) crushed graham crackers
- 1 cup (120g) freeze-dried strawberries, crushed
- 12 oz (340g) white chocolate chips
- 2 tablespoons (30ml) vegetable oil
In a large mixing bowl, combine softened cream cheese with crushed graham crackers and freeze-dried strawberries until thoroughly mixed. Form the mixture into 1-inch balls and place on a parchment-lined baking sheet. Freeze for 30 minutes until firm.
Melt white chocolate chips with vegetable oil in a microwave using 30-second intervals, stirring between each interval until smooth. Using a fork, dip each frozen ball into the melted chocolate, tap off excess, and place back on the parchment paper. Refrigerate for 15 minutes until the chocolate coating is completely set.
For optimal results, ensure the cream cheese is at room temperature before mixing to achieve the smoothest texture possible. Keep the rolled balls frozen until ready to dip in chocolate, as this makes handling easier and results in a neater appearance.
If the melted chocolate begins to thicken during the dipping process, briefly reheat it in the microwave. Store finished truffles in an airtight container in the refrigerator for up to one week, and allow them to sit at room temperature for 5-10 minutes before serving for the best flavor and texture.
Cooking Steps
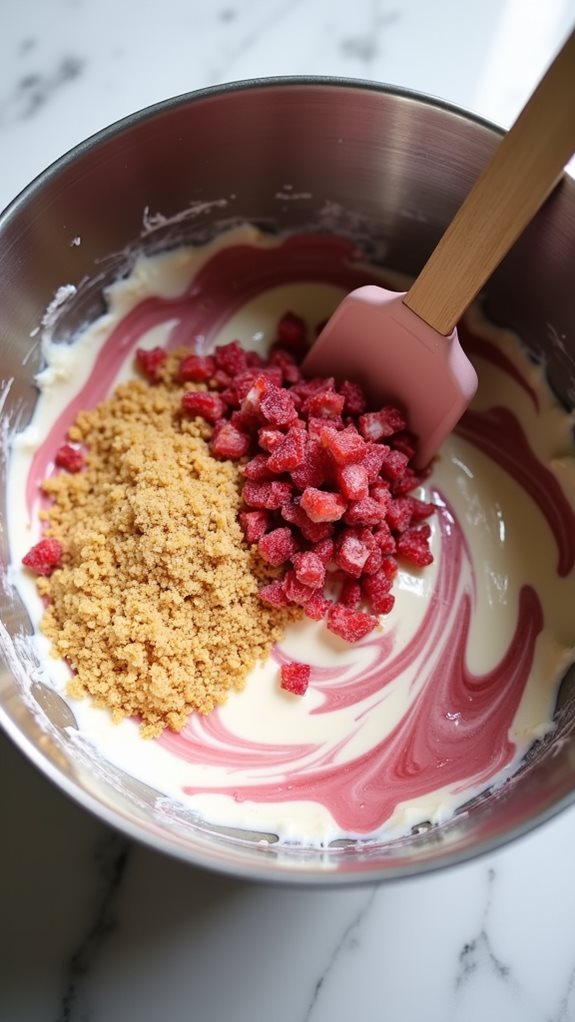
Let's start by combining your room-temperature cream cheese with crushed graham crackers and freeze-dried strawberries, mixing thoroughly until you've created a uniform mixture.
You'll then shape the mixture into 1-inch balls, placing them on a parchment-lined baking sheet before freezing them until they're firm.
Finally, you'll dip each frozen ball into melted white chocolate that's been smoothly combined with vegetable oil, allowing the chocolate coating to set completely in the refrigerator.
Step 1. Mix Cream Cheese Mixture Thoroughly
Mixing your cream cheese filling properly creates the foundation for perfect truffles. Before you begin combining ingredients, ensure your cream cheese has reached room temperature, which typically takes about 30 minutes on your counter. You'll know it's ready when it yields easily to gentle pressure from your finger.
In a large mixing bowl, combine your softened cream cheese with the crushed graham crackers, making sure to break up any large cookie pieces that might affect the texture.
Add your crushed freeze-dried strawberries to the mixture, and begin folding everything together with a rubber spatula. You'll want to work the ingredients until they're completely incorporated, with no streaks of plain cream cheese remaining. The mixture should achieve a uniform pink color throughout, indicating that the strawberry powder has been evenly distributed.
If you notice any lumps, press them against the side of the bowl to smooth them out. Don't rush this process – proper mixing now will ensure each truffle has the same delightful taste and texture when you're finished.
Step 2. Roll Into Small Balls
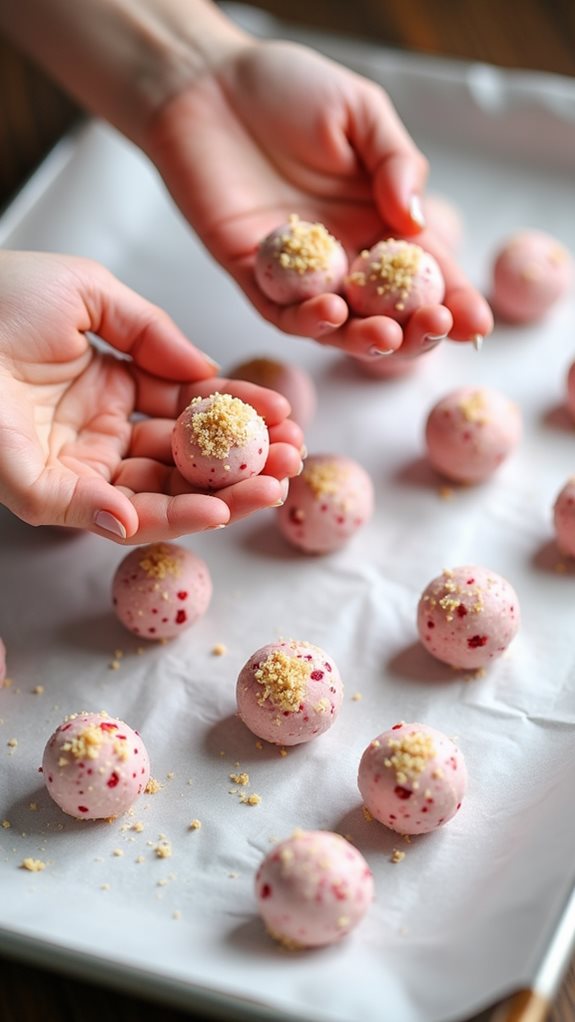
Once your cream cheese mixture is thoroughly combined, scoop out small portions using a tablespoon or cookie scoop to create uniform-sized balls. You'll want each portion to be approximately one inch in diameter, which typically requires about 1½ tablespoons of mixture per truffle.
Roll each portion between your palms using gentle, circular motions until you've formed a smooth, round ball. If you notice the mixture becoming too soft or sticky, you can pause and refrigerate it for 10-15 minutes to firm up.
Place each completed ball on your parchment-lined baking sheet, leaving about an inch of space between them to prevent sticking. As you work, you'll want to periodically clean your hands with a paper towel to prevent buildup that could affect the smoothness of your truffles.
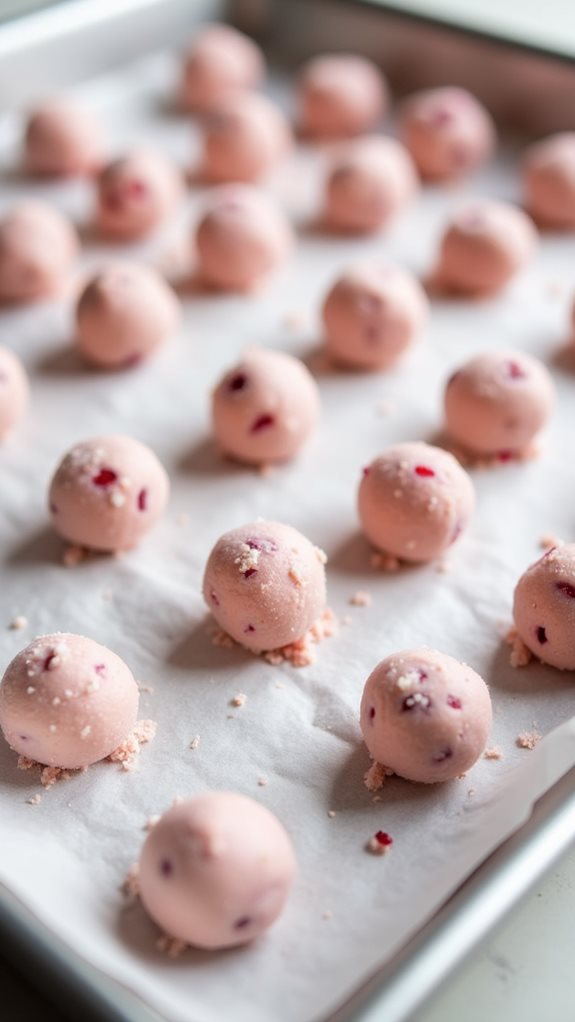
Once you've rolled all the mixture into balls, place the entire baking sheet in the freezer for at least 30 minutes, or until they're firm to the touch. Don't skip this freezing step, as it's crucial for maintaining the balls' shape during the chocolate coating process.
Step 3. Freeze Balls Until Firm
After forming your truffle balls, proper freezing is essential for maintaining their shape during the chocolate coating process.
Place each ball carefully on a parchment-lined baking sheet, ensuring they don't touch each other to prevent sticking. You'll want to freeze them for exactly 30 minutes, which provides the perfect firmness for dipping.
During the freezing process, you'll notice the balls become significantly firmer, but they shouldn't freeze completely solid. If you're working in batches, keep the remaining balls in the freezer while you're coating the first set.
The ideal texture you're looking for is firm enough that the balls won't lose their shape when dipped in warm chocolate, but not so frozen that condensation forms when they meet the coating.
If you're making these in advance, you can freeze the balls for up to 24 hours before coating them. Just remember to check that your baking sheet fits in your freezer before starting, and ensure it's placed on a level surface to prevent any rolling or misshapen truffles.
Step 4. Melt Chocolate Until Smooth
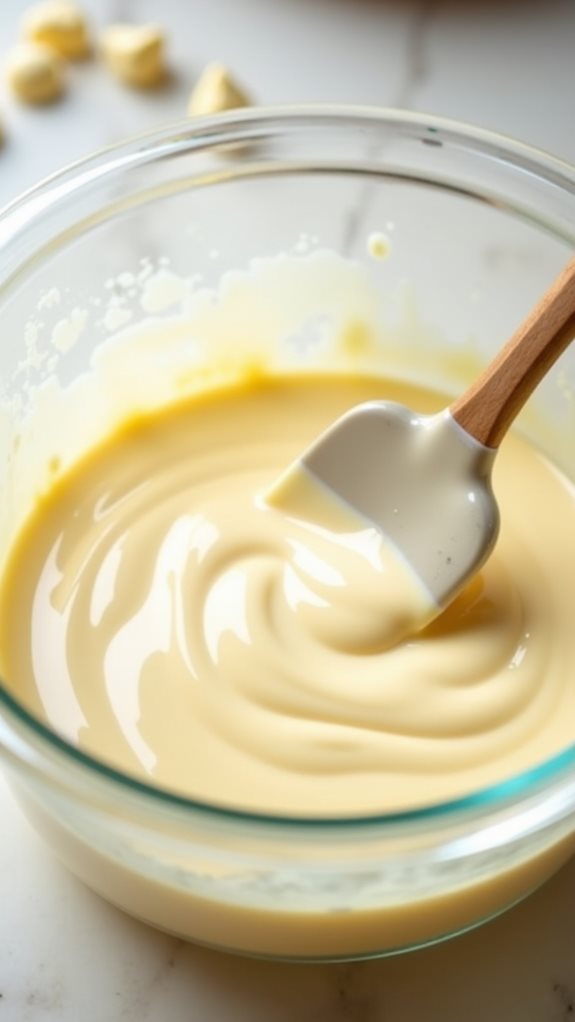
While your truffle centers chill in the freezer, preparation of the chocolate coating can begin. You'll need to combine your white chocolate chips with vegetable oil in a microwave-safe bowl, ensuring the bowl is completely dry to prevent the chocolate from seizing.
Set your microwave to 50% power, and heat the chocolate mixture in 30-second intervals. After each interval, you'll need to remove the bowl and stir thoroughly with a rubber spatula, making sure to scrape the sides and bottom of the bowl.
Don't rush this process – microwaving the chocolate for too long at once can result in scorching. Continue this heating and stirring pattern until the chocolate is completely smooth and glossy. You'll know it's ready when there aren't any remaining lumps and the mixture flows freely from your spatula.
If the chocolate seems too thick for dipping, you can add an additional teaspoon of vegetable oil and stir until incorporated. Keep the melted chocolate warm while you work, and if it begins to thicken, simply reheat it briefly using the same interval method.
Step 5. Dip and Cool Truffles

Throughout the dipping process, you'll need to work quickly but methodically to achieve the best results. Remove only a few frozen truffle balls from the freezer at a time, as they'll start softening quickly at room temperature.
Using a fork, lower each ball into the melted white chocolate, ensuring complete coverage. Gently tap the fork against the bowl's edge to remove excess chocolate, then carefully slide the truffle onto the parchment-lined baking sheet.
If you notice the chocolate beginning to thicken, don't hesitate to reheat it in the microwave for 15-second intervals, stirring between each one.
Once you've coated all the truffles, transfer them immediately to the refrigerator and let them cool for at least 15 minutes, or until the chocolate shell has completely hardened. You'll know they're ready when the surface appears matte and feels firm to the touch.
For added decoration, you can drizzle the cooled truffles with contrasting melted chocolate or sprinkle them with crushed freeze-dried strawberries while the coating is still wet. Just remember to work swiftly, as the chocolate sets quickly in cool temperatures.
Final Thoughts
These strawberry cheesecake truffles offer the perfect balance of creamy, sweet, and tangy flavors in an elegant bite-sized package. You'll find that they're not only delicious but also versatile enough to serve at both casual gatherings and formal events.
While they require some patience during the freezing and dipping stages, the end result is well worth your time and effort.
When you're making these truffles, remember that attention to temperature and timing is crucial for success. You'll get the best results by allowing your cream cheese to soften properly and keeping your chocolate at the right consistency for dipping.
Don't rush the freezing process, as properly chilled balls will make the chocolate coating process much smoother. If you're planning to make these treats ahead of time, you'll be pleased to know that they maintain their quality for up to a week when stored properly in the refrigerator.
With their beautiful presentation and irresistible flavor combination, these truffles are sure to become one of your go-to dessert recipes for special occasions.