You've probably encountered the irresistible aroma of cinnamon rolls wafting through a bakery, but have you experienced the autumnal twist of pumpkin cinnamon rolls? This seasonal treat combines two beloved flavors into one indulgent pastry that's perfect for crisp fall mornings or cozy gatherings. While the concept might seem like a recent trend, these rolls have been warming hearts and satisfying taste buds for longer than you'd think. There's more to these swirled delights than meets the eye, and understanding their history and preparation can elevate your appreciation for this fall favorite.
Key Takeaways
- Pumpkin Cinnamon Rolls combine traditional cinnamon roll dough with a pumpkin puree filling for a fall-inspired treat.
- They're typically made with crescent roll dough, pumpkin puree, sugar, maple syrup, and ground cinnamon.
- The rolls are baked at 375°F (190°C) for 20-25 minutes until golden brown.
- The preparation involves spreading pumpkin filling on rolled-out dough, then rolling and cutting into individual pieces.
- These rolls can be stored at room temperature for 2 days or refrigerated for up to 5 days.
History
The origins of pumpkin cinnamon rolls can be traced back to the fusion of two beloved treats: traditional cinnamon rolls and pumpkin pie.
You'll find that cinnamon rolls have a long history, dating back to Sweden in the 1920s. These sweet, spiraled pastries quickly gained popularity across Europe and North America.
Pumpkin pie, on the other hand, has been a staple of American cuisine since the colonial era.
As autumn-inspired flavors became increasingly trendy in the culinary world, bakers began experimenting with combining these two classic desserts. The addition of pumpkin to cinnamon rolls not only enhanced their flavor profile but also provided a seasonal twist that resonated with consumers.
You'll notice that pumpkin cinnamon rolls started appearing in bakeries and cafes in the early 2000s, coinciding with the rise of the "pumpkin spice" craze.
Since then, these rolls have become a fall favorite, with countless variations and recipes emerging.
From gourmet bakeries to home kitchens, you'll find pumpkin cinnamon rolls gracing tables and warming hearts throughout the autumn months.
Recipe
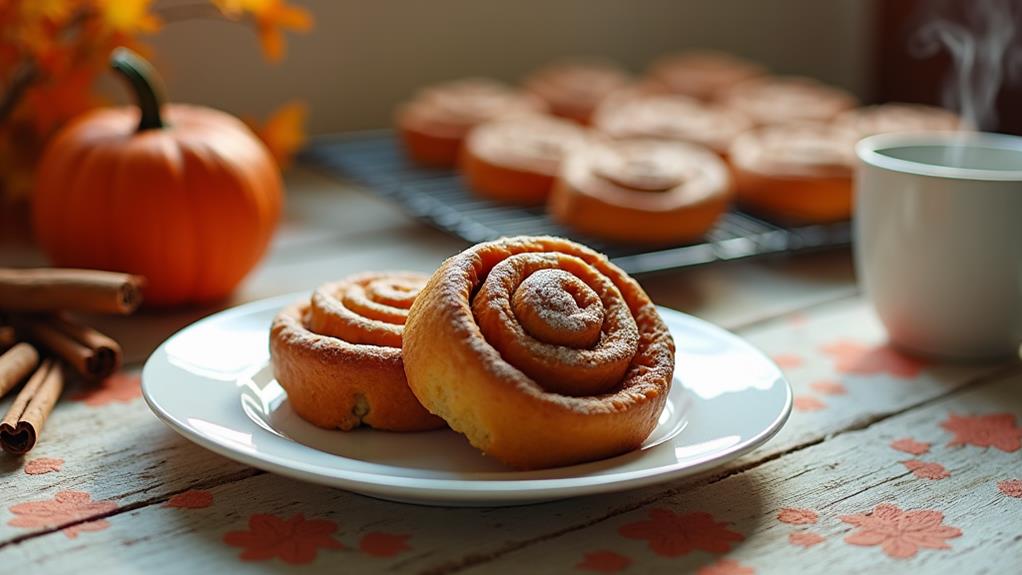
Pumpkin Cinnamon Rolls are a delightful autumn treat that combines the warm, comforting flavors of pumpkin and cinnamon in a soft, gooey pastry. These rolls are perfect for a cozy weekend breakfast or a special holiday brunch, filling your home with the inviting aroma of freshly baked goodness.
This simplified version uses just five ingredients to create a delicious and satisfying treat. By utilizing pre-made crescent roll dough as a base, you can whip up these pumpkin-infused rolls in no time, allowing you to enjoy a taste of fall without spending hours in the kitchen.
- 2 cans (8 oz / 226 g each) refrigerated crescent roll dough
- 1 cup (240 ml) canned pumpkin puree
- 1/4 cup (50 g) granulated sugar
- 2 tablespoons (30 ml) maple syrup
- 2 teaspoons (5 g) ground cinnamon
Preheat your oven to 375°F (190°C). Unroll the crescent dough and pinch the seams together to create two large rectangles. In a bowl, mix the pumpkin puree, sugar, maple syrup, and cinnamon until well combined.
Spread the mixture evenly over both rectangles of dough, leaving a small border around the edges. Starting from the long side, roll each rectangle tightly into a log. Cut each log into 8 equal pieces and place them in a greased baking dish. Bake for 20-25 minutes or until golden brown and cooked through.
For best results, allow the rolls to cool for a few minutes before serving. If you prefer a sweeter treat, you can drizzle the rolls with additional maple syrup or dust them with powdered sugar before serving.
These pumpkin cinnamon rolls can be stored in an airtight container at room temperature for up to 2 days, or refrigerated for up to 5 days. To reheat, simply microwave individual rolls for 15-20 seconds or warm them in a low oven until heated through.
Cooking Steps
To make these pumpkin cinnamon rolls, you'll start by preheating your oven to 375°F and preparing the dough.
Next, you'll mix the pumpkin filling ingredients and spread the mixture evenly over the dough rectangles.
Step 1. Preheat Oven to 375°F
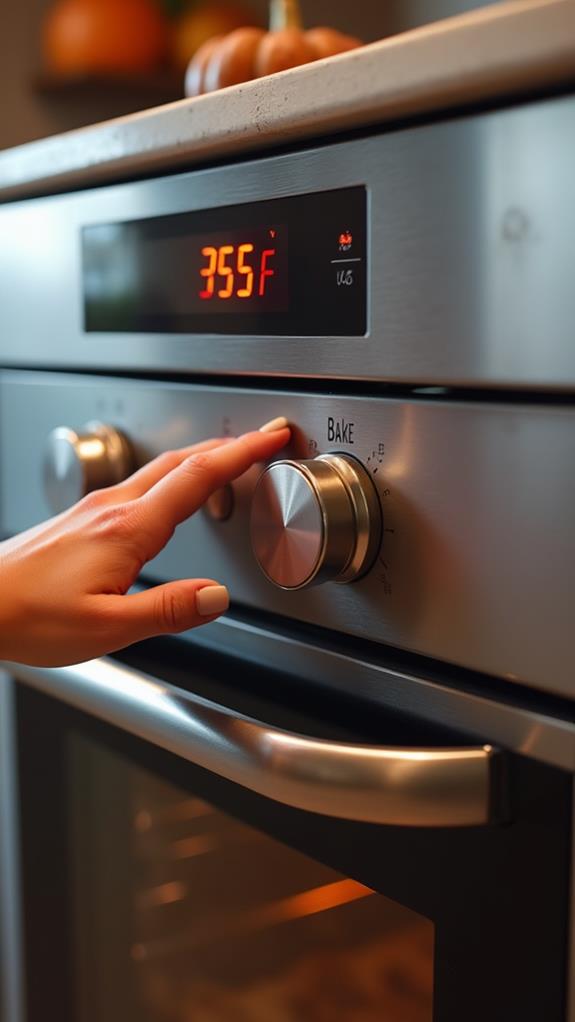
Before you begin mixing ingredients, it's crucial to preheat your oven to 375°F (190°C). This step ensures that your oven reaches the correct temperature by the time you're ready to bake your pumpkin cinnamon rolls.
While preheating, gather all your ingredients and equipment to streamline the preparation process. Proper preheating is essential for achieving the perfect texture and flavor in your rolls. It allows for even baking and helps create that golden-brown exterior while maintaining a soft, gooey center.
If you're using a conventional oven, it typically takes about 20 minutes to reach the desired temperature. However, if you have a convection oven, you might need to adjust the temperature or baking time slightly.
While waiting for your oven to heat up, you can start preparing your baking dish by greasing it lightly. This prevents the rolls from sticking and makes cleanup easier.
Step 2. Unroll and Prepare Dough
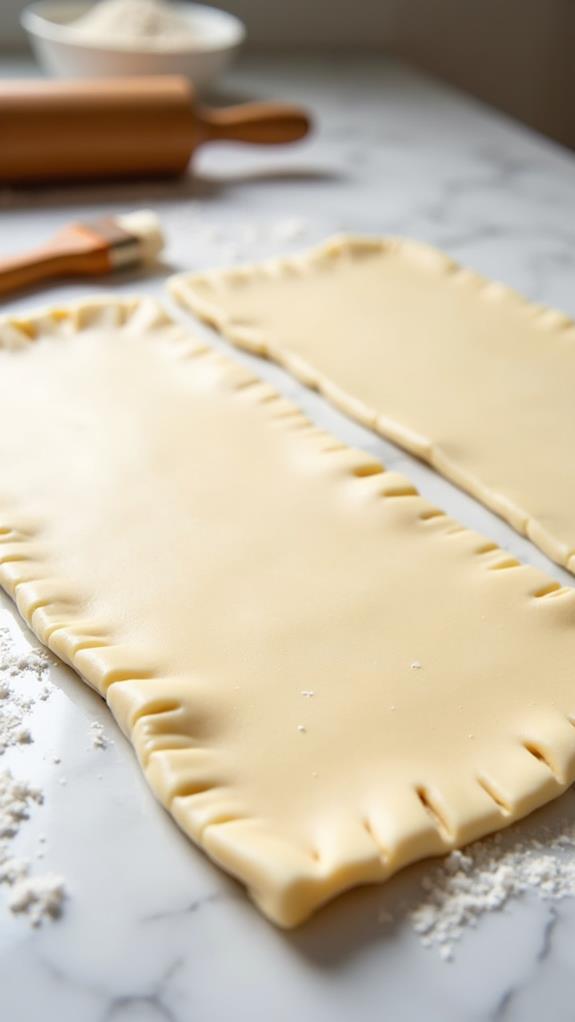
With your oven preheating, it's time to focus on the dough. Start by opening the two cans of refrigerated crescent roll dough. Carefully unroll each can's contents onto a clean, flat surface. You'll notice perforated lines dividing the dough into triangles; these are the seams you'll need to address.
Using your fingers, gently pinch these seams together to create two large, uniform rectangles of dough. This step is crucial for ensuring your rolls hold together during baking.
Once you've formed your rectangles, take a moment to inspect them for any remaining gaps or thin spots. If you find any, use small pieces of dough from the edges to patch these areas, pressing firmly to seal. The goal is to create a smooth, even surface that will hold your pumpkin filling.
Don't worry if your rectangles aren't perfect; they'll still taste delicious. Remember, you're aiming for two separate rectangles, as you'll be creating two logs of rolls. This preparation sets the stage for the next step: adding the flavorful pumpkin mixture that will transform your dough into irresistible pumpkin cinnamon rolls.
Step 3. Mix Pumpkin Filling Ingredients
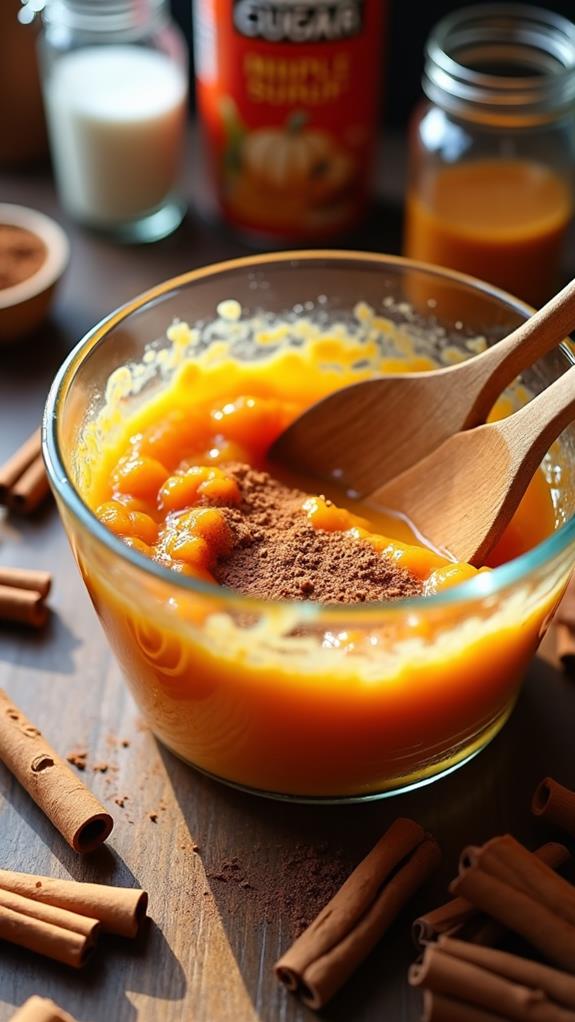
Now that you've prepared the dough, it's time to create the star of the show: the pumpkin filling. In a medium-sized bowl, combine one cup of canned pumpkin puree, a quarter cup of granulated sugar, two tablespoons of maple syrup, and two teaspoons of ground cinnamon.
Using a whisk or spatula, mix these ingredients thoroughly until you've achieved a smooth, uniform consistency. The pumpkin puree provides a rich, autumnal base, while the sugar and maple syrup add sweetness and depth. The cinnamon contributes warmth and complexity, enhancing the overall flavor profile.
As you're mixing, take care to break up any lumps in the pumpkin puree, ensuring a silky texture that'll spread easily over the dough. If you find the mixture too thick, you can add a teaspoon of milk to thin it slightly. Conversely, if it seems too runny, incorporate a tablespoon of all-purpose flour to thicken it up.
Once you're satisfied with the consistency and flavor, set the bowl aside. You'll use this delectable filling in the next step of your pumpkin cinnamon roll journey.
Step 4. Spread Filling on Dough
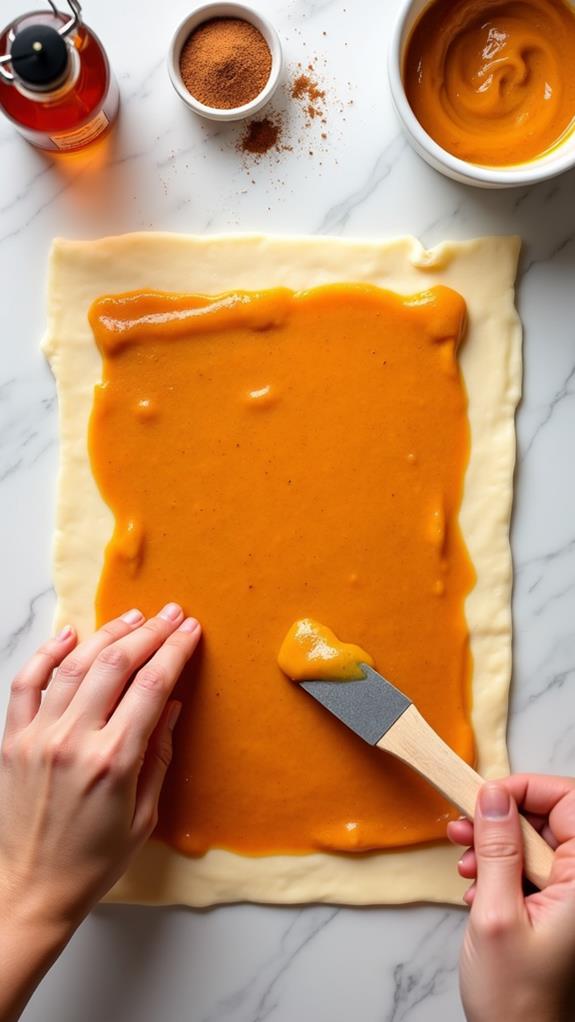
After preparing your pumpkin filling, it's time to spread it onto the crescent roll dough. Start by unrolling the dough and pinching the seams together to create two large rectangles. This will provide a smooth surface for your filling and ensure even distribution.
Using a spatula or the back of a spoon, gently spread the pumpkin mixture over both rectangles, making sure to cover the entire surface. Leave a small border, about 1/4 inch, around the edges to prevent the filling from spilling out during rolling.
As you spread the filling, aim for an even layer that's not too thick or thin. This will help maintain the balance of flavors and textures in your finished rolls. If you find the filling difficult to spread, try warming it slightly in the microwave for 10-15 seconds to soften it.
Once you've covered both rectangles, take a moment to smooth out any lumps or uneven areas. This attention to detail will contribute to the overall appearance and consistency of your pumpkin cinnamon rolls.
With the filling evenly distributed, you're now ready to roll the dough and create your delicious autumn treats.
Step 5. Roll and Cut Dough
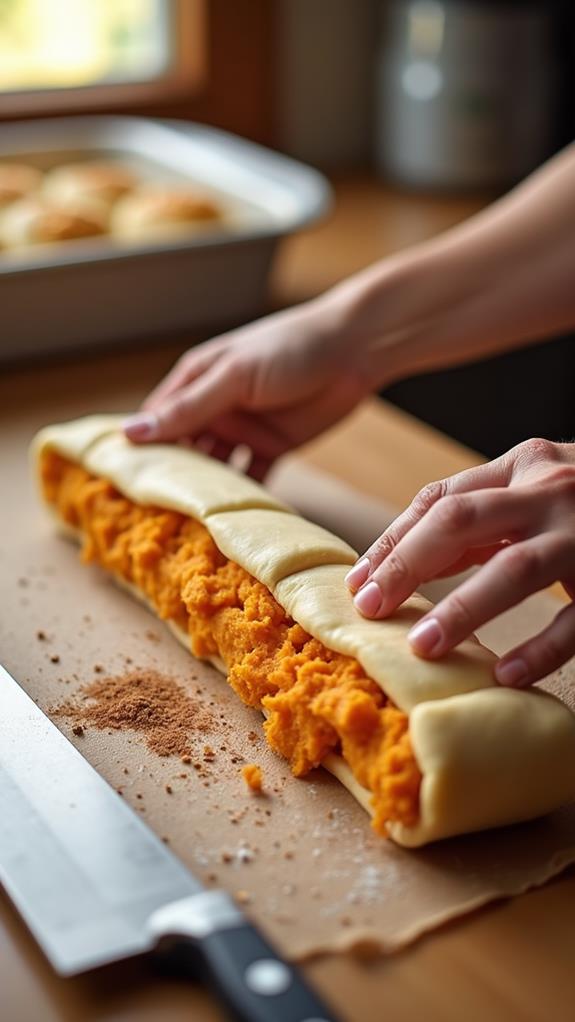
Once you've spread the filling evenly, it's time to transform your dough into rolls. Starting from the long edge of each rectangle, carefully roll the dough into a tight log. Use your fingertips to gently press and smooth the dough as you roll, ensuring there are no air pockets. When you reach the end, pinch the seam to seal it securely.
Next, you'll need to cut each log into individual rolls. Using a sharp knife or unflavored dental floss, slice each log into 8 equal pieces. If using a knife, make sure it's clean and sharp to avoid crushing the dough.
For the dental floss method, slide a long piece of floss under the log, cross the ends over the top, and pull to cleanly slice through the dough.
Place the cut rolls in your prepared baking dish, leaving some space between each for expansion during baking. Arrange them with the cut sides facing up to showcase the swirled filling. Your pumpkin cinnamon rolls are now ready for the oven, where they'll transform into golden, fragrant treats.
Final Thoughts
These simplified Pumpkin Cinnamon Rolls offer a delicious taste of autumn without the fuss of traditional recipes. You'll find that this five-ingredient version isn't only easy to make but also incredibly satisfying. By using pre-made crescent roll dough, you've saved valuable time in the kitchen without sacrificing flavor.
As you enjoy your warm, gooey rolls, remember that they're versatile enough for various occasions. They're perfect for a cozy weekend breakfast, a special holiday brunch, or even as an after-school snack for the kids.
Don't hesitate to experiment with toppings or additions to suit your taste. A cream cheese glaze or chopped nuts can elevate these rolls even further.
If you've made extra, store them properly to enjoy later. At room temperature, they'll last for two days, but refrigeration extends their life to five days.
When you're ready to indulge again, a quick reheat in the microwave or oven will restore that fresh-baked taste and texture. With this simple recipe in your repertoire, you'll be able to bring the comforting flavors of fall to your table anytime you desire.