Like a cherished childhood memory frozen in time, PB&J ice cream sandwiches represent the perfect marriage of comfort food and cool summer treats. You'll find that these nostalgic desserts don't just satisfy your sweet tooth—they transport you back to simpler days of sticky fingers and carefree afternoons. While the classic peanut butter and jelly sandwich has been a lunchbox staple for generations, this frozen interpretation elevates the familiar combination into something unexpectedly sophisticated. If you're wondering how such a simple concept became a beloved dessert sensation, there's quite a story behind its evolution from sandwich to frozen treat.
Key Takeaways
- Mix softened vanilla ice cream with peanut butter and salt, then swirl in your favorite jam for a creamy PB&J filling.
- Sandwich the PB&J ice cream mixture between graham cracker halves and freeze for a crunchy-creamy dessert combination.
- Store wrapped sandwiches in an airtight container for up to two weeks in the freezer to maintain freshness.
- The recipe requires minimal cooking skills and basic ingredients: vanilla ice cream, peanut butter, jam, and graham crackers.
- Customize flavors by using different jams or nut butters while maintaining the classic PB&J taste in frozen form.
History
While ice cream sandwiches date back to the early 1900s, the PB&J version emerged much later as Americans sought creative ways to combine their favorite comfort foods.
You'll find that the traditional peanut butter and jelly sandwich gained widespread popularity during World War II when both peanut butter and jelly were included in soldiers' rations, making them convenient, nutritious meals.
The fusion of PB&J with ice cream sandwiches didn't gain traction until the 1990s, when artisanal ice cream makers began experimenting with nostalgic flavors.
You'll discover that this combination capitalized on America's enduring love affair with peanut butter, which had been a pantry staple since the early 20th century.
The trend accelerated as food bloggers and social media influencers started sharing their homemade versions, inspiring others to create their own variations.
Today, you'll see PB&J ice cream sandwiches featured in both small-batch ice cream shops and major manufacturers' product lines, proving that this creative twist on two classic treats continues to captivate dessert lovers of all ages.
Recipe
PB&J Ice Cream Sandwiches transform a beloved childhood sandwich into a refreshing frozen treat. These homemade ice cream sandwiches combine smooth peanut butter, sweet jam swirls, and creamy vanilla ice cream between crispy graham crackers for the perfect balance of flavors and textures.
This easy-to-make dessert requires minimal cooking skills and can be customized with different jam flavors or ice cream bases. The preparation process mainly involves mixing and freezing, making it an ideal project for both experienced cooks and beginners who want to create a memorable frozen treat.
- Vanilla ice cream – 1 quart (946ml)
- Creamy peanut butter – 1 cup (250g)
- Grape or strawberry jam – 1/2 cup (125g)
- Graham crackers – 12 whole rectangles
- Salt – 1/4 teaspoon (1.25g)
Remove ice cream from freezer and let soften at room temperature for 10 minutes. Transfer to a large mixing bowl and stir in peanut butter and salt until well combined.
Line a 9×13 inch baking pan with parchment paper and spread the ice cream mixture evenly. Drop spoonfuls of jam across the surface and use a knife to create swirls throughout. Freeze until firm, about 2 hours.
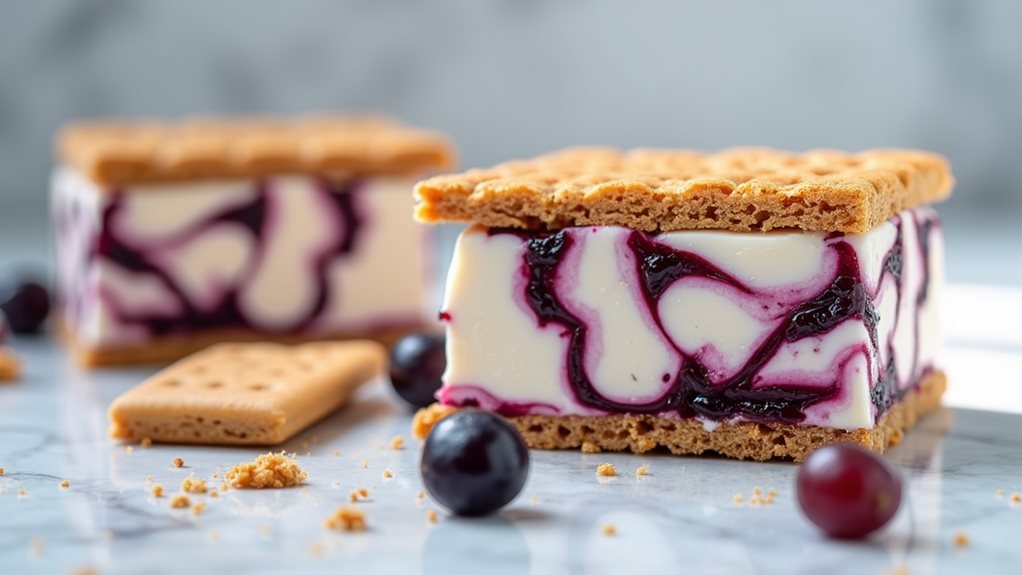
Break graham crackers in half to create squares. Cut ice cream into portions matching the graham cracker size and sandwich between crackers. Wrap each sandwich individually in plastic wrap and freeze until serving.
For optimal results, keep the ice cream mixture as cold as possible during assembly. If it becomes too soft, return to freezer for 15-20 minutes before continuing. Work in small batches when assembling the sandwiches to prevent excessive melting.
Store completed sandwiches in an airtight container in the freezer for up to two weeks. For cleaner cuts, dip your knife in hot water and wipe dry between slices.
Cooking Steps
To create these satisfying ice cream sandwiches, you'll start by softening your ice cream and mixing in the peanut butter until thoroughly combined.
Next, you'll carefully swirl jam throughout the mixture and spread it in a lined baking pan before freezing until firm.
Once frozen, you'll cut the mixture into squares and sandwich them between graham cracker halves, working quickly to prevent melting.
Step 1. Softening Frozen Dessert First
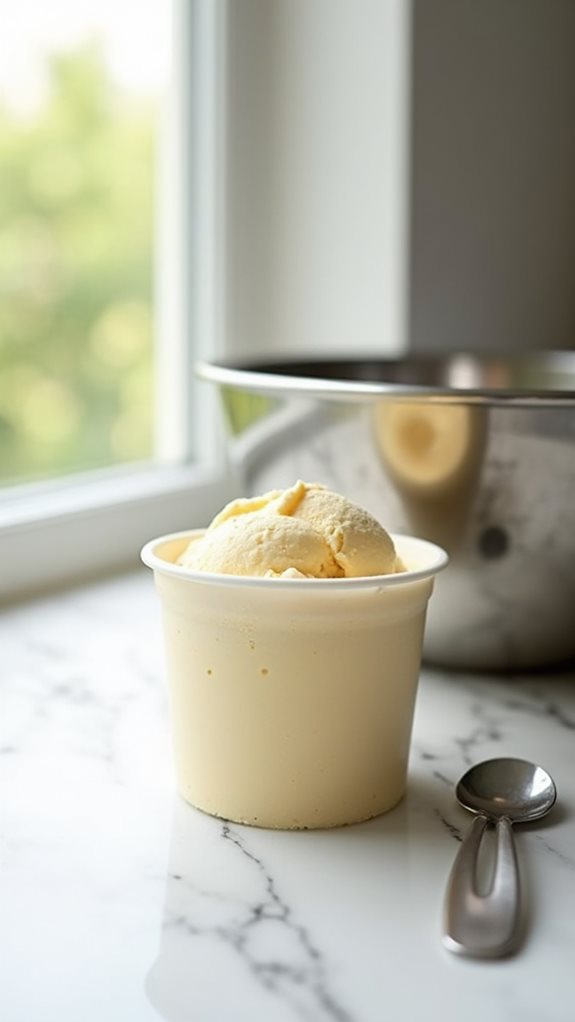
Starting with properly softened ice cream is crucial for creating smooth, well-mixed PB&J ice cream sandwiches. You'll want to remove your ice cream from the freezer and let it rest at room temperature for about 10 minutes, or until it's just soft enough to stir without being melted.
If you're working in a particularly warm kitchen, you might need to check the consistency after 7-8 minutes to prevent over-softening.
You'll know your ice cream has reached the ideal consistency when you can easily press a spoon into it, but it still holds its shape. Don't let it become too soft or soupy, as this will make it difficult to achieve those beautiful jam swirls later.
If you've accidentally left it out too long, don't panic – simply return it to the freezer for 15-20 minutes until it firms up slightly.
Once you've achieved the right consistency, you can proceed with adding your peanut butter and creating those signature PB&J swirls. Remember, working with properly softened ice cream will ensure that all your ingredients blend seamlessly without breaking down the ice cream's structure.
Step 2. Mix Peanut Butter Into Ice-Cream
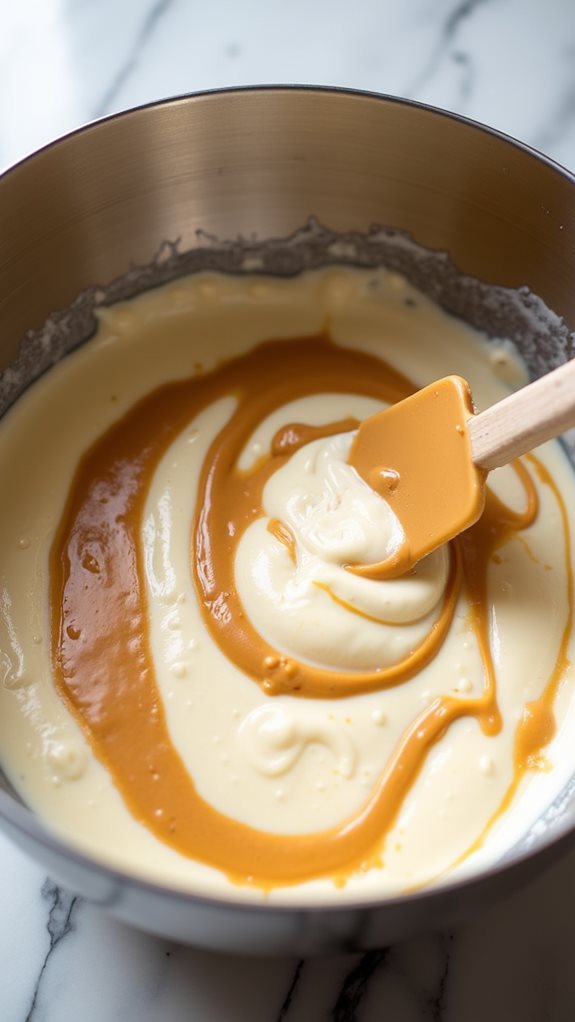
Now that your ice cream has reached the perfect consistency, it's time to incorporate the creamy peanut butter. Transfer your softened ice cream to a large mixing bowl, ensuring you have enough space to work with the mixture comfortably.
Add one cup of creamy peanut butter and a quarter teaspoon of salt to the ice cream, as these measurements will create the perfect balance of flavors.
Using a sturdy spatula or wooden spoon, begin folding the peanut butter into the ice cream with steady, deliberate strokes. You'll want to work efficiently but thoroughly, continuing until the peanut butter is fully incorporated and no streaks remain.
The mixture should take on a uniform, light tan color throughout. If you notice the ice cream becoming too soft during mixing, don't hesitate to return it to the freezer for a few minutes before continuing.
Once you've achieved a smooth, well-blended mixture, you're ready to transfer it to your parchment-lined baking pan, where you'll create those signature jelly swirls in the next step.
Step 3. Adding Jam Swirls
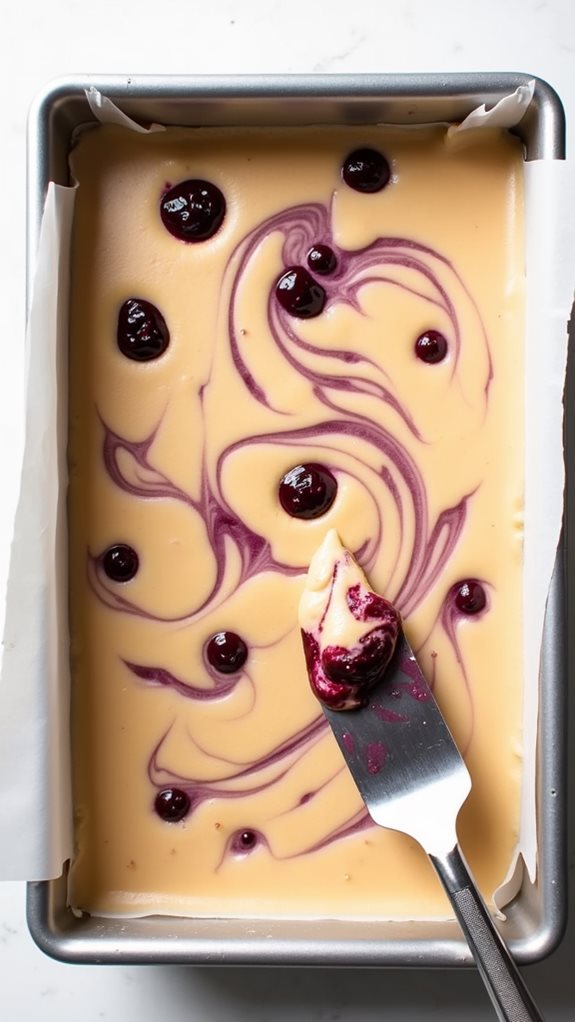
Ready to create those beautiful jam swirls in your peanut butter ice cream mixture? Once you've thoroughly combined your softened ice cream with peanut butter, it's time to add that classic jelly component that makes this treat truly special.
Take your preferred jam – whether it's grape or strawberry – and drop spoonfuls of it across the surface of your peanut butter ice cream mixture in the lined baking pan. You'll want to space these dollops evenly throughout to ensure every bite has that perfect PB&J flavor.
Using a butter knife or thin spatula, gently pull the jam through the ice cream mixture in fluid, sweeping motions to create attractive swirls. Don't over-mix; you're aiming for distinct ribbons of jam rather than a fully incorporated blend.
Work quickly during this step to prevent the ice cream from becoming too soft. If you notice the mixture starting to melt, pop it back in the freezer for 15-20 minutes before continuing.
Once you've achieved your desired swirl pattern, immediately transfer the pan to the freezer and let it set completely firm for about two hours.
Step 4. Cutting Ice Cream Into Squares
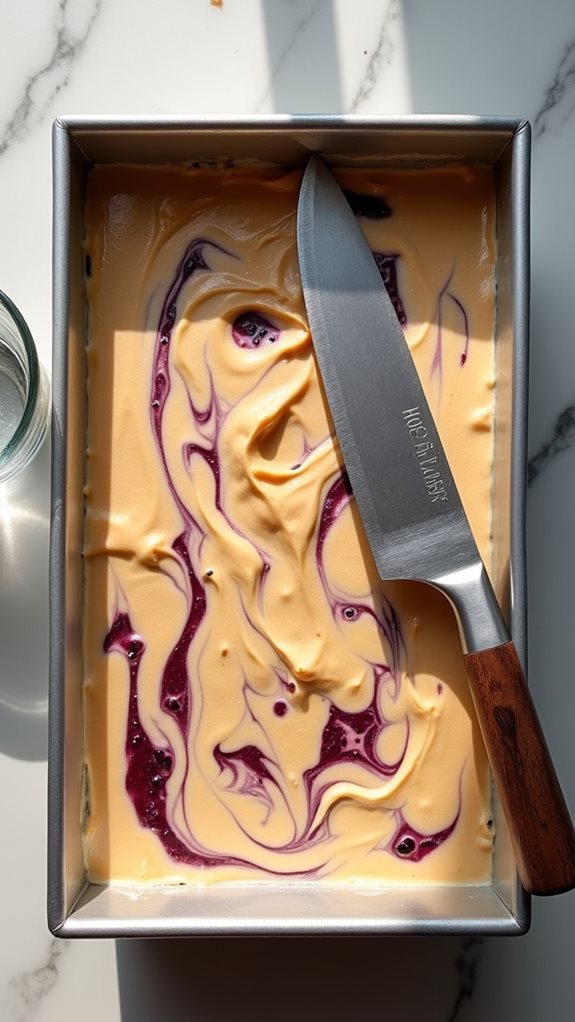
With your ice cream mixture firmly frozen, the precise cutting of squares marks a crucial step in creating perfect ice cream sandwiches.
You'll want to remove the frozen mixture from the freezer and let it sit for just 2-3 minutes to slightly soften, making it easier to cut without compromising its structure.
Using a sharp knife that's been warmed under hot water and dried thoroughly, you'll need to measure and mark your cutting lines to match the size of your graham cracker squares.
Start by scoring light guidelines across the surface of your frozen mixture, ensuring they're evenly spaced. Then, press the warm knife firmly through the mixture, wiping the blade clean between cuts to maintain precision.
For the cleanest results, you'll want to work quickly and methodically, cutting rows in one direction first, then completing the perpendicular cuts to form perfect squares.
If you notice the mixture becoming too soft, don't hesitate to return it to the freezer for 15 minutes before continuing.
Remember to slightly undersize your squares to account for the spreading that occurs when you press them between the graham crackers.
Step 5. Layering Crackers Over Ice Cream

Once your ice cream squares are perfectly cut, the layering process requires swift, deliberate movements to create well-structured sandwiches.
You'll want to work with graham cracker squares that you've already broken in half, ensuring they're ready to go before handling the ice cream.
Place your first graham cracker square on a clean work surface, then carefully lift an ice cream square using a flat spatula and position it directly onto the cracker.
You'll need to work quickly here, as the ice cream can begin softening immediately.
Press a second graham cracker square gently but firmly on top of the ice cream, applying just enough pressure to secure the sandwich without causing the filling to squeeze out the sides.
If you notice the ice cream becoming too soft during this process, don't hesitate to return both the remaining ice cream squares and partially completed sandwiches to the freezer for 15-20 minutes.
Continue this process until you've assembled all your sandwiches, then immediately wrap each one individually in plastic wrap.
This swift wrapping step is crucial for maintaining the integrity of your ice cream sandwiches and preventing freezer burn.
Final Thoughts
Creating homemade PB&J ice cream sandwiches lets you take a beloved childhood classic to delicious new heights. You'll find that these frozen treats offer the perfect balance of creamy, nutty, and fruity flavors, all wrapped between crispy graham crackers that bring a delightful textural contrast to each bite.
While the recipe is straightforward, you'll want to pay attention to timing and temperature for the best results. Don't skip the initial freezing period, as it ensures your ice cream mixture is firm enough to work with, and remember that keeping your ingredients cold throughout the assembly process is crucial for maintaining the ideal consistency.
You can experiment with different jam flavors, from traditional grape to exotic varieties like raspberry or blackberry, making each batch uniquely yours. If you're serving these at a gathering, you'll appreciate how easily they can be made ahead and stored.
The satisfaction of crafting these nostalgic treats from scratch is matched only by the joy of sharing them with friends and family, who'll surely be impressed by your creative spin on two classic favorites.