To master perfectly flaky pastry dough, you'll need to focus on key elements. Use high-quality ingredients, especially European-style butter, and keep everything cold. Gently knead the dough to avoid overworking it, aiming for a shaggy texture. Master the lamination process by folding and turning the dough multiple times, creating thin layers. Allow for proper resting and proofing times to relax the gluten and enhance flavor. When rolling and shaping, maintain consistent thickness and use proper crimping techniques to seal edges. Finally, bake at a high temperature for the right amount of time. Exploring these techniques in depth will elevate your pastry game.
Understanding Dough Ingredients and Properties
Pastry dough's success lies in the careful selection and handling of its ingredients. To achieve that coveted flaky texture, you'll need to master the interplay between flour, butter, and cold water. Start with all-purpose flour, which provides the ideal balance of gluten for structure without toughness.
Next, opt for high-quality European-style butter, as its higher fat content contributes to superior richness and flakiness.
The key to innovation in your pastry-making lies in temperature control. Keep your ingredients, especially the butter and water, ice-cold. This prevents premature melting of the fat, which would result in a dense, rather than flaky, crust.
As you incorporate the cold water gradually, you're creating pockets of butter within the flour matrix. These pockets are crucial; they'll evaporate during baking, leaving behind layers of crisp, flaky goodness.
For an extra tender result, consider adding a small amount of vinegar or lemon juice to your dough. This clever trick inhibits gluten formation, ensuring your pastry remains delicate and melt-in-your-mouth delicious.
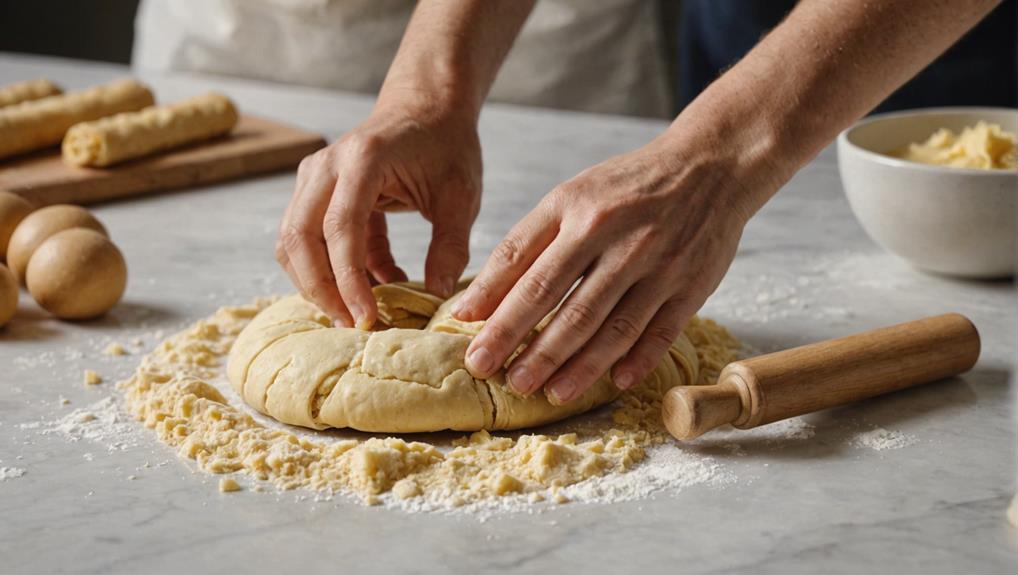
Perfecting Kneading Techniques
The art of kneading pastry dough is a delicate balance between mixing and restraint. When crafting flaky pastry, you'll want to approach kneading with a gentle touch. Use the heel of your hand to push the dough away, then fold it back over itself. After each push, rotate the dough a quarter turn to ensure even mixing. Your goal is to combine ingredients without activating too much gluten, which can lead to tough pastry.
Aim for a shaggy texture as you knead, and resist the urge to overwork the dough. Maintaining cold temperatures is crucial for preserving those coveted butter layers that create the flaky texture. Keep your hands, work surface, and ingredients chilled throughout the process.
If you find the dough becoming sticky, lightly dust your surface and hands with flour. However, be cautious not to add too much flour, as this can result in dense pastry. Remember, the key to perfectly flaky dough lies in your ability to knead just enough to bring the ingredients together, while preserving the delicate balance of gluten development and butter distribution.
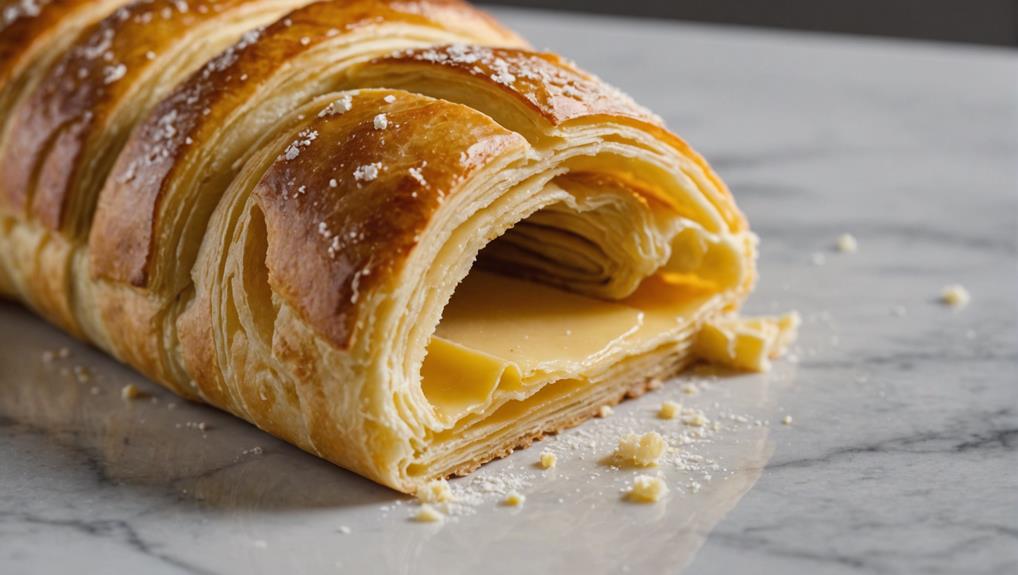
Mastering Lamination for Flaky Layers

To achieve perfectly flaky pastry layers, you'll need to master the art of lamination, which hinges on two critical factors: butter temperature control and proper folding techniques.
You must keep your butter cold throughout the process, ensuring it doesn't melt into the dough and compromise the distinct layers.
As you fold the dough, focus on maintaining even pressure and alignment, creating numerous thin layers that will puff up beautifully when baked.
Butter Temperature Control
Mastering butter temperature control is the key to achieving perfectly flaky pastry layers. When working with laminated dough, you'll need to maintain the butter at around 60°F (15°C) to create distinct layers that enhance flakiness. This technique is particularly relevant when making dishes like the Asparagus, Rocket, Caper & Hollandaise Tart, where the crispness of the pastry is vital for the overall presentation and enjoyment.
Start by cutting cold butter into small cubes, which will help you incorporate it evenly into the dough. As you roll and fold, keep the dough cool to prevent the butter from melting into the flour. If you notice the dough or butter softening, don't hesitate to chill them for 10-15 minutes before continuing.
To ensure your butter is at the optimal temperature, use the "press test." The butter should yield slightly under pressure without losing its shape. This indicates it's ready for incorporation into the dough.
Folding Techniques Explained
At the heart of perfectly flaky pastry lies the art of lamination through precise folding techniques. You'll need to master a series of single folds, known as turns, to create distinct layers of butter and dough. Aim for four to six turns, allowing the gluten to relax between each fold. This process is crucial for achieving that coveted flaky texture.
As you embark on this culinary journey, remember that attention to detail is paramount. Keep your dough and butter consistently cool throughout the folding process to prevent melting, which can disrupt the layering effect.
When using your rolling pin, employ a light touch to avoid overworking the dough, as this can lead to toughness rather than flakiness.
Between folds, brush off excess flour to ensure even baking and browning. This step prevents layers from sticking together, preserving the integrity of your lamination.
Proper Resting and Proofing Times
Pastry perfection hinges on proper resting and proofing times. To achieve those enviable distinct layers and flaky pastry, you'll need to master the art of patience. After mixing your dough, refrigerate for at least 30 minutes to relax the gluten and enhance flakiness. This crucial step sets the foundation for your pastry's success.
Between folds, allow your dough to rest for 15-30 minutes. This prevents the butter from melting and ensures those sought-after layers remain intact. For optimal results, take it a step further and refrigerate your dough overnight after the final fold. This extended rest period improves texture and develops flavor, elevating your pastry to new heights.
When it comes to proofing, keep your dough in a cool environment. This maintains the integrity of the butter layers, which is essential for achieving that perfect flake.
Stay vigilant and monitor your dough's temperature throughout the process. If it starts to warm up, don't hesitate to return it to the refrigerator.
Rolling and Shaping Pastry Dough
With your dough properly rested and proofed, it's time to tackle the art of rolling and shaping. Begin by rolling out the dough on a lightly floured surface to about 1/8-inch thickness. Apply even pressure to ensure consistency throughout, creating the foundation for a flaky pastry.
As you work, rotate the dough frequently to prevent sticking and achieve a uniform shape without overusing flour. This technique helps maintain the delicate layers of dough that'll result in that coveted flaky texture.
When you're ready to transfer the dough to your pie dish, use your rolling pin as a lifting tool. Gently drape the dough over the filling, taking care not to stretch it. For a double-crust pie, roll the top layer to the same thickness as the bottom for even baking.
Don't forget to crimp the edges, sealing the pie crust and adding a decorative touch. This step isn't just for aesthetics; it'll prevent filling spills during baking, ensuring your pie comes out perfectly golden brown and intact.
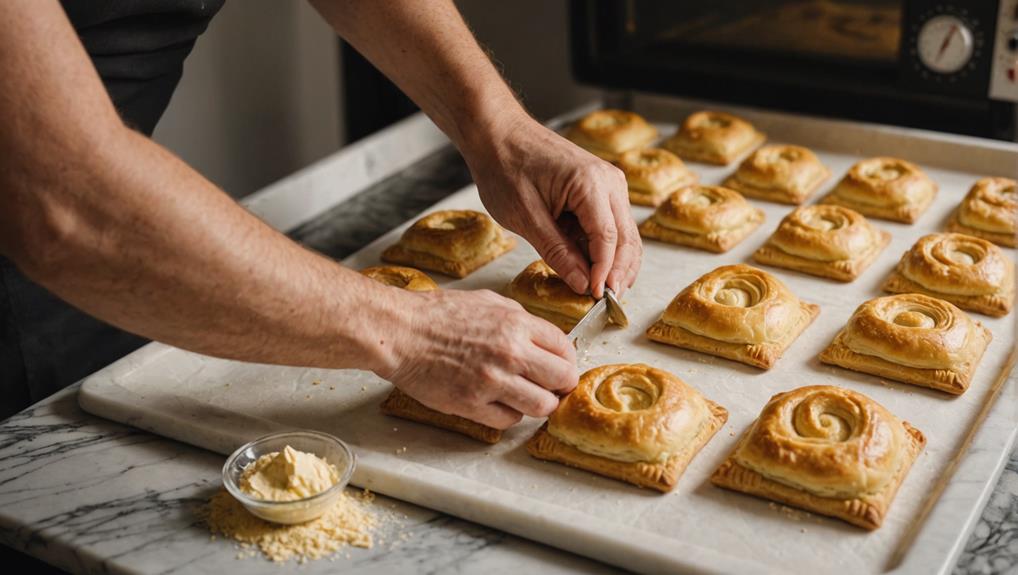
Crimping and Sealing Pastry Edges
When it comes to creating perfectly flaky pastry dough, mastering the art of crimping and sealing edges is crucial for both aesthetics and functionality.
You'll want to explore essential crimping techniques, such as using your thumb and index finger to create decorative patterns or employing a fork for a classic look, while ensuring proper sealing to prevent filling leakage.
Essential Crimping Techniques
The art of crimping is a crucial skill for any baker looking to create perfectly sealed and visually appealing pastries. To master this technique, you'll need to innovate and experiment with various methods. Start by dampening the pastry edges with water or egg wash to ensure a strong seal.
Then, use your fingers to create a fluted edge by pinching the dough between your thumb and index finger. Alternatively, employ a fork to imprint a decorative pattern while sealing the edges.
For added security and thickness, consider combining crimping with folding the edges over. This innovative approach not only enhances stability but also creates a unique visual effect.
As you practice, you'll develop your own signature style that balances functionality with aesthetics. Remember, consistency is key to achieving a uniform appearance and preventing filling leakage during baking.
Don't be afraid to try different crimping techniques, adapting them to suit various pastry types and fillings. With patience and practice, you'll soon master the art of crimping, elevating your pastries to new heights of both beauty and taste.
Sealing for Optimal Results
Building on the art of crimping, sealing pastry edges is a fundamental skill that ensures your creations are both visually appealing and structurally sound. To achieve optimal results, you'll need to master the delicate balance between form and function.
Start by moistening the edges of your dough with water or an egg wash, creating a tacky surface that will form a strong seal. This crucial step prevents gaps and leakage, maintaining the integrity of your flaky crust during baking.
When it comes to crimping, you have options. Use your fingers for creative designs or a fork for a uniform pattern. Whichever method you choose, focus on sealing the edges firmly to contain the filling and promote even cooking.
For juicy fillings, consider employing a double fold or thicker crimp, providing extra protection against sogginess and bubbling over. This technique not only enhances the structural integrity of your pastry but also adds a professional touch to its appearance.
Temperature and Baking Times
Mastering the art of perfectly flaky pastry dough hinges on precise temperature control and baking times. To achieve optimal results, you'll need to maintain a consistent oven temperature of at least 220°C/200°C. This high heat is crucial for creating that coveted flaky texture and ensuring your pastry rises beautifully.
Don't rely solely on your oven's display; invest in an oven thermometer to verify the actual temperature matches what you've set. Additionally, considering the use of the classic chicken pot pie can further validate how temperature impacts the final texture of your baked goods.
Quality baking pans are your secret weapon for evenly baking your pastry. They distribute heat more effectively, contributing to a uniformly golden-brown finish. As you monitor your pastry's progress, resist the urge to frequently open the oven door. Each time you do, you risk temperature fluctuations that can compromise your pastry's texture.
The ideal baking time for flaky pastry typically ranges from 20 to 30 minutes, but this can vary based on your specific recipe and pastry size. Keep a watchful eye on your creation, looking for that perfect golden-brown hue that signals it's done.
Frequently Asked Questions
What Makes Pastry More Flaky?
You'll achieve flakier pastry by using cold butter, resting your dough, selecting the right flour, mastering mixing techniques, perfecting rolling methods, and employing smart baking tips. Experiment with these elements to innovate your pastry game.
What Is the Golden Rule of Pastry?
Keep it cool, keep it quick: that's your golden pastry rule. You'll master dough temperature, explore fat types, and perfect rolling methods. Embrace innovative techniques, respect resting time, and discover baking tips for flaky, mouthwatering results.
How to Achieve a Tender and Flaky Pastry?
You'll achieve tender, flaky pastry by using cold butter, resting your dough, selecting the right flour blend, mixing gently, rolling carefully, and baking at the perfect temperature. Master these elements, and you'll revolutionize your pastry game.
What Is the Secret to Making Good Pastry?
You've stumbled upon pastry's secret! It's all about butter temperature, flour type, and mixing technique. Master these, then focus on resting time, chilling method, and baking temperature. You'll revolutionize your pastry game in no time!
Final Thoughts
You've mastered the art of flaky pastry dough, yet ironically, your greatest challenge lies ahead. As you present your perfectly crafted creations, you'll discover that your friends and family now expect nothing less than perfection from your kitchen. Your hard-earned skills have become both a blessing and a curse. Remember, with great pastry comes great responsibility. Embrace this double-edged knife as you continue to refine your craft, always striving for that elusive, buttery perfection.