To master sous vide cooking, start by understanding the basics: food is sealed in vacuum bags and cooked in temperature-controlled water. You'll need an immersion circulator, vacuum sealer, and proper bags. Prepare ingredients, seal them carefully, and set up your water bath. Follow recommended cooking times and temperatures for different foods, such as 130°F to 139°F for medium-rare beef. After cooking, finish with a quick sear for texture and flavor. Enhance your dishes with marinades, aromatics, and infused oils. With practice, you'll achieve restaurant-quality results at home. Explore further to unlock the full potential of this precise cooking method.
Understanding Sous Vide Basics
In the world of culinary innovation, sous vide cooking stands out as a game-changer. This precision cooking method allows you to achieve perfectly cooked dishes every single time.
Sous vide, which means "under vacuum" in French, involves sealing your food in a vacuum-sealed bag and immersing it in a temperature-controlled water bath. This unique approach ensures even cooking throughout, preserving flavors and textures that traditional methods often compromise.
To start your sous vide setup, you'll need a few key components: an immersion circulator for temperature control, a container for water, and vacuum-sealed bags for your food.
The beauty of sous vide lies in its ability to cook your food at precise, low temperatures over extended periods. This gentle cooking process not only enhances tenderness and flavor but also prevents shrinkage and retains moisture.
Whether you're preparing meats, vegetables, or even desserts, sous vide offers unparalleled consistency and quality. With ideal cooking temperatures ranging from 130°F to 145°F for meats, you can easily customize your cooking times based on thickness and desired doneness.
Embrace this innovative technique to elevate your culinary skills and impress with restaurant-quality results at home.
Essential Equipment for Sous Vide
To get started with sous vide cooking, you'll need some essential equipment.
First, let's explore immersion circulators, the heart of sous vide cooking, which maintain precise water temperatures for perfect results.
We'll then cover vacuum sealers and bags, crucial for sealing in flavors and protecting your food during the cooking process.
Immersion Circulators Explained
When it comes to sous vide cooking, an immersion circulator is your most essential piece of equipment. This precision cooker heats and circulates water at a consistent temperature, ensuring your food is cooked evenly and perfectly every time.
You'll find that affordable options start around £99.00, making sous vide cooking accessible for home cooks like you.
Immersion circulators are designed to maintain temperatures within a degree, giving you unparalleled control over your cooking process. They typically come with digital interfaces that allow you to set precise cooking times and temperatures tailored to your recipes.
Many models also feature built-in timers, enabling unattended cooking without the risk of overcooking.
To get the most out of your immersion circulator, follow these tips:
- Choose a model with a user-friendly interface for easy operation
- Look for circulators with strong clamps to securely attach to your cooking vessel
- Consider Wi-Fi-enabled models for remote monitoring and control
- Invest in a high-quality water container to pair with your circulator
Vacuum Sealers and Bags
Now that you've got your immersion circulator sorted, let's focus on another key component of sous vide cooking: vacuum sealers and bags. A vacuum sealer is essential for removing air from your sous vide bags, ensuring proper heat transfer and preventing moisture entry during cooking.
When choosing bags, opt for food-grade vacuum pouches designed to withstand high temperatures and extend food shelf life up to five times compared to regular storage methods.
Proper sealing is crucial for successful sous vide cooking. Tightly sealed bags minimize the risk of food floating in the water bath, which can lead to uneven cooking. Some immersion circulators come with compatible vacuum sealing systems, making it easier to pair your equipment for an optimal sous vide experience.
When selecting vacuum bags, always ensure they're labeled as sous vide-safe. These bags are specifically designed to withstand prolonged cooking times without compromising food quality or safety.
Containers and Accessories
Diving into the world of sous vide containers and accessories, you'll find that the right equipment can make a significant difference in your cooking results. A dedicated sous vide container, such as a large pot or specialized vessel, is essential for maintaining a consistent water bath temperature.
Your precision cooker, or immersion circulator, will heat and circulate the water, ensuring even cooking throughout the process.
To maximize your sous vide experience, consider these key accessories:
- Vacuum sealer: Removes air from sous vide bags, preserving flavor and preventing water infiltration
- High-quality sous vide bags: Withstand high temperatures, ensuring food safety and optimal results
- Racks or clips: Keep bags separated and submerged, promoting even cooking
- Container lid: Helps retain heat and reduce water evaporation during long cooks
These accessories work in tandem with your precision cooker and container to create the ideal sous vide environment.
By investing in the right equipment, you'll be well-prepared to explore innovative cooking techniques and achieve restaurant-quality results at home.
Preparing and Sealing Ingredients

To begin your sous vide cooking journey, you'll need to master the art of preparing and sealing your ingredients. Start by seasoning your food with your favorite herbs, spices, or marinades to infuse flavors during the cooking process.
Next, carefully place your seasoned ingredients into food-grade vacuum pouches or high-quality freezer bags, ensuring you remove as much air as possible to optimize cooking and prevent spoilage.
Seasoning and Marinating Techniques
Mastering the art of seasoning and marinating is crucial for successful sous vide cooking. To optimize your culinary results, you'll need to understand the delicate balance between flavors and technique.
Similar to how lentils can be enhanced with a flavorful Lentils With Spring Greens & Watercress Walnut Pesto preparation, start by seasoning your ingredients with your preferred spices, herbs, or marinades before vacuum sealing. This process enhances flavor penetration during the sous vide cooking process, ensuring a delicious outcome.
For proteins, it's beneficial to marinate for at least 30 minutes to a few hours before sealing. This allows the flavors to infuse more deeply into the meat, elevating your dish.
When dealing with delicate ingredients like fish or vegetables, apply a light seasoning to avoid overpowering their natural flavors.
To achieve even cooking and optimize results, follow these key steps:
- Season ingredients thoroughly before sealing
- Use a vacuum sealer to remove air and ensure tight packaging
- Avoid folds or wrinkles in the bag for even heat distribution
- Adjust seasoning intensity based on ingredient delicacy
Proper Vacuum Sealing Methods
Proper vacuum sealing is a critical step in sous vide cooking that ensures optimal heat transfer and flavor infusion. To achieve the best results, use high-quality, sous vide-safe vacuum bags that prevent harmful chemicals from leaching into your food. These specialized bags also enhance food safety throughout the cooking process.
When sealing your ingredients, remove as much air as possible from the bags. If you have a vacuum sealer, use it to create a tight seal that maximizes heat transfer and prevents bags from floating in the water bath.
Don't worry if you lack a vacuum sealer; you can still achieve excellent results using the water displacement method with Ziploc freezer bags. Simply submerge the bag in water to push out excess air before sealing.
Before sealing, consider marinating or seasoning your ingredients to infuse flavors during the sous vide cooking process. This technique helps maintain moisture while enhancing taste.
Always double-check that your bags are sealed properly to avoid leaks, which can compromise the cooking process and lead to contamination.
Setting Up the Water Bath
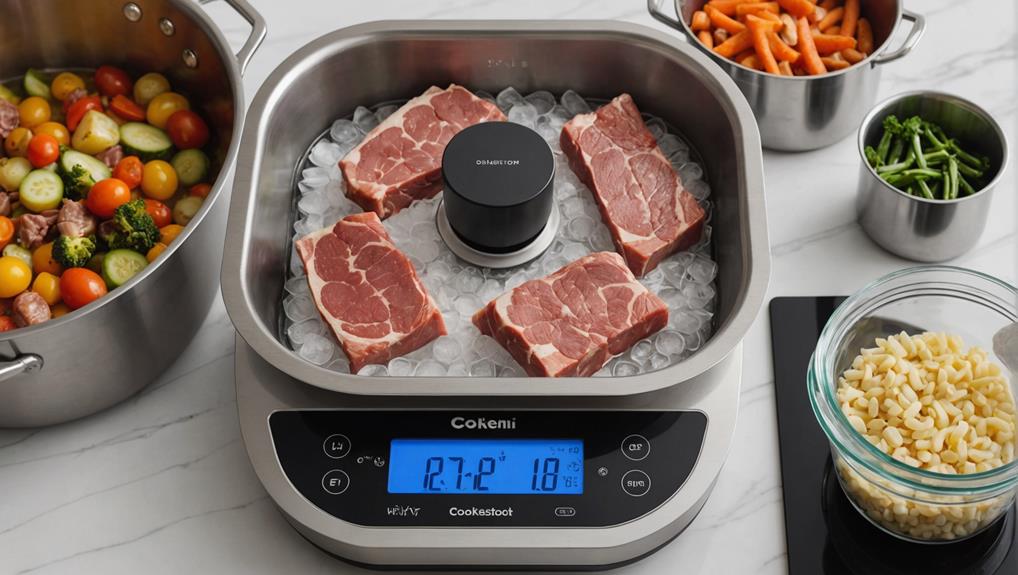
Setting up the water bath is a crucial step in sous vide cooking. To begin, fill a large pot or sous vide container with water, ensuring it's deep enough to fully submerge your food without overflowing.
Next, attach your immersion circulator to the container and set it to the desired cooking temperature. Allow time for the water to reach this temperature before adding your vacuum-sealed food items.
To maintain consistent temperatures and minimize evaporation, use a lid or cover for your water bath. Consider placing a rack or clips in the water to keep your vacuum-sealed bags submerged and separated, promoting even cooking throughout.
Here are four key tips to remember when setting up your sous vide water bath:
- Always check that the water level remains above the minimum line on your circulator.
- Use a thermometer to verify the water temperature before adding food.
- Position your sous vide machine away from drafts or heat sources.
- Pre-heat the water bath while you prepare and vacuum seal your ingredients.
Cooking Times and Temperatures
The heart of sous vide cooking lies in precise temperature control and timing. When you're aiming for perfectly cooked meals, understanding the right cooking times and temperatures is crucial.
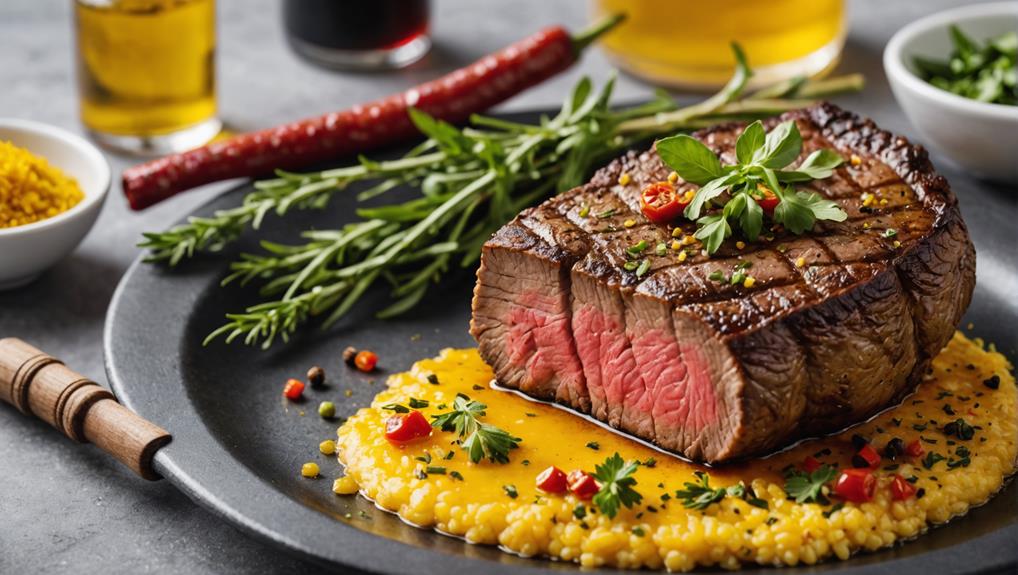
For medium-rare beef, you'll want to set your sous vide cooker between 130°F and 139°F, letting it cook for 1.5 to 4 hours. This ensures tender, juicy results without overcooking.
Chicken breasts require a slightly higher temperature range of 140°F to 150°F, with a cooking time of 1.5 to 4 hours. If you're working with dark chicken meat, extend the cooking time to 4 to 8 hours for optimal tenderness.
Pork lovers can achieve mouthwatering results by cooking at 135°F to 145°F for 1 to 4 hours, especially when using thicker cuts.
For delicate fish, aim for temperatures between 110°F and 132°F, with a shorter cooking time of 30 minutes to 1.5 hours.
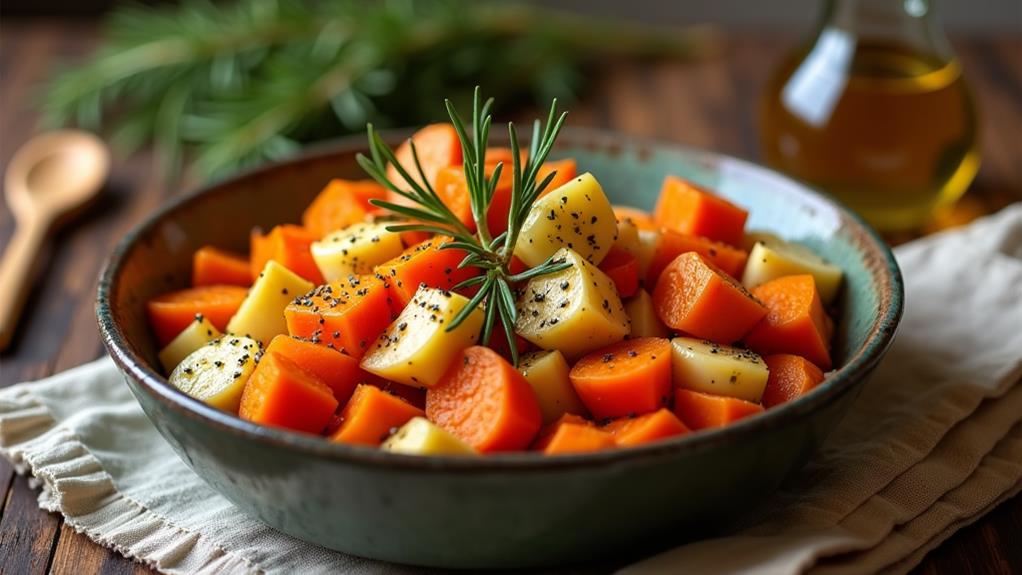
Don't forget about vegetables! Carrots, for example, benefit from a higher temperature of 183°F, cooked for 1 to 1.5 hours to maintain flavor and achieve the perfect texture.
Finishing and Searing Techniques
Once your food has reached the perfect internal temperature through sous vide cooking, it's time to focus on the exterior. The finishing process is crucial for enhancing flavor and texture.
After removing your food from the vacuum-sealed bag, pat it dry with a towel to ensure a good sear and prevent unwanted steaming.
To achieve that perfect crust while maintaining moisture inside, follow these steps:
- Heat a cast iron skillet or grill to high temperature
- Add a small amount of oil or butter to the pan
- Sear the food for 1-2 minutes per side
- Work quickly to avoid overcooking
Using a hot pan, preferably cast iron, is ideal for searing as it retains heat well, allowing for an even crust without cooling down the cooking surface.
This method will give your sous vide-cooked food a crispy exterior while preserving the desired temperature inside.
Advanced Tips and Flavor Variations
Mastering sous vide cooking opens up a world of culinary possibilities. To elevate your dishes, experiment with different marinades and seasonings before vacuum sealing. This technique allows flavors to penetrate deeply into proteins and vegetables during the cooking time.
Enhance the flavor of meats by adding aromatics like garlic, herbs, or citrus zest to the vacuum bag, infusing the food as it cooks.
For optimal results, use sous vide-safe bags made from nylon or polyethylene. These materials withstand higher temperatures and prevent harmful chemicals from leaching into your food.
To add texture and depth, finish sous vide-cooked meats with a quick sear in a hot pan or on the grill. This creates a desirable crust while maintaining the perfect internal temperature.
Explore innovative flavor variations by incorporating infused oils, flavored salts, or even smoking your ingredients before sous vide cooking. These techniques can transform your dishes into gourmet masterpieces.
Frequently Asked Questions
What Is the First Thing I Should Sous Vide?
For your first sous vide adventure, try a steak. It's perfect for beginners and showcases precision cooking. You'll master steak preparation, flavor enhancement, and meal prepping. Once you're comfortable, explore chicken marination, vegetable infusion, and egg custard techniques.
What Is a Disadvantage of Sous Vide?
Like a snail's pace, sous vide's extended cooking time can be a drawback. You'll need specialized equipment and patience. While it's great for flavor infusion, you'll face longer meal prep and potential texture issues if not careful with temperature control.
What Are 5 Tips for Using Sous Vide?
Master sous vide essentials: Invest in reliable equipment, maintain precise temperature control, experiment with cooking times, prioritize food safety, and explore flavor infusion. You'll innovate your meal prep with diverse sous vide recipes, elevating your culinary game effortlessly.
What Are the Steps in the Sous Vide Process?
Dive into sous vide cooking! You'll need sous vide equipment for precise temperature control. Vacuum seal seasoned food, submerge in a water bath, and cook for recommended times. Ensure food safety, infuse flavors, and finish with a sear for perfection.
Final Thoughts
As you've journeyed through the sous vide process, you've unlocked a world of culinary possibilities. Picture perfectly cooked steaks, juicy chicken breasts, and velvety vegetables, all achieved with minimal effort. You're now equipped to experiment with flavors, textures, and techniques that'll elevate your cooking to restaurant-quality levels. Remember, practice makes perfect, so don't be afraid to dive in and explore. With your newfound skills, you'll soon be creating mouthwatering masterpieces that'll impress even the most discerning palates.