You've probably seen those whimsical hot dog spiders popping up on social media, especially around Halloween. These fun snacks, created by inventive parents looking to make mealtime more exciting, have taken the internet by storm. But there's more to these edible arachnids than meets the eye. Beyond their playful appearance, hot dog spiders offer a unique opportunity to explore culinary creativity and engage children in the kitchen. As you consider incorporating this trend into your next family gathering or kids' party, you might wonder about their origin, the best techniques for making them, and how to customize these creepy-crawly treats to suit your taste.
Key Takeaways
- Hot Dog Spiders are whimsical snacks made by cutting hot dogs into spider-like shapes with eight legs.
- They're popular for children's parties, Halloween-themed meals, and as fun family cooking activities.
- The recipe involves slicing hot dogs, inserting pretzel sticks as legs, and baking with cheese and optional olive eyes.
- Hot Dog Spiders gained popularity in the early 2000s through social media platforms like Pinterest and Instagram.
- They're typically served with dipping sauces and can be customized with different cheeses or hot dog varieties.
History
While we don't know exactly when Hot Dog Spiders were first created, they've become a popular party snack in recent years. Their origin likely stems from the creative minds of parents and party planners looking to make food more appealing to children. The concept of transforming everyday foods into whimsical shapes has been around for decades, with Hot Dog Spiders being a relatively recent addition to this culinary tradition.
You'll find that these playful treats gained traction in the early 2000s as social media platforms allowed for the rapid sharing of food ideas. Pinterest and Instagram, in particular, have been instrumental in popularizing Hot Dog Spiders, with countless variations and decorative techniques spreading across the internet.
Food bloggers and home cooks have embraced this fun twist on a classic American food, often incorporating them into Halloween-themed meals or children's birthday parties.
As you explore the history of Hot Dog Spiders, you'll notice they're part of a broader trend of turning simple foods into engaging, visually appealing dishes. This approach to cooking has roots in bento box preparations and has evolved to include a wide range of creative food presentations.
Recipe
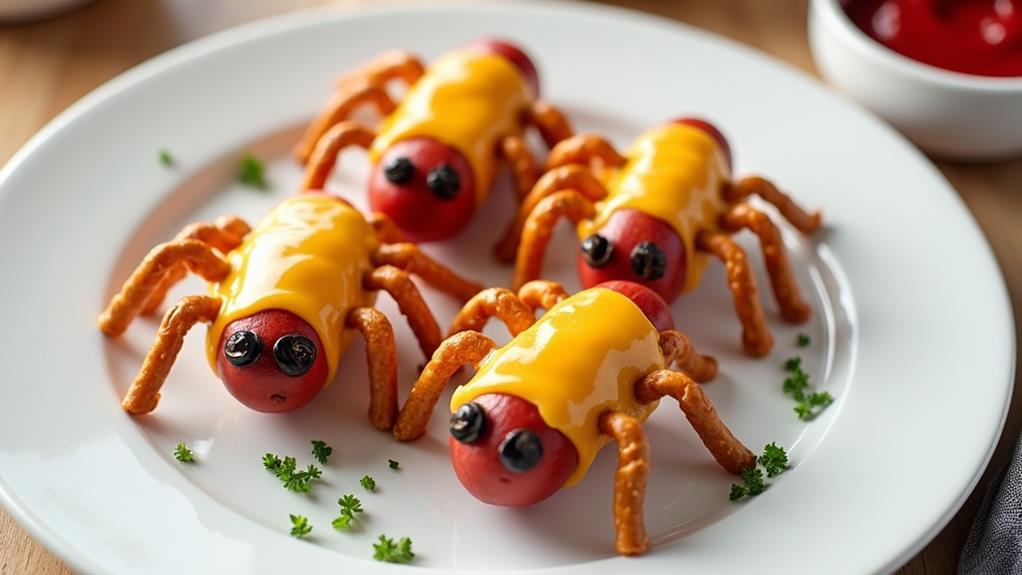
Hot Dog Spiders are a whimsical and fun twist on traditional hot dogs, perfect for parties, kids' gatherings, or simply as a unique snack. These playful treats transform ordinary hot dogs into spider-like creatures that are both visually appealing and delicious. With just a few simple ingredients and some creative cutting, you can create a batch of these spooky snacks that will delight both children and adults alike.
The key to making Hot Dog Spiders lies in the preparation and cooking method. By carefully slicing the hot dogs to resemble spider legs and using pretzel sticks for added detail, you can achieve a realistic spider appearance. When baked in the oven, the hot dog legs curl up, enhancing the spider-like effect. The addition of melted cheese and optional olive slices for eyes adds both flavor and visual interest to these creepy-crawly treats.
Ingredients:
- 4 hot dogs (8 oz / 226 g)
- 8 pretzel sticks (2 oz / 57 g)
- 1 cup (240 ml) ketchup (optional for dipping)
- 1 cup (150 g) shredded cheese (cheddar or mozzarella)
- 8 slices of olives (optional)
To prepare Hot Dog Spiders, preheat your oven to 375°F (190°C). Cut each hot dog into four equal lengths from the middle down, leaving the ends intact to form spider legs. Insert two pretzel sticks into the sides of each hot dog for additional legs.
Place the hot dog spiders on a parchment-lined baking sheet, sprinkle with shredded cheese, and bake for about 10 minutes or until the cheese is melted and bubbly. If desired, add olive slices for eyes after baking.
For extra flavor and creativity, consider using flavored hot dogs or spicy cheese varieties. You can also experiment with different types of olives or vegetable cut-outs for eyes and decorations.
Serve these spooky snacks with a variety of dipping sauces such as mustard, ranch, or BBQ sauce to cater to different taste preferences. Remember, the key to perfect Hot Dog Spiders is achieving the right balance between cooking time and temperature to ensure the legs curl up nicely without overcooking the hot dogs.
Cooking Steps
To create your Hot Dog Spiders, you'll start by slicing the hot dogs lengthwise and inserting pretzel sticks for legs.
Next, arrange your spider-like creations on a baking sheet, adding cheese and olive slices for extra flavor and decoration.
Step 1. Slice Hot Dogs Lengthwise
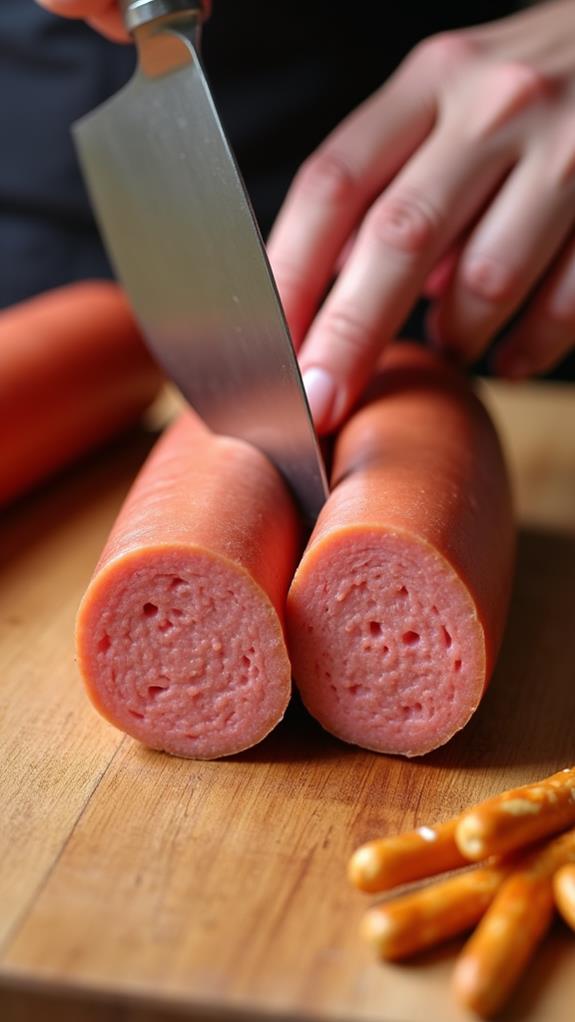
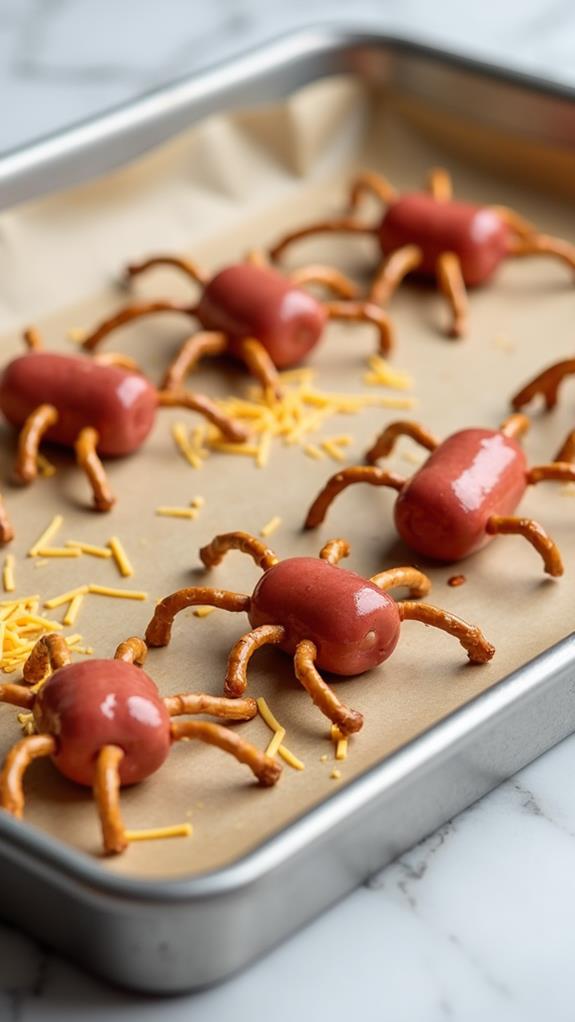
The first step in creating your Hot Dog Spiders is to slice the hot dogs lengthwise. Begin by placing each hot dog on a clean cutting board.
Using a sharp knife, carefully make four evenly spaced cuts along the length of the hot dog, starting from one end and stopping about half an inch from the other end. This will create eight "legs" for your spider.
As you're cutting, ensure that you're not slicing all the way through the hot dog. You want to leave the top portion intact to hold the legs together. It's crucial to maintain a steady hand and apply consistent pressure to achieve uniform cuts.
If you're working with larger hot dogs, you may need to make slightly deeper cuts to ensure the legs will curl properly when cooked.
Once you've finished slicing, gently spread the legs apart to create a spider-like appearance.
If you're having trouble separating the legs, you can use the tip of your knife to carefully loosen them. Remember, precision is key to achieving the perfect Hot Dog Spider shape.
Step 2. Insert Pretzel Stick Legs
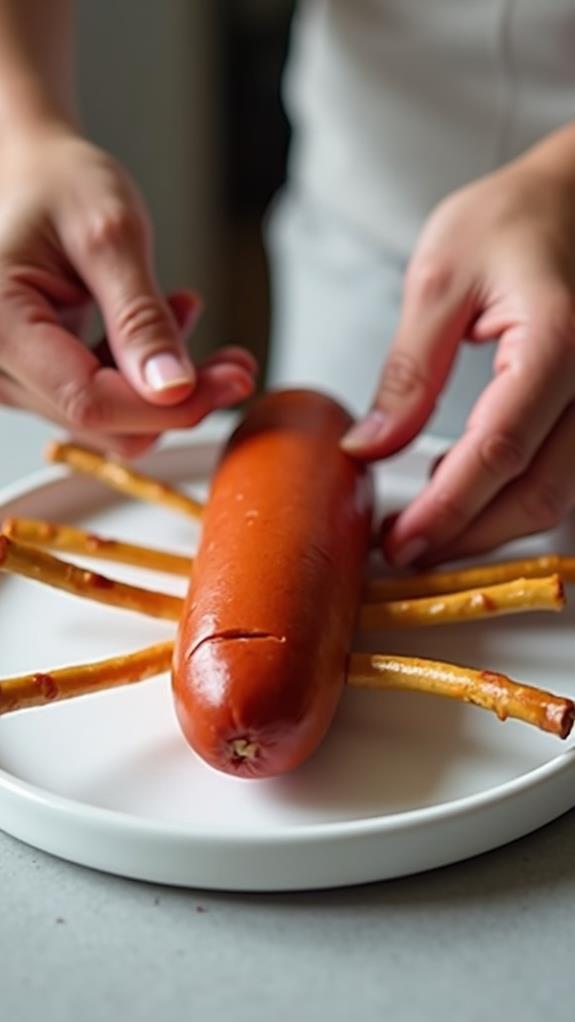
After slicing your hot dogs, it's time to give your spiders some extra legs. Take your pretzel sticks and carefully insert them into the sides of each hot dog segment. You'll want to use two pretzel sticks per hot dog, positioning them evenly to create a balanced appearance.
Gently push the pretzels into the meat, ensuring they're secure but not so deep that they poke through the other side.
As you insert the pretzel sticks, consider the overall shape you're aiming for. The goal is to mimic a spider's body with eight legs. The four hot dog segments will serve as four legs, while the pretzels will complete the set.
Pay attention to spacing, making sure the legs are evenly distributed around the hot dog's body. If you're working with younger children, you might need to assist them in this step to prevent any accidents with the sharp ends of the pretzel sticks.
Once you've inserted all the legs, your hot dog spiders are ready for the next stage of preparation.
Step 3. Arrange on Baking Sheet
Preparation is key when arranging your Hot Dog Spiders on the baking sheet. After you've cut and inserted the pretzel legs into your hot dogs, it's time to position them for baking.
Start by lining your baking sheet with parchment paper to prevent sticking and ensure easy cleanup. Place each spider-shaped hot dog on the sheet, leaving about an inch of space between them to allow for even cooking and cheese melting.
Arrange the spiders in neat rows, making sure they're not overcrowded. This spacing will help the heat circulate properly, resulting in evenly cooked and crispy legs. If you're adding cheese, sprinkle it generously over each spider, covering the body and legs. For an extra touch, place olive slices on the "heads" to create eyes.
Remember to handle the spiders gently to maintain their shape. If you're making a large batch, you may need to use multiple baking sheets or cook in batches.
Once arranged, your Hot Dog Spiders are ready for the oven, where they'll transform into deliciously crispy, cheesy treats.
Step 4. Add Cheese and Olives
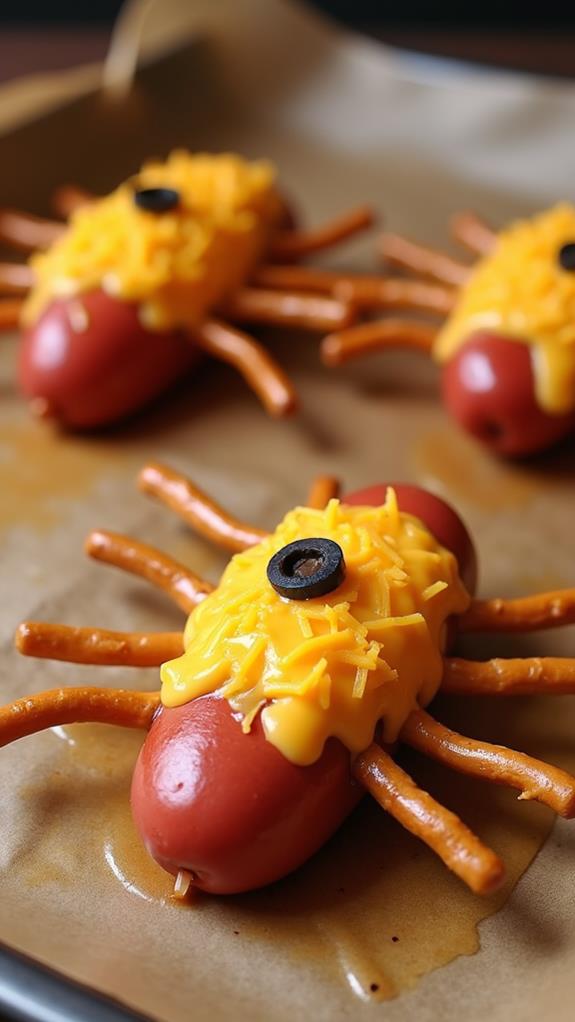
Now that your Hot Dog Spiders are arranged on the baking sheet, it's time to add the finishing touches. Sprinkle a generous amount of shredded cheese over each spider, ensuring you cover the body and legs evenly. The cheese will melt and create a gooey, delicious coating that'll hold your spider's shape together.
For an extra touch of creativity, place olive slices on the spider's head to create eyes. You can use black olives for a classic look or mix it up with green olives for a more colorful appearance.
If you're feeling adventurous, try using different types of cheese to create unique flavor combinations. Cheddar provides a sharp taste, while mozzarella offers a milder, stretchy texture. For a spicier kick, consider using pepper jack or a Mexican cheese blend.
Step 5. Bake Until Cheese Melts
With your Hot Dog Spiders assembled and adorned with cheese and olives, it's time to bake them to perfection.
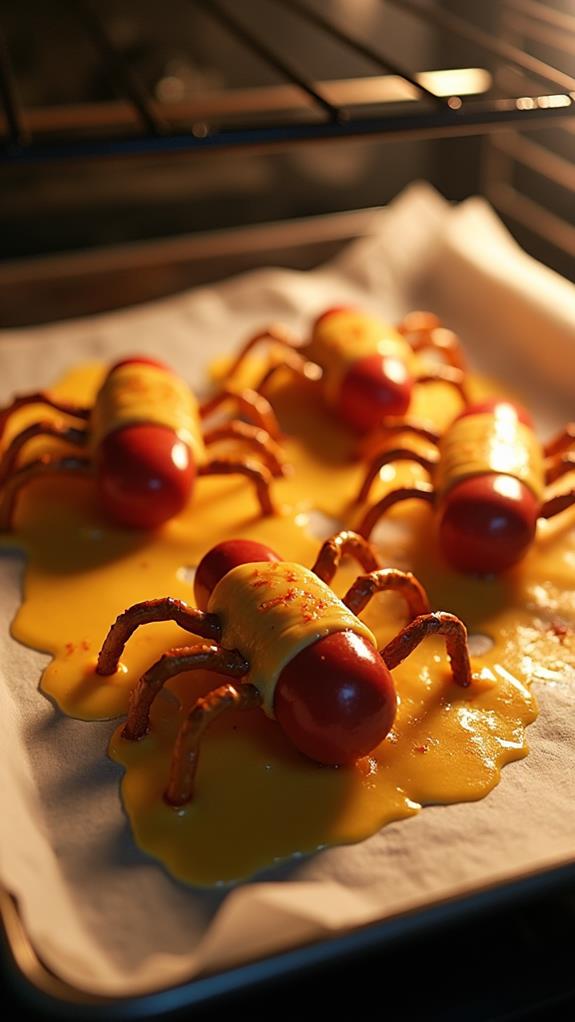
Place the baking sheet with your creations into the preheated oven, setting the temperature to 375°F (190°C). As the heat works its magic, you'll notice the cheese beginning to melt and bubble, creating a gooey, delicious coating for your spiders.
Keep a close eye on your Hot Dog Spiders as they bake. The cooking process should take about 10 minutes, but ovens can vary. You're looking for the cheese to be fully melted and slightly golden around the edges. The hot dog "legs" will curl slightly, enhancing the spider-like appearance.
If you've used olives for eyes, they'll become nicely warmed through. Once you see these signs, it's time to remove your spiders from the oven. Use oven mitts to carefully extract the baking sheet, placing it on a heat-resistant surface.
Allow the Hot Dog Spiders to cool for a few minutes before serving, as the cheese will be extremely hot. This cooling period also helps the cheese set slightly, making the spiders easier to handle and enjoy.
Final Thoughts
Hot Dog Spiders offer a delightful twist on a classic snack that's sure to impress both kids and adults alike.
They're not only fun to eat but also enjoyable to create, making them perfect for family cooking activities or themed parties. As you serve these spooky treats, you'll notice how they spark conversation and laughter among your guests.
Remember, presentation is key. Arrange your Hot Dog Spiders on a platter with various dipping sauces for added appeal.
You can even create a themed backdrop or use Halloween-inspired serving dishes to enhance the overall effect. Don't forget to experiment with different cheese types or hot dog varieties to suit your taste preferences.
If you're catering to a health-conscious crowd, consider using turkey or veggie dogs as alternatives.
Lastly, safety is paramount when cooking with children. Ensure adult supervision during the cutting and baking processes.
With these final thoughts in mind, you're now equipped to create a memorable snack experience. Your Hot Dog Spiders will undoubtedly become a hit at your next gathering, leaving your guests impressed and asking for the recipe.