You've probably encountered less-than-inspiring beverages at social gatherings, but a hot chocolate bar with toppings galore is anything but ordinary. As you contemplate this cozy concept, you'll find it's an opportunity to transform a simple drink into a personalized experience. With a rich, velvety base and an array of tempting toppings, you're not just serving cocoa; you're crafting memories. The visual appeal of neatly arranged mix-ins invites creativity and conversation, making it more than just a drink station. But what's the secret to creating the perfect hot chocolate bar? The answer lies in the details.
Key Takeaways
- Offer a variety of sweet and savory toppings like marshmallows, whipped cream, chocolate shavings, and sea salt.
- Arrange toppings in attractive containers with serving utensils and clear labels for easy navigation.
- Prepare a simple hot chocolate base recipe that can be customized with different milk options and flavors.
- Create an inviting atmosphere with festive decorations, cozy lighting, and background music.
- Position the hot chocolate serving station near the toppings bar for convenient access and customization.
History
The history of hot chocolate dates back over 2,000 years to the ancient Mayans and Aztecs.
These cultures revered cacao as a sacred plant, often using it in religious ceremonies and as a form of currency. They'd prepare a bitter, frothy drink by grinding cacao beans and mixing them with water, cornmeal, and spices. This early version was far from the sweet treat we know today.
Europeans first encountered chocolate when Spanish conquistadors brought it back from the Americas in the 16th century.
They added sugar and milk to make it more palatable, transforming it into a luxurious beverage enjoyed by the elite. As chocolate's popularity grew, it spread throughout Europe, with each country developing its own variations.
Recipe
Hot chocolate is a beloved winter beverage that can be elevated to a whole new level with a customizable hot chocolate bar. This simple recipe creates a rich, creamy base that serves as the perfect canvas for an array of toppings and mix-ins.
By using just a few key ingredients, you can create a delicious hot chocolate that will warm up your guests on even the chilliest of days. This recipe is easy to scale up for larger gatherings and can be kept warm in a thermos or slow cooker for extended periods.
- 4 cups (960 ml) milk
- 1/2 cup (100 g) granulated sugar
- 1/4 cup (25 g) unsweetened cocoa powder
- 1/2 cup (85 g) semi-sweet chocolate chips
- 1 teaspoon vanilla extract
In a medium saucepan, whisk together the milk, sugar, and cocoa powder over medium heat. Stir constantly until the mixture is warm and the sugar has dissolved.
Add the chocolate chips and continue stirring until they've melted completely. Remove from heat and stir in the vanilla extract. Pour the hot chocolate into a large thermos or insulated dispenser to keep it warm.
For the best results, use high-quality cocoa powder and chocolate chips to ensure a rich, flavorful base. If you prefer a thicker hot chocolate, you can add a tablespoon of cornstarch mixed with a little cold milk before heating.
Remember to stir the hot chocolate occasionally to prevent a skin from forming on top. Consider offering both regular and non-dairy milk options to accommodate different dietary preferences.
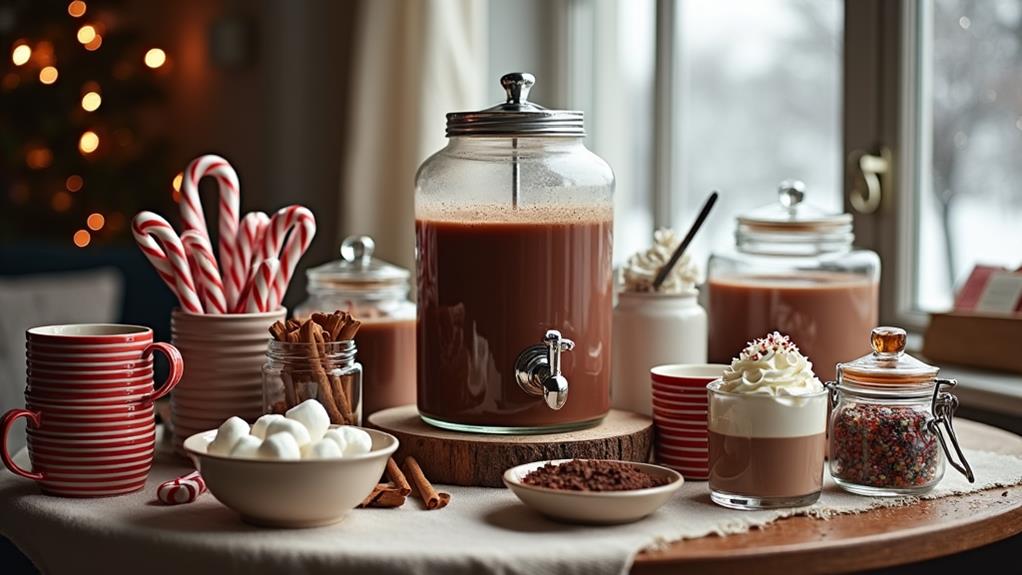
Set up your toppings bar with a variety of options such as marshmallows, whipped cream, candy canes, cinnamon sticks, and flavored syrups to allow guests to customize their drinks.
Cooking Steps
To create your hot chocolate base, you'll start by whisking the dry ingredients together before adding milk and heating the mixture.
Once warm, you'll incorporate the chocolate chips, stirring until they're fully melted, then add the vanilla extract for flavor.
Step 1. Whisk Dry Ingredients Together
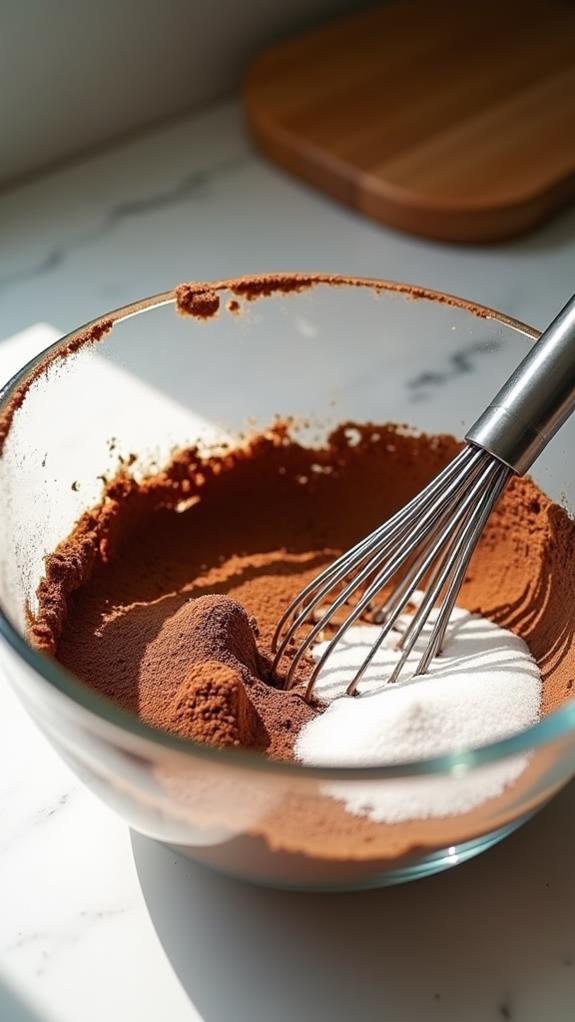
Whisking dry ingredients together marks the first crucial step in creating your hot chocolate base. Begin by measuring out the granulated sugar and unsweetened cocoa powder into a medium-sized mixing bowl. Use a whisk or fork to combine these ingredients thoroughly, ensuring there are no clumps of cocoa powder remaining.
This process helps distribute the sugar evenly throughout the mixture and prevents lumps from forming when you add the liquid. As you whisk, you'll notice the color of the mixture becoming uniform, indicating that the sugar and cocoa are well-integrated.
Don't rush this step; take your time to achieve a smooth, homogeneous blend. If you're doubling or halving the recipe, adjust your measurements accordingly, but maintain the same ratio of sugar to cocoa for consistent flavor.
Once you've achieved a uniform mixture, set it aside. You'll add this dry blend to your milk in the saucepan, where the heat will help dissolve the sugar and cocoa, creating a smooth, velvety texture for your hot chocolate base.
This meticulous preparation ensures that every sip of your hot chocolate will be rich and indulgent.
Step 2. Add Milk and Heat
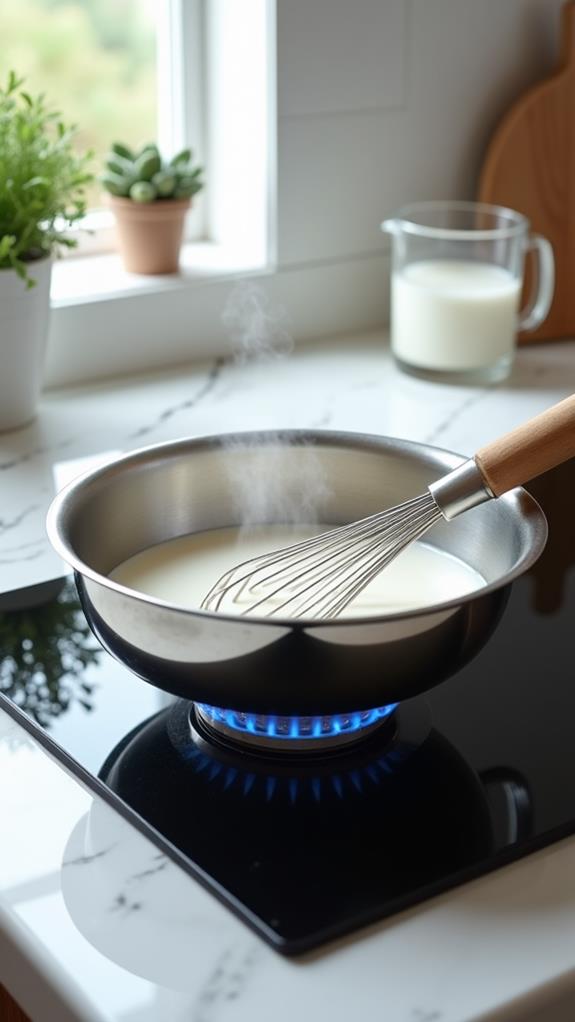
After whisking the dry ingredients, it's time to introduce the milk and begin the heating process. Pour the milk into the saucepan containing your cocoa mixture, ensuring you've measured out the correct amount.
Place the saucepan on the stove over medium heat, and start stirring immediately. You'll want to use a whisk or wooden spoon to combine the ingredients thoroughly, breaking up any clumps that may have formed.
As you heat the mixture, keep a close eye on it and continue stirring constantly. This prevents the milk from scalding and ensures that all the ingredients blend smoothly.
You'll notice the mixture gradually warming up and becoming more uniform in color and consistency. Don't let it come to a boil; instead, aim for a gentle simmer.
You'll know it's ready when you see small bubbles forming around the edges of the saucepan and steam rising from the surface. The cocoa powder and sugar should be completely dissolved, creating a smooth, velvety texture.
Once you've achieved this, you're ready to move on to the next step in creating your delicious hot chocolate base.
Step 3. Add Chocolate Chips, Stir
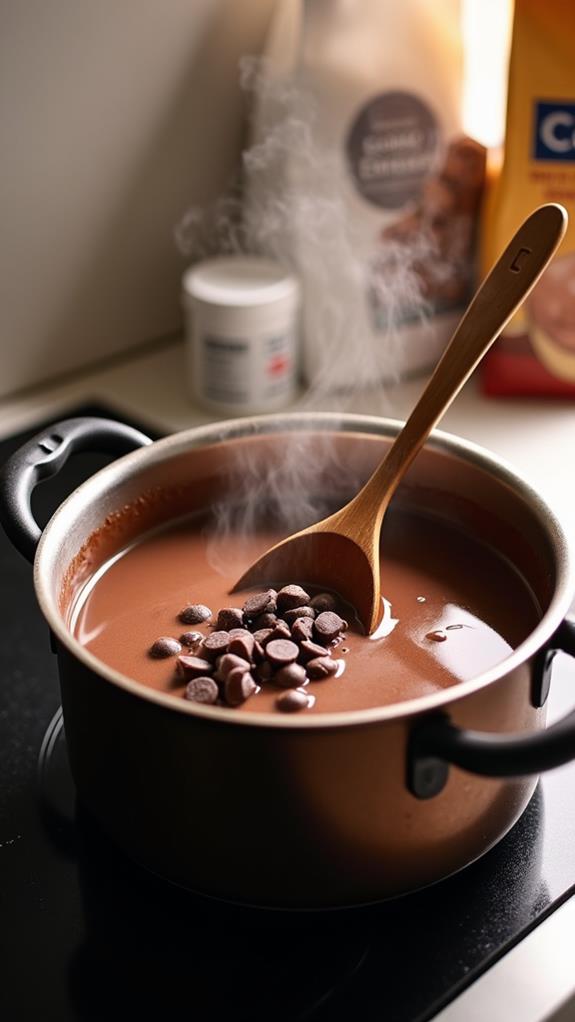
With your hot chocolate mixture simmering, it's time to add the chocolate chips. Grab your 1/2 cup of semi-sweet chocolate chips and slowly pour them into the saucepan.
As you add the chips, continue stirring the mixture with a whisk or wooden spoon. This constant motion will help the chips melt evenly and prevent them from sticking to the bottom of the pan.
Keep stirring until you can no longer see any solid pieces of chocolate. The mixture should become smooth and glossy, with a rich, dark color. This process usually takes about 2-3 minutes, depending on the heat of your mixture.
If you notice any stubborn chunks of chocolate, gently press them against the side of the pan with your spoon to encourage melting.
Once all the chocolate chips have melted, remove the saucepan from the heat. Give the hot chocolate one final, vigorous stir to ensure everything is well combined.
At this point, you'll have a velvety, indulgent base for your hot chocolate bar. The melted chocolate chips add depth and creaminess to your drink, elevating it from a simple cocoa to a luxurious treat.
Step 4. Add Vanilla Extract
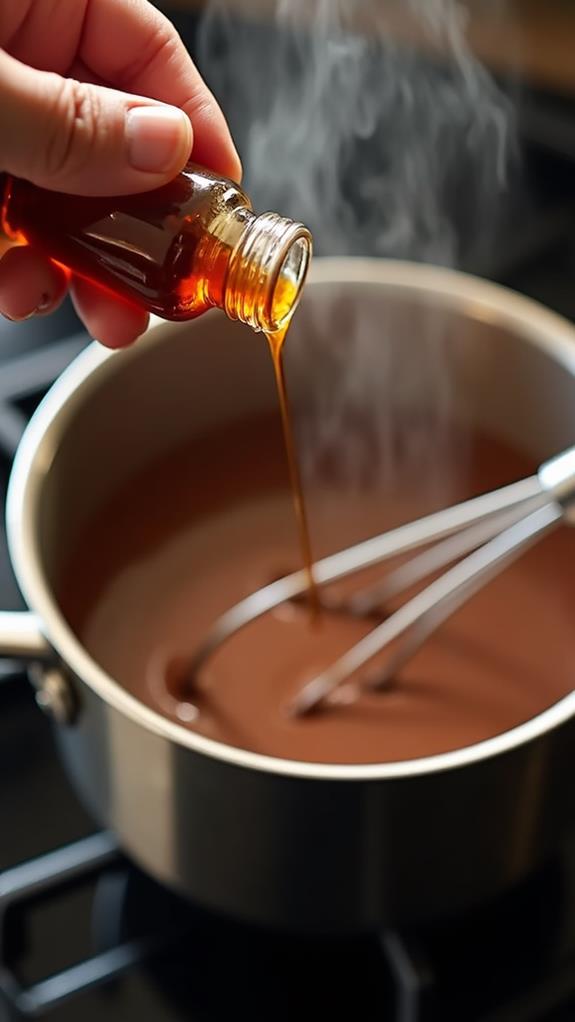
The final touch to your hot chocolate mixture is a splash of vanilla extract. Once you've removed the saucepan from the heat, it's time to add this aromatic ingredient. Measure out one teaspoon of pure vanilla extract and pour it into the warm chocolate mixture. The vanilla will enhance the chocolate's flavor profile, adding depth and complexity to your drink.
Gently stir the vanilla extract into the hot chocolate, ensuring it's evenly distributed throughout the mixture. You'll notice a subtle but delightful aroma wafting up from the saucepan as you incorporate the vanilla. This step is crucial for achieving that perfect balance of flavors in your hot chocolate base.
After adding the vanilla, your hot chocolate is ready to be served. Pour it into a large thermos or insulated dispenser to keep it warm throughout your event. This will allow your guests to easily access the hot chocolate as they customize their drinks at the toppings bar.
Remember to give the mixture a quick stir occasionally to maintain its smooth consistency and prevent a skin from forming on top.
Step 5. Pour Into Serving Container
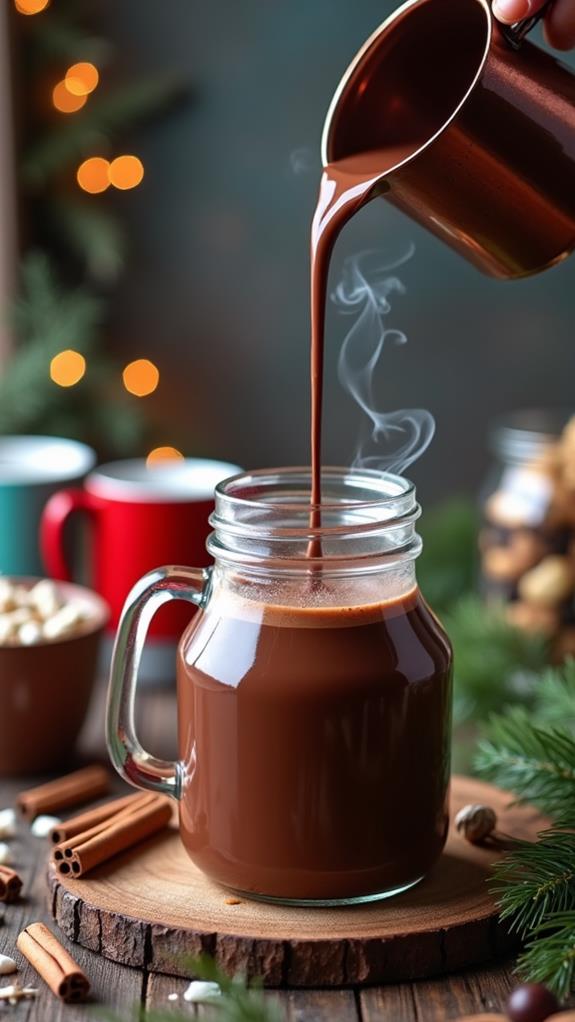
Now that your hot chocolate is perfectly mixed and flavored, it's time to transfer it to a serving container. Choose a vessel that will keep your hot chocolate warm throughout your event. A large thermos or insulated dispenser works best, as it will maintain the temperature for an extended period.
If you don't have either of these, a slow cooker set to the "warm" setting can be an excellent alternative. Before pouring, give your hot chocolate one final stir to ensure all ingredients are well combined.
Carefully ladle or pour the mixture into your chosen container, leaving some room at the top to prevent spills when serving. If you're using a thermos, make sure to pre-warm it with hot water to maximize heat retention.
For added convenience, place your serving container near your toppings bar, allowing guests easy access to both the hot chocolate and its accompaniments. Don't forget to provide a ladle or pump for easy dispensing.
Final Thoughts
As you set up your hot chocolate bar, remember that the key to success lies in offering a variety of options while keeping the base recipe simple.
You'll want to provide an assortment of toppings that cater to different tastes and preferences. Consider including both sweet and savory options, such as marshmallows, whipped cream, chocolate shavings, and even a pinch of sea salt for those who enjoy a more complex flavor profile.
Don't forget about presentation. Arrange your toppings in attractive containers, and provide small serving spoons or tongs for each. Label everything clearly to help your guests navigate the options.
You might also want to offer alternative milk choices, like almond or oat milk, for those with dietary restrictions.
Lastly, think about the ambiance. Set the mood with festive decorations, cozy lighting, and perhaps some soft background music.
By paying attention to these details, you'll create a warm and inviting atmosphere that encourages your guests to linger and enjoy their personalized hot chocolate creations.
With a little planning and creativity, your hot chocolate bar will be the highlight of any gathering.