As you embark on a culinary journey, the honey-glazed ham with pineapple stands as a beacon of sweet and savory harmony. You'll find this dish to be a perfect blend of tradition and taste, offering a tantalizing experience for your palate. The combination of juicy ham, sticky-sweet glaze, and tropical pineapple creates a symphony of flavors that's hard to resist. But there's more to this dish than meets the eye. Its history and cultural significance add layers of depth to its appeal, making it more than just a meal – it's a story waiting to be uncovered.
Key Takeaways
- Honey-Glazed Ham with Pineapple combines sweet honey, tangy pineapple, and savory ham for a flavorful centerpiece dish.
- The recipe requires five simple ingredients: pre-cooked ham, honey, pineapple slices, Dijon mustard, and brown sugar.
- Slow cooking and frequent basting ensure maximum flavor absorption and tenderness throughout the cooking process.
- The dish is prepared by applying a glaze mixture, arranging pineapple slices, and baking for about an hour at 325°F (165°C).
- Leftovers are versatile, suitable for sandwiches, salads, and breakfast dishes, extending the meal's appeal beyond the main serving.
History
Honey-glazed ham has a rich culinary history dating back centuries. You'll find its roots in ancient preservation techniques, where curing meat with sugar and salt was essential for long-term storage.
As trade routes expanded, exotic spices and sweeteners like honey became more accessible, leading to the development of glazed hams as we know them today.
In the United States, honey-glazed ham gained popularity in the mid-20th century, becoming a staple at holiday dinners and special occasions. The addition of pineapple to the glaze is often attributed to the tiki culture boom of the 1950s and 1960s, when tropical flavors were all the rage.
This fusion of sweet and savory elements perfectly complemented the salty, smoky taste of ham.
Today, you'll find countless variations of honey-glazed ham recipes, each with its own unique twist. Some incorporate bourbon or maple syrup, while others feature spices like cloves or cinnamon.
Whether you're preparing a traditional family recipe or experimenting with new flavors, honey-glazed ham remains a beloved centerpiece that continues to evolve with culinary trends.
Recipe
This classic Honey-Glazed Ham with Pineapple is a perfect centerpiece for any festive occasion. The combination of sweet honey, tangy pineapple, and savory ham creates a mouthwatering dish that's sure to impress your guests.
With just five simple ingredients, this recipe is easy to prepare and delivers maximum flavor. The key to success lies in the perfect balance of flavors and the slow cooking process, which allows the ham to absorb the delicious glaze while remaining tender and juicy.
- 1 (5-6 lb / 2.3-2.7 kg) pre-cooked ham
- 1 cup (340g) honey
- 1 can (20 oz / 567g) pineapple slices, juice reserved
- 1/4 cup (60ml) Dijon mustard
- 1/4 cup (50g) brown sugar
Preheat the oven to 325°F (165°C). Place the ham in a roasting pan. In a bowl, mix honey, 1/2 cup (120ml) of the reserved pineapple juice, Dijon mustard, and brown sugar to create the glaze.
Brush half of the glaze over the ham and arrange pineapple slices on top, securing with toothpicks if needed. Bake for about 1 hour, basting every 15 minutes with the remaining glaze. The ham is ready when it reaches an internal temperature of 140°F (60°C).
For best results, let the ham rest for 15 minutes before slicing. This allows the juices to redistribute, ensuring a moist and flavorful ham.
If you prefer a more caramelized exterior, you can broil the ham for 2-3 minutes at the end of cooking, but watch it carefully to prevent burning. Leftover ham can be stored in the refrigerator for up to 5 days or frozen for up to 2 months.
Cooking Steps
To create this mouthwatering honey-glazed ham, you'll begin by preparing the glaze mixture and applying it generously to the ham.
Next, you'll arrange the pineapple slices on top of the ham, securing them with toothpicks if necessary.
Step 1. Prepare Glaze Mixture
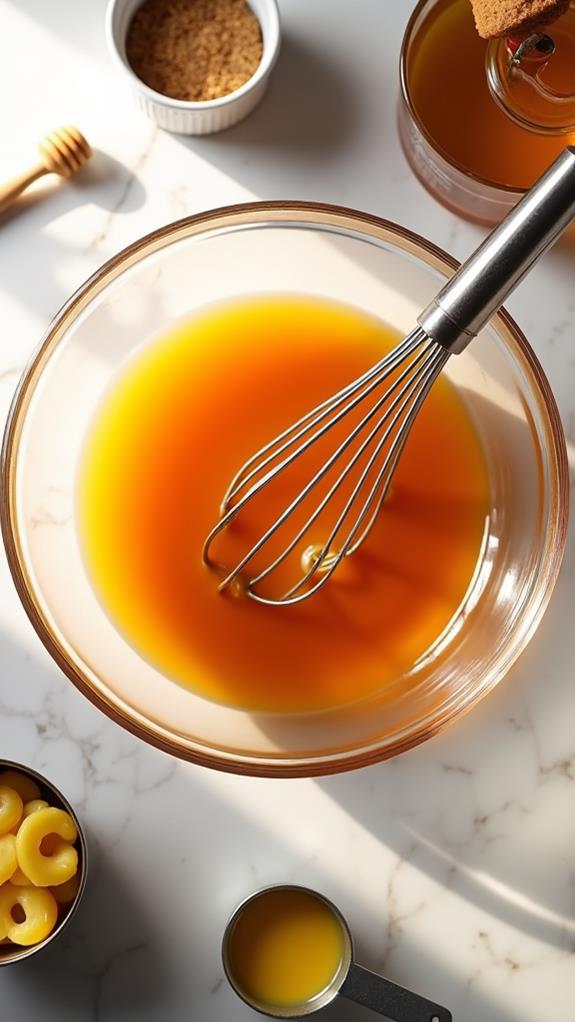
Before you begin baking, you'll need to prepare the flavorful glaze that'll infuse your ham with sweetness and tang. Start by gathering your ingredients: honey, reserved pineapple juice, Dijon mustard, and brown sugar.
In a medium-sized bowl, measure out 1 cup of honey, which forms the base of your glaze. Next, add 1/2 cup of the reserved pineapple juice from your can of pineapple slices. This liquid will help thin the honey and distribute the flavors evenly.
Now, it's time to introduce some contrasting flavors. Add 1/4 cup of Dijon mustard, which will provide a sharp, tangy note to balance the sweetness.
Finally, incorporate 1/4 cup of brown sugar to deepen the caramel-like flavor profile. Using a whisk, blend these ingredients thoroughly until you achieve a smooth, homogeneous mixture. Ensure there are no lumps of brown sugar remaining.
Your glaze is now ready to be applied to the ham, creating a delicious coating that'll caramelize beautifully during the baking process.
Step 2. Apply Glaze to Ham
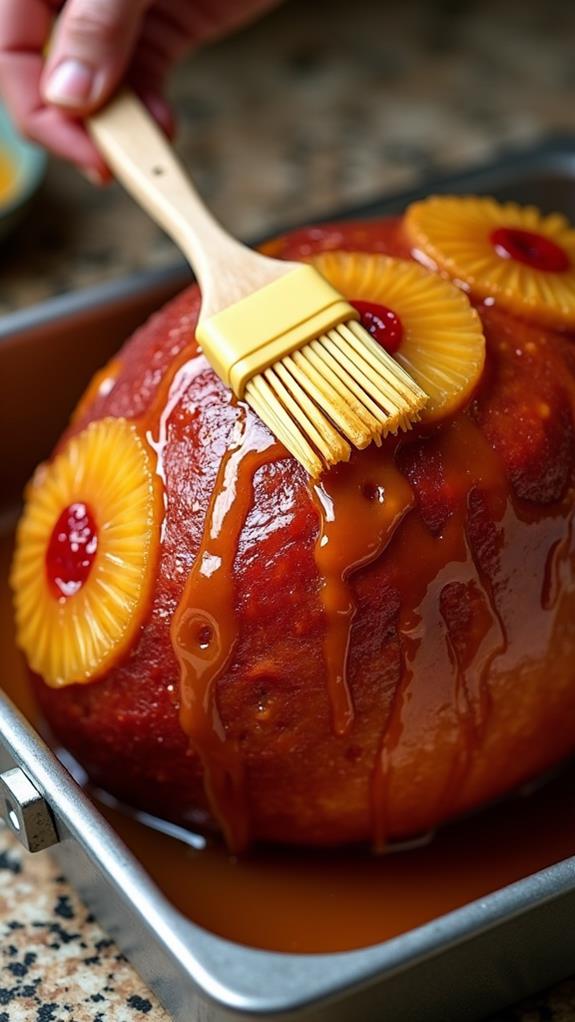
With your glaze prepared, it's time to apply it to the ham and begin the cooking process. First, place your pre-cooked ham in a roasting pan, ensuring it's positioned flat side down for stability.
Take half of the glaze mixture you've prepared and generously brush it over the entire surface of the ham, making sure to cover it evenly. Don't worry if some of the glaze drips into the pan; this will contribute to the overall flavor.
Next, arrange the pineapple slices on top of the ham, securing them with toothpicks if necessary. This not only adds a decorative touch but also infuses the ham with a delightful fruity essence.
Once you've completed this step, place the roasting pan with the glazed and pineapple-adorned ham into your preheated oven.
As the ham bakes, you'll need to baste it every 15 minutes with the remaining glaze. This frequent basting ensures that the ham develops a rich, caramelized exterior while staying moist and flavorful on the inside.
Continue this process until the ham reaches an internal temperature of 140°F (60°C), which typically takes about an hour.
Step 3. Arrange Pineapple Slices on Ham
After you've brushed the ham with half of the glaze, it's time to add the pineapple slices.
Take the canned pineapple slices and arrange them evenly over the surface of the ham. You'll want to create an attractive pattern that covers as much of the ham as possible. If you're having trouble getting the pineapple slices to stay in place, don't worry. You can use toothpicks to secure them to the ham, which will keep them from sliding off during the cooking process.
As you're arranging the pineapple, consider how you'll be slicing the ham later. Try to position the slices in a way that will make it easy to cut and serve the ham with a pineapple garnish on each slice.
Once you've placed all the pineapple slices, take a step back and assess your work. Make any adjustments needed to ensure even coverage and an appealing presentation.
Step 4. Bake and Baste Periodically

Now that you've arranged the pineapple slices, it's time to bake the ham. Place the roasting pan with your prepared ham into the preheated oven at 325°F (165°C). Set your timer for one hour, but don't simply walk away and forget about it.
The key to a perfectly glazed ham is periodic basting, which will ensure a rich, flavorful exterior. Every 15 minutes, open the oven door and carefully baste the ham with the remaining glaze. Use a basting brush or spoon to evenly coat the surface, paying special attention to any areas that might be drying out.
This process allows the glaze to penetrate the ham, creating layers of sweet and savory flavors. As you baste, you'll notice the ham developing a beautiful, caramelized sheen. Continue this process until the ham reaches an internal temperature of 140°F (60°C), which you can check using a meat thermometer.
If you prefer a more caramelized exterior, you can broil the ham for 2-3 minutes at the end of cooking. Just be sure to watch it carefully to prevent burning.
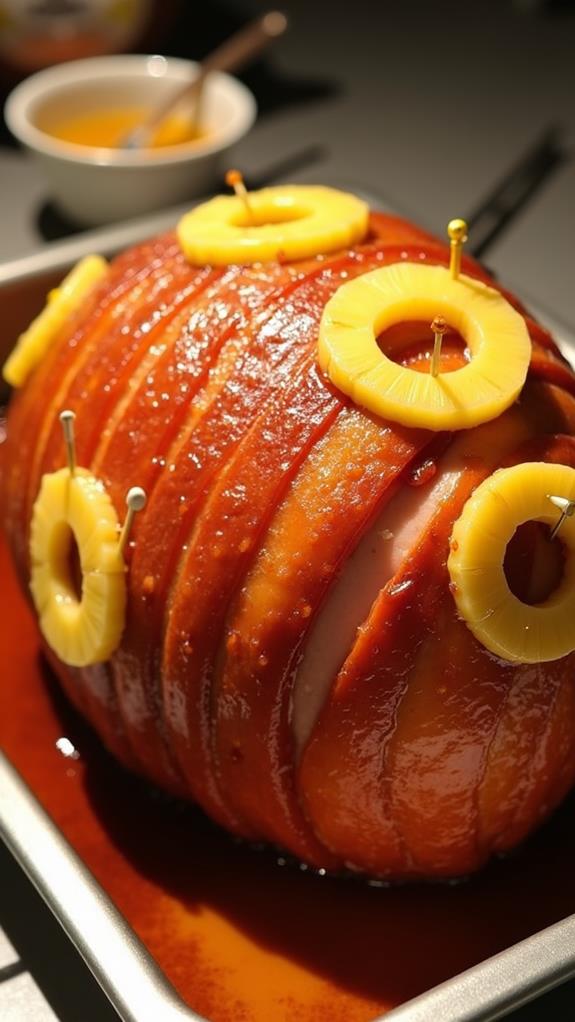
Step 5. Rest and Serve Ham

The moment of truth has arrived. After carefully basting and cooking your ham to perfection, it's time to let it rest and prepare for serving.
Remove the ham from the oven and carefully transfer it to a cutting board. Tent it loosely with aluminum foil and let it rest for 15 minutes. This resting period is crucial, as it allows the juices to redistribute throughout the meat, ensuring every slice is moist and flavorful.
While the ham rests, you can prepare your serving platter. Once the 15 minutes are up, remove the foil and start carving. Use a sharp knife to slice the ham against the grain, creating thin, even pieces.
As you carve, arrange the slices on your platter, fanning them out for an attractive presentation. Don't forget to include the pineapple slices as a garnish. They'll add a pop of color and complement the ham's flavor beautifully.
If you have any remaining glaze, you can drizzle it over the sliced ham for extra sweetness. Your honey-glazed ham is now ready to be the centerpiece of your meal, impressing your guests with its tantalizing aroma and gorgeous appearance.
Final Thoughts
With its perfect balance of sweet and savory flavors, this honey-glazed ham recipe is sure to become a favorite for your holiday gatherings.
You'll find that the combination of honey, pineapple, and Dijon mustard creates a glaze that perfectly complements the salty ham. Don't be surprised if your guests ask for seconds or even the recipe itself!
Remember, the key to success lies in the slow cooking process and frequent basting. This ensures that the ham absorbs the delicious glaze while remaining tender and juicy.
If you're looking to impress, consider garnishing the platter with fresh herbs or additional pineapple slices for a beautiful presentation.
While this recipe is perfect for special occasions, don't hesitate to make it for smaller family dinners as well.
Leftovers can be used in sandwiches, salads, or even breakfast dishes. With its versatility and crowd-pleasing flavor, you'll find yourself turning to this honey-glazed ham recipe time and time again.
It's a testament to how simple ingredients, when combined thoughtfully, can create a truly memorable dish.