To elevate your baking game with artful layered cakes, start by gathering high-quality ingredients and mastering the basics of cake baking. Focus on creating even layers, perfecting frosting consistency, and assembling multi-tiered structures with proper support. Apply smooth frosting techniques, including crumb coating and palette knife skills, while maintaining optimal temperature control. Add decorative flourishes like sugar flowers or sculpted elements for visual impact. Experiment with complementary flavor combinations to enhance taste complexity. Proper storage and presentation ensure your creation remains fresh and visually appealing. By honing these skills, you'll transform simple desserts into stunning centerpieces that captivate both the eye and palate.
Gathering Essential Ingredients
Before diving into the baking process, it's crucial to gather all the essential ingredients for your layered cake. Start by selecting high-quality components that'll form the foundation of your creation. You'll need all-purpose flour, granulated sugar, unsalted butter, eggs, and baking powder.
Don't forget to include flavor enhancers like vanilla or almond extract to elevate your cake's taste profile. For chocolate lovers, incorporating quality chocolate into your recipe can add depth and richness. Remember to bring your butter and eggs to room temperature for smoother mixing and better incorporation.
As you prepare, gather additional items for decorating, such as frosting ingredients, food coloring, and toppings like fresh fruit or chocolate ganache.
Ensure you have all the necessary baking tools at hand, including mixing bowls, a whisk or mixer, measuring cups, and cake pans. To make your life easier, consider lining your pans with parchment paper for effortless cake removal.
Mastering Layer Cake Baking
The art of mastering layer cake baking begins with selecting the right recipe. Choose a sturdy butter or pound cake that can support multiple layers without collapsing.
Once you've baked your cakes, ensure uniformity by using a cake leveler or serrated knife to trim each layer to the same height. This precision is crucial for achieving a professional-looking result.
Next, enhance your cake's moisture and flavor by brushing each layer with a simple syrup. This step not only adds depth to the taste but also keeps your creation fresh for longer.
When it comes to fillings and frostings, select complementary flavors that balance well. You might even consider learning to temper chocolate for a glossy finish on your layers or decorations.
For taller cakes, don't forget to use a dowel or support system to stabilize your creation. This prevents shifting during transport or display.
Perfecting Frosting Consistency
To achieve the perfect frosting consistency for your layered cake, you'll need to master both texture and temperature control.
You're aiming for a smooth, spreadable frosting that's neither too thick nor too thin, which requires careful balancing of ingredients and mixing techniques.
Ideal Frosting Texture
For layered cakes, achieving the ideal frosting texture is crucial to both appearance and taste. You'll want to aim for a smooth, spreadable consistency similar to peanut butter, which allows for easy application without tearing your cake layers.
To perfect this texture, start with softened butter or cream cheese as your base. Gradually incorporate powdered sugar while mixing, adjusting with small amounts of milk or heavy cream until you reach the desired consistency.
For those seeking innovative frosting flavors and texture variations, consider incorporating air into your mixture. Beat the frosting for several minutes to create a light, fluffy texture that beautifully complements denser cake layers.
However, be cautious not to overmix, as this can lead to a grainy texture or make your frosting too soft for decorating.
When applying your perfectly textured frosting, use advanced frosting techniques like the crumb coat method. This involves spreading a thin initial layer to seal in crumbs before adding the final, thicker coat.
This two-step process ensures a polished, professional finish that'll impress even the most discerning cake enthusiasts.
Temperature Control Techniques
Once you've mastered the ideal frosting texture, it's time to focus on temperature control techniques to perfect your frosting consistency. Understanding the optimal baking temperature and frosting temperatures for different types of frostings is crucial for achieving professional results.
For buttercream, aim for a room temperature of around 70°F (21°C) to ensure smooth spreading and piping. When working with cream cheese frosting, allow the cream cheese to soften to 65°F (18°C) for seamless ingredient integration and a lump-free texture.
For ganache enthusiasts, let it cool to approximately 85°F (29°C) before pouring to achieve that coveted glossy finish without excessive dripping.
If you notice your frosting becoming too warm during mixing, don't panic. Simply:
- Place the frosting in the refrigerator for 10-15 minutes
- Remove it from the refrigerator
- Re-whip the frosting to restore its desired consistency
- Assess the texture and repeat if necessary
When working with royal icing, strive for a medium consistency by mixing until soft peaks form. Adjust the texture with water or powdered sugar as needed, carefully monitoring the temperature to maintain the perfect balance between fluidity and structure.
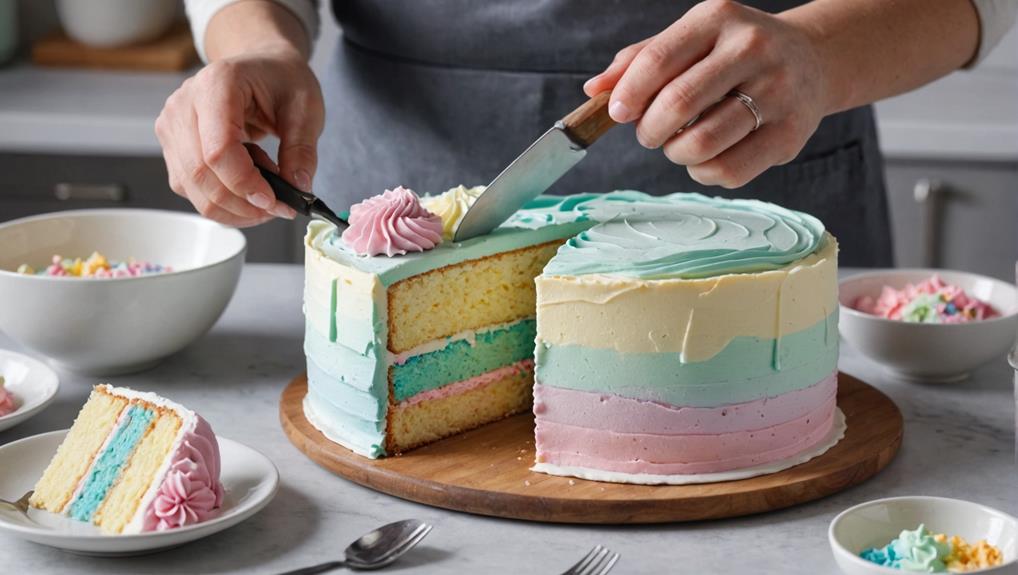
Assembling Multi-Tiered Cakes
Precision is key when assembling multi-tiered cakes. To ensure your masterpiece stands tall and proud, you'll need to master essential cake support systems and tier stability strategies.
Start by leveling each cake layer with a serrated knife, creating a solid foundation for your creation. Next, employ sturdy cake boards for each tier, providing crucial support to prevent collapse during assembly.
When it comes to stacking techniques, apply a thin layer of frosting between layers to enhance stability and cohesion. For taller cakes, incorporate dowels or straws cut to the exact height of each tier, offering additional structural integrity. These innovative solutions will revolutionize your approach to multi-tiered cake construction.
As you build your cake, remember that attention to detail is paramount. Carefully align each tier, ensuring a perfectly symmetrical appearance.
Finally, achieve a polished, professional look by applying a smooth outer coating of frosting or fondant. This final touch not only enhances the cake's visual appeal but also seals in moisture, preserving the freshness of your culinary masterpiece.
With these techniques, you'll elevate your baking game and create stunning, stable multi-tiered cakes that are sure to impress.
Smooth Frosting Application Techniques
To achieve a flawlessly frosted cake, you'll need to master a few key techniques.
Start with a crumb coat, which is essential for sealing in loose crumbs and creating a smooth base for your final layer of frosting.
Next, hone your skills with a palette knife or offset spatula, as these tools are crucial for spreading frosting evenly and creating clean lines.
Crumb Coat Essentials
The secret to achieving a flawlessly frosted cake lies in mastering the crumb coat. This essential step in cake decoration involves applying a thin layer of frosting to seal in crumbs and create a smooth canvas for your final masterpiece.
To execute this technique effectively, you'll need to arm yourself with the right frosting spreading tools and cake crumb techniques.
Begin by selecting a frosting with the ideal consistency for crumb coating—a slightly thicker buttercream works best. Using a spatula, spread the frosting evenly over your cake's surface, covering both the top and sides. Maintain a light touch to avoid disturbing crumbs. Remember to clean your spatula frequently to prevent crumb contamination.
The crumb coat offers several benefits:
- Seals in loose crumbs
- Creates a smooth foundation for the final layer
- Improves overall cake appearance
- Allows for easier application of decorative elements
After applying the crumb coat, chill your cake for about 30 minutes. This crucial step allows the frosting to set, ensuring a flawless final layer.
With these crumb coat essentials mastered, you're well on your way to creating stunning, professional-looking cakes.
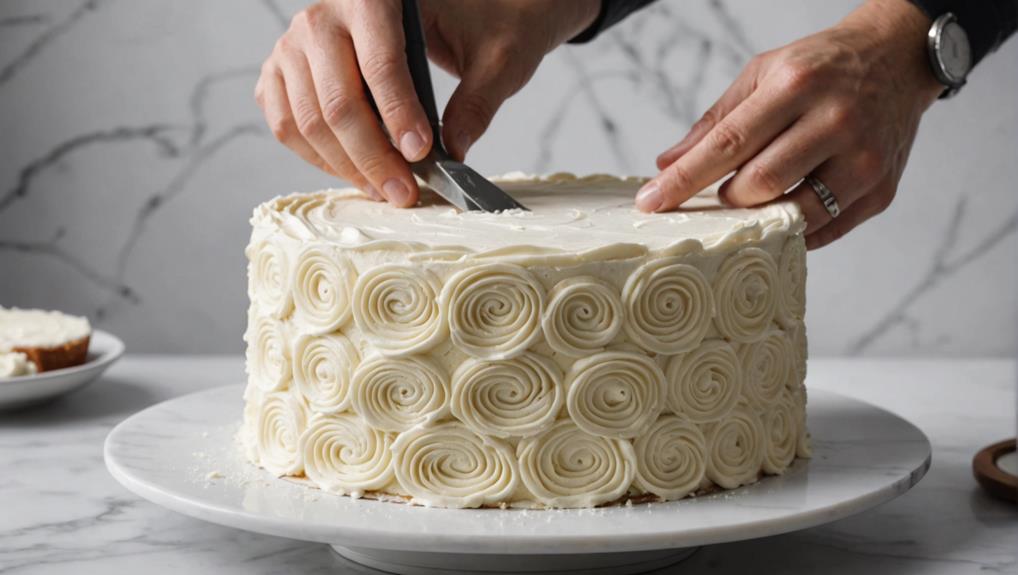
Palette Knife Mastery
Mastering the palette knife is a game-changer for achieving smooth, professional-looking frosted cakes. To elevate your cake finishing skills, you'll need to employ innovative palette knife techniques that transform your frosting application process.
Start by holding your knife at a 45-degree angle to the cake, applying gentle pressure to avoid tearing the layers. This angle ensures an even spread and sets the foundation for a flawless finish.
Before diving into the final frosting, apply a crumb coat—a thin layer that seals in loose crumbs. Let it chill for 30 minutes, then proceed with your main frosting application.
Use a straight-edged palette knife for initial coverage, followed by a larger offset spatula for refining the sides and top. For a truly polished look, warm your palette knife by dipping it in hot water and drying it thoroughly. This simple trick allows for smoother application and a more refined appearance.
Temperature Control Tricks
For smooth frosting application, temperature control is key. You'll want to master the art of managing heat at every stage of the process, from baking to frosting. Start by ensuring your cakes are completely cooled to room temperature before applying any frosting. This prevents melting and allows for a smooth finish.
When it comes to the frosting itself, maintain it at a slightly warmer temperature, around 70°F, for optimal spreadability.
To elevate your frosting game, consider these innovative temperature control tricks:
- Use a warm spatula or bench scraper to smooth frosting effortlessly.
- Chill delicate frostings like cream cheese for 20-30 minutes after the crumb coat.
- Work in a cool, dry environment to prevent frosting from becoming too soft.
- Monitor room temperature throughout the frosting process.
Don't overlook the importance of ingredient temperature. Bring butter and eggs to room temperature before mixing for better incorporation.
As for cooling techniques, try placing your cake layers in the refrigerator for a short time to firm them up slightly before frosting.
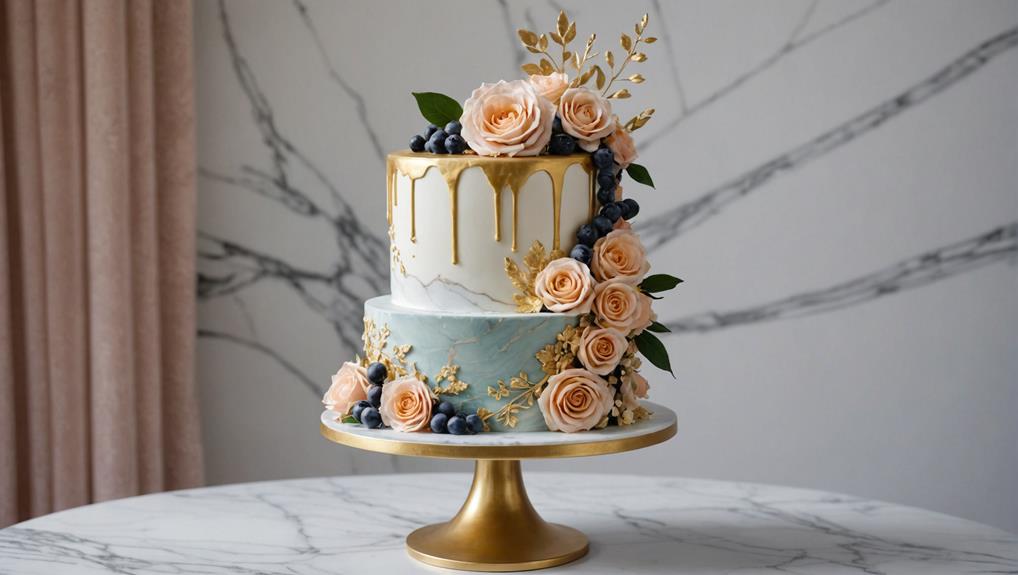
Adding Decorative Flourishes
With your cake layers stacked and crumb-coated, it's time to elevate your creation with decorative flourishes. Embrace sugar flower artistry by crafting exquisite blooms from gum paste or fondant, adding a touch of elegance that'll last long after the cake is gone.
Experiment with sculpted cake techniques, carving unique shapes to transform your layered masterpiece into a true work of art. For a stunning finish, try your hand at mirror glaze magic, creating a glossy, reflective surface that'll make your cake shine.
Don't stop there—master the art of royal icing piping to add intricate lacework, borders, and filigree designs that'll captivate your audience.
Take your decorations to the next level by tempering chocolate to create sophisticated curls and sculptures. These advanced techniques will set your cakes apart, impressing even the most discerning dessert enthusiasts.
Flavor Combinations for Layers
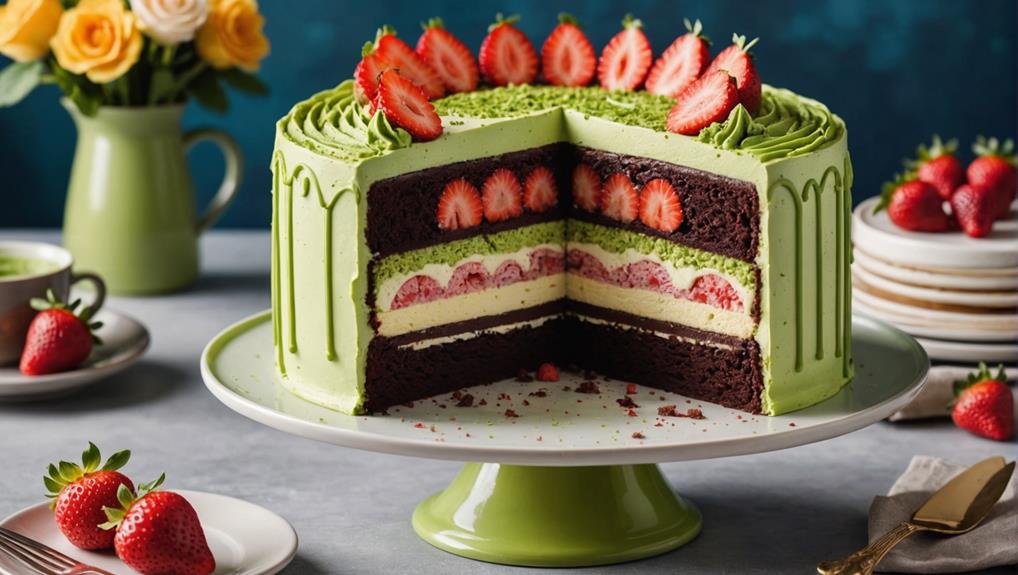
The art of layered cake creation reaches new heights when you explore exciting flavor combinations. By pairing complementary tastes and incorporating unique textures, you can transform a simple dessert into a culinary masterpiece. Consider these innovative approaches to elevate your layered cakes:
- Combine classic flavors with unexpected elements
- Experiment with contrasting textures
- Incorporate seasonal ingredients
- Balance sweet and savory notes
When selecting flavor profiles for your layers, don't hesitate to push boundaries. For example, pairing rich chocolate with tangy raspberry or delicate vanilla with zesty lemon can create a harmonious blend.
You could also draw inspiration from desserts like Maple Pecan Pie, where the gooey maple filling perfectly complements crunchy pecans, showcasing how flavors can intertwine beautifully.
Texture contrasts add depth to each bite, so try combining a moist cake layer with a light, airy mousse. Seasonal fruits not only enhance flavor but also provide visual appeal, making your cake a true showstopper.
For a sophisticated twist, experiment with spices like cinnamon or cardamom to create unique pairings that will surprise and delight your guests.
Proper Storage and Presentation
You've poured your heart into creating a stunning layered cake, but your work isn't over yet. Proper storage and presentation are crucial to ensure your masterpiece stays fresh and looks its best.
To maintain the cake's moisture and flavor, store it in an airtight container at room temperature for up to three days or refrigerate for a week. For longer-term storage, freeze your fully decorated cake by first chilling it uncovered for 1-2 hours, then wrapping it tightly in plastic and foil.
When it's time to showcase your creation, elevate its visual appeal with innovative presentation tips. Use a sturdy cake board for stability and consider decorative stands or platters to add flair. Fresh flowers or fruits can complement your cake's design, creating an elegant focal point.
For picture-perfect slices, warm your knife in hot water before each cut. This simple technique ensures clean edges and enhances the overall presentation.
Frequently Asked Questions
How Do I Prevent My Cake Layers From Sticking to the Pans?
You'll conquer sticky layers with innovative cake release techniques. Master pan preparation methods like greasing and flouring, or try parchment paper. After baking, employ smart cooling strategies before removing. These tricks ensure your layers release effortlessly every time.
What's the Best Way to Level Cake Layers for Even Stacking?
Did you know 78% of bakers struggle with uneven layers? You'll revolutionize your cake leveling techniques using essential baking tools like a serrated knife or cake leveler. These innovative layer frosting methods ensure perfectly stacked, professional-looking cakes every time.
Can I Make a Layered Cake in Advance? How Long Will It Last?
You can make layered cakes in advance! Freeze unfrosted layers for up to 3 months. For optimal freshness, assemble and frost 1-2 days before serving. Use innovative frosting techniques to seal in moisture and elevate your cake's longevity.
How Do I Transport a Multi-Tiered Cake Safely Without Damaging It?
Did you know 90% of cake damage occurs during transport? You'll revolutionize your cake delivery by using a sturdy cake box, implementing savvy transportation tips, and incorporating support structures. Don't forget to secure tiers for a flawless presentation.
What Are Some Alternatives to Traditional Cake Stands for Unique Presentations?
You'll love these creative serving options: repurpose vintage suitcases, stack books, or use wooden crates as unique pedestal ideas. Try serving on upturned bowls or rustic wooden slabs for alternative display solutions that'll wow your guests.
Final Thoughts
You've now unlocked the secrets to creating stunning layered cakes. By mastering these techniques, you'll elevate your baking from amateur to artisanal. It's true that practice makes perfect, so don't be discouraged if your first attempts aren't flawless. With each cake you create, you'll refine your skills and develop your unique style. Remember, the joy of baking lies not just in the final product, but in the creative process itself. So, preheat that oven and let your culinary imagination soar!