While raspberry desserts are common in home kitchens, you won't find many that capture both romance and whimsy quite like Cupid's Cloud. This mid-century creation has stood the test of time, offering you a perfect balance of nostalgic comfort and sophisticated presentation. You'll notice its cloud-like texture transforms simple ingredients—marshmallows, whipped cream, and fresh raspberries—into something far more enchanting than their humble origins suggest. If you're curious about how this airy confection earned its place in America's dessert repertoire, there's an intriguing story behind its rise to popularity at romantic gatherings and celebrations.
Key Takeaways
- A romantic dessert combining whipped cream, marshmallows, and fresh raspberries into a light, mousse-like consistency perfect for Valentine's Day celebrations.
- Recipe requires minimal cooking skills, using just 5 main ingredients: heavy cream, marshmallows, sugar, raspberries, and vanilla extract.
- Assembly involves layering melted marshmallow-cream mixture with fresh raspberries in serving glasses and chilling for 2+ hours.
- Best served 5-10 minutes after removal from refrigerator, with mint leaves or powdered sugar garnish for elegant presentation.
- Dessert offers balanced flavors of sweet marshmallow cream and tart raspberries, with a cloud-like texture that's light and airy.
History
Tracing its roots to mid-20th century American dessert cuisine, Cupid's Cloud Raspberry Dessert emerged during the post-war era when convenience foods like marshmallows became widely available.
You'll find its origins intertwined with the rise of no-bake desserts that became popular among home cooks seeking quick, impressive treats for social gatherings and family celebrations.
The dessert's name wasn't coined until the 1960s when women's magazines began featuring romantic-themed recipes for Valentine's Day entertaining.
You'll notice it's part of a broader category of cloud-like desserts that capitalize on the airy texture created by combining whipped cream with melted marshmallows.
The addition of raspberries wasn't part of the original recipe, which initially featured only vanilla flavoring.
As you explore this dessert's evolution, you'll discover that by the 1970s, fresh fruit additions became standard variations, with raspberries emerging as the most popular choice due to their visual appeal and complementary tartness.
The recipe has remained largely unchanged since then, though modern versions sometimes incorporate Greek yogurt or cream cheese for added stability.
Recipe
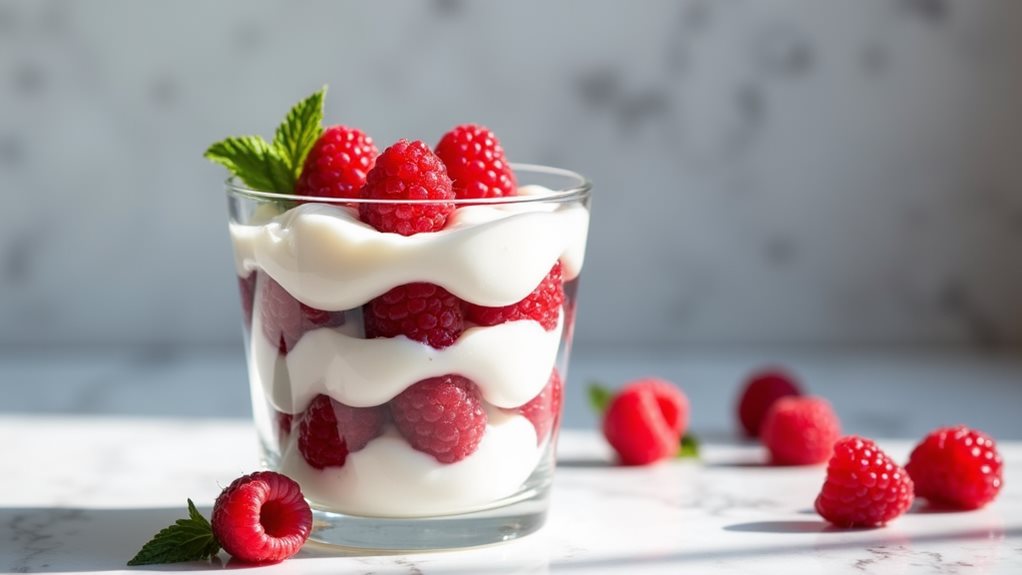
Cupid's Cloud Raspberry Dessert is a heavenly combination of whipped cream and marshmallows, layered with fresh raspberries to create a light, cloud-like texture. This elegant dessert strikes the perfect balance between sweet and tart flavors, making it an ideal choice for romantic occasions or special celebrations.
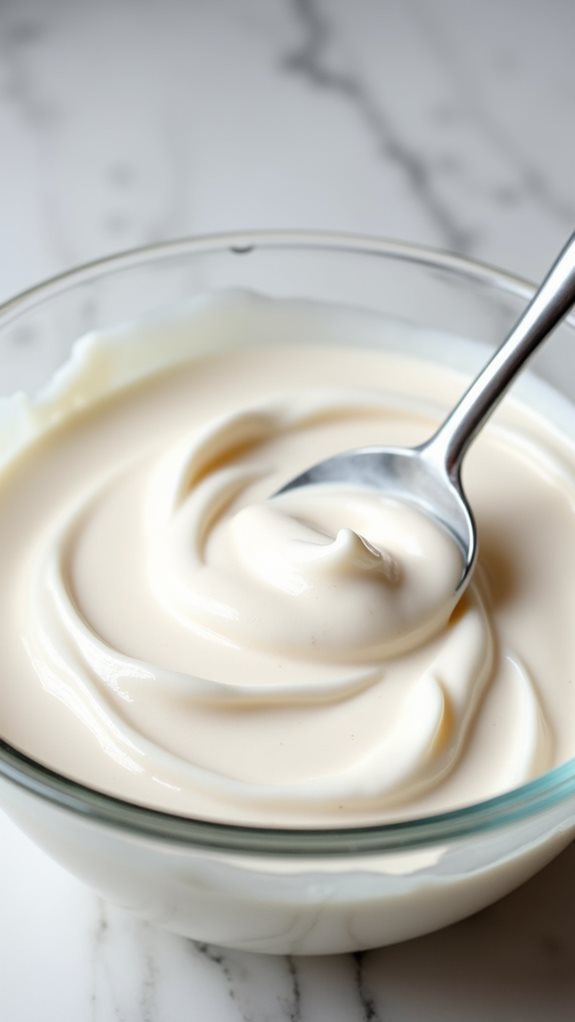
This simple yet impressive dessert requires minimal cooking skills and can be prepared well in advance. The magic happens when melted marshmallows combine with whipped cream to create a stable, mousse-like consistency that holds its shape beautifully while remaining incredibly light and airy.
- 2 cups (475ml) heavy whipping cream
- 8 oz (225g) marshmallows
- 1/2 cup (100g) granulated sugar
- 2 cups (250g) fresh raspberries
- 1 teaspoon vanilla extract
Place marshmallows and 1/4 cup of the heavy cream in a microwave-safe bowl and heat in 30-second intervals, stirring between each, until completely melted. Allow this mixture to cool to room temperature.
While cooling, whip the remaining cream with sugar and vanilla extract until stiff peaks form. Once the marshmallow mixture has cooled, gently fold it into the whipped cream until well combined.
Layer the mixture in serving glasses, alternating with fresh raspberries, and finish with raspberries on top. Refrigerate for at least 2 hours or overnight before serving.
For best results, ensure all ingredients are properly chilled before starting, except for the marshmallows. The marshmallow mixture must be completely cooled to room temperature before combining with the whipped cream to prevent the cream from deflating.
If using frozen raspberries, thaw and drain them thoroughly to prevent excess moisture from affecting the dessert's texture. The dessert can be stored in the refrigerator for up to 2 days, though the texture is best within the first 24 hours.
Cooking Steps
You'll start by melting marshmallows with a portion of cream in the microwave, letting this mixture cool while you whip the remaining cream with sugar and vanilla until stiff peaks form.
Next, you'll carefully fold the cooled marshmallow mixture into your whipped cream until well combined, creating a light and airy base.
Finally, you'll layer this cloud-like mixture with fresh raspberries in serving glasses and let it chill for at least two hours, ensuring the perfect texture and presentation of your dessert.
Step 1. Mix Marshmallows and Cream
The kitchen preparation begins with melting marshmallows and cream together to create a silky-smooth base. You'll need to place 8 ounces of marshmallows in a microwave-safe bowl, adding 1/4 cup of heavy cream to help facilitate the melting process.
Heat this combination in 30-second intervals, making sure to stir thoroughly between each round until you've achieved a completely smooth mixture.
Once you've melted the marshmallows and cream, you'll need to let the mixture cool to room temperature, which typically takes about 15-20 minutes.
While you're waiting, you can begin whipping the remaining cream with sugar and vanilla until stiff peaks form. It's crucial that your marshmallow mixture has cooled completely before you proceed; if it's still warm, it'll deflate your whipped cream and compromise the dessert's texture.
When you're ready to combine the elements, gently fold the marshmallow mixture into your whipped cream using a rubber spatula. Use broad, sweeping motions from bottom to top, maintaining as much air as possible in the mixture while ensuring everything is well incorporated.
Step 2. Whip Cream With Sugar
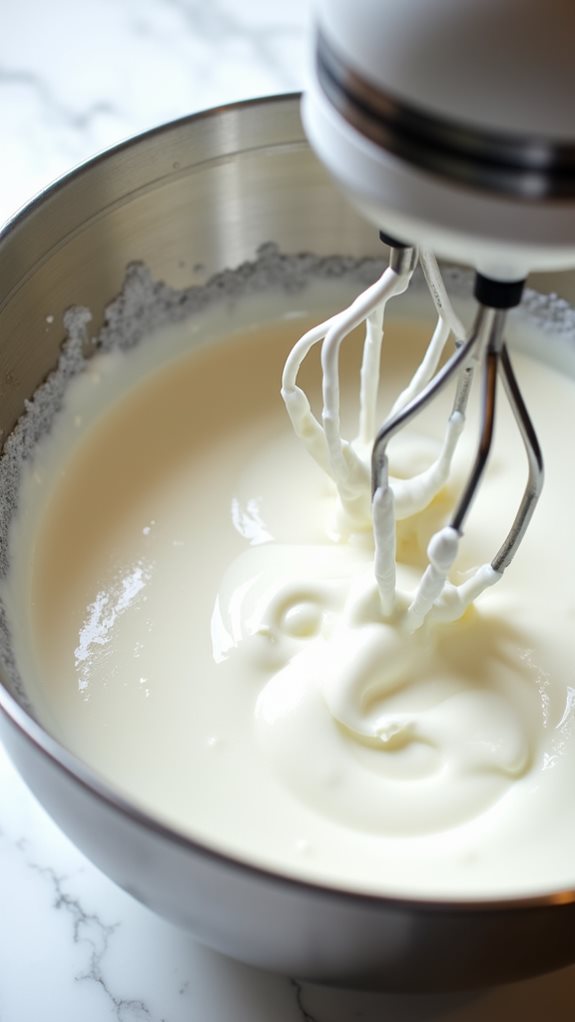
While the marshmallow mixture cools, begin whipping the remaining heavy cream in a large mixing bowl.
You'll want to use an electric mixer set to medium-high speed to achieve the best results. Add the granulated sugar gradually as you continue whipping, which allows it to incorporate more evenly throughout the cream.
Once you've added all the sugar, pour in the vanilla extract and continue beating the mixture. You'll notice the cream beginning to thicken and form soft peaks.
Keep whipping until you achieve stiff peaks, which typically takes about 3-4 minutes. You'll know you've reached the right consistency when the cream stands up firmly when you lift the beaters, and the peaks hold their shape without falling over.
Don't overbeat the cream, as it can quickly turn grainy and start to separate into butter.
If you're using a stand mixer, keep a close eye on the process, as it can happen faster than with a hand mixer. The finished whipped cream should be smooth, glossy, and firm enough to hold its shape when folded with the marshmallow mixture later.
Step 3. Fold Marshmallows Into Cream
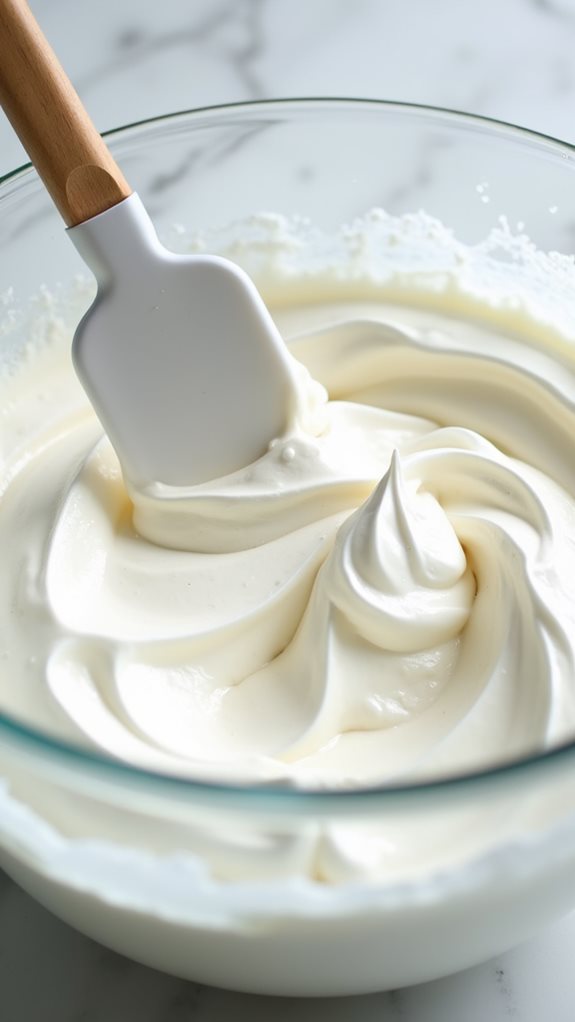
Now that your whipped cream has reached the perfect consistency, it's time to combine it with the cooled marshmallow mixture.
Using a rubber spatula, gently fold the marshmallow mixture into the whipped cream using broad, sweeping motions from bottom to top. You'll want to maintain the light, airy texture you've created, so avoid vigorous stirring that could deflate your mixture.
Continue folding until you see no more streaks of marshmallow in the cream, and the mixture appears uniform throughout. The resulting texture should be cloudlike and ethereal, with a slight sheen from the incorporated marshmallows.
If you notice any small lumps of marshmallow, continue folding carefully until they're fully integrated. The finished mixture should hold its shape well while remaining light and fluffy.
Take care not to overmix, as this can cause the dessert to become dense and heavy. You'll know you've achieved the right consistency when the mixture looks smooth and silky, with no visible streaks or lumps.
At this point, your cream base is ready for layering with the fresh raspberries in your serving glasses.
Step 4. Layer in Serving Glasses
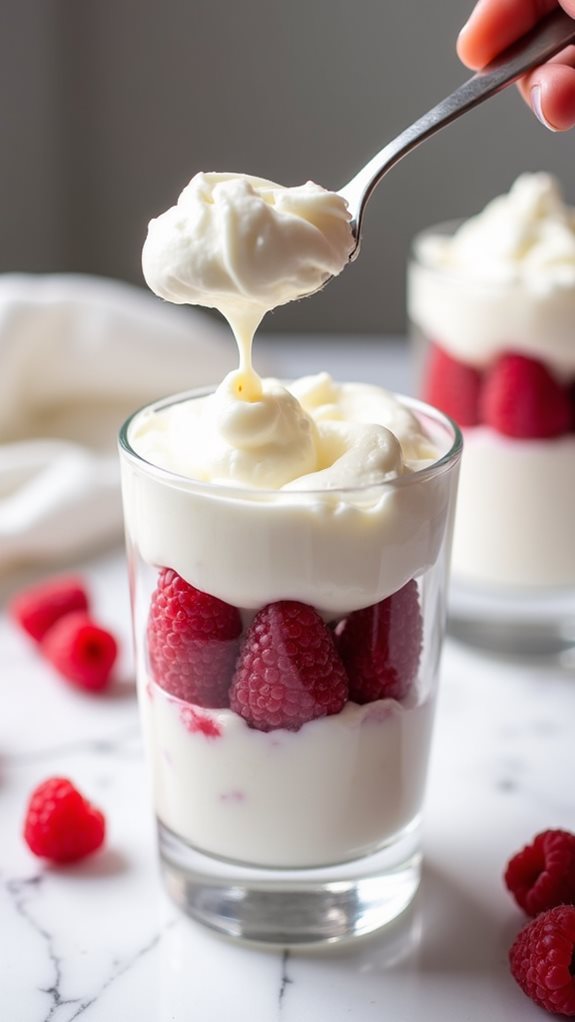
Starting the layering process requires a strategic approach to achieve visually striking results.
You'll want to select clear serving glasses that showcase the dessert's beautiful layers, ensuring they're completely clean and dry before you begin.
Take your marshmallow-cream mixture and carefully spoon about 2-3 tablespoons into the bottom of each glass, creating an even base layer.
Next, you'll add a layer of fresh raspberries, placing them gently against the glass to create an attractive visual effect.
Don't overcrowd the berries – space them evenly so the cream mixture can settle between them.
Continue alternating layers of the cream mixture and raspberries, making sure each layer is level before adding the next.
You'll want to tap the glasses gently on the counter between layers to eliminate any air pockets that might form.
For the final layer, arrange the raspberries in a decorative pattern on top of the last cream layer.
You can position them point-up for a more dramatic presentation, or lay them flat for a simpler look.
Remember to leave a small space at the top of each glass to prevent spillage during transport to the refrigerator.
Step 5. Chill Two Hours Before Serving
Once you've completed the layering process, proper chilling time becomes crucial for achieving the perfect texture and flavor melding in your Cupid's Cloud Raspberry Dessert.
You'll need to refrigerate the dessert for a minimum of two hours, though overnight chilling will yield even better results as it allows the marshmallow mixture to fully set and the raspberry flavors to thoroughly infuse the cream.
During the chilling process, you'll want to ensure your refrigerator maintains a consistent temperature between 35-38°F (2-3°C).
If you're preparing this dessert for an evening event, it's best to complete the assembly in the morning to guarantee adequate chilling time.
While you might be tempted to speed up the process by placing the dessert in the freezer, don't do this as it can compromise the delicate, cloud-like texture you're aiming for.
Keep the desserts covered with plastic wrap during refrigeration to prevent them from absorbing any unwanted odors or forming a skin on top.
When you're ready to serve, remove them from the refrigerator about 5-10 minutes beforehand to allow the optimal creamy consistency to develop.
Final Thoughts
Cupid's Cloud Raspberry Dessert consistently delivers an enchanting combination of light, dreamy textures and vibrant raspberry flavors that's sure to impress your guests.
You'll find that this dessert strikes the perfect balance between sophisticated presentation and straightforward preparation, making it an ideal choice for both special occasions and casual gatherings.
When you're planning to serve this cloud-like creation, remember that timing is crucial. While you can prepare it up to two days in advance, the optimal serving window is between 2 and 24 hours after assembly.
You'll notice that the marshmallow mixture provides structural stability while maintaining an incredibly smooth texture that complements the fresh raspberries.
If you're considering modifications, you can experiment with different berries, but raspberries offer the ideal tartness to balance the sweet, creamy base.
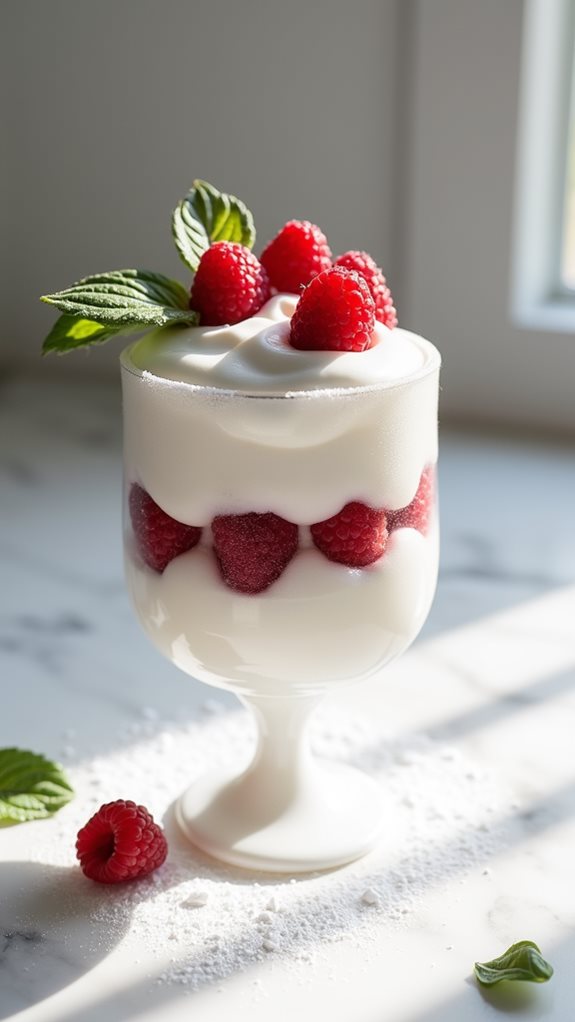
Don't forget that presentation matters – clear glasses or dessert bowls will showcase the beautiful layering effect you've created.
For an extra touch of elegance, you might consider garnishing with mint leaves or a light dusting of powdered sugar just before serving.