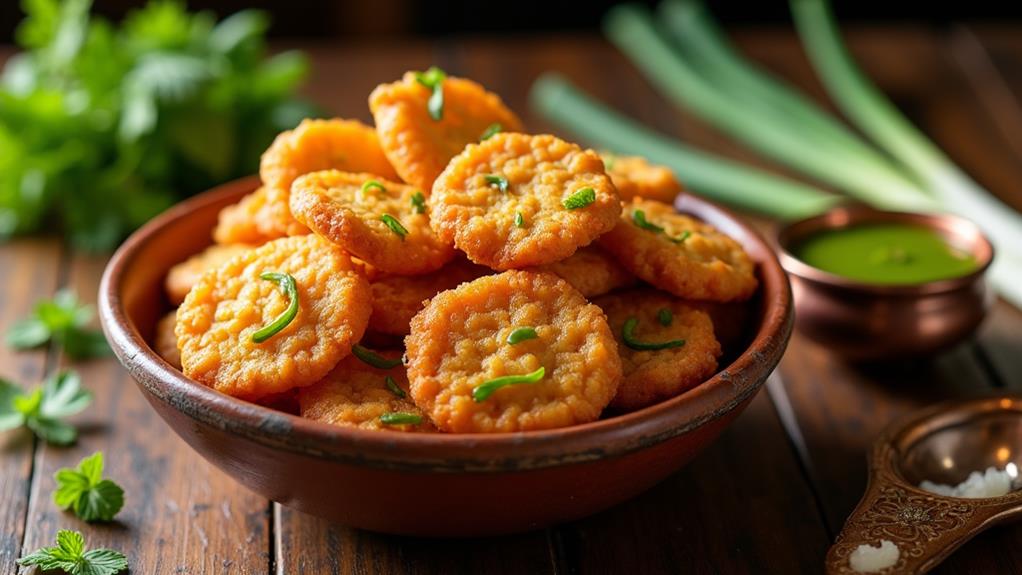
Imagine you're at a bustling Indian street market, and the aroma of crispy spring onion bhajis wafts through the air, drawing you closer to a vendor's stall. You've never tried this popular snack before, but the golden-brown fritters paired with vibrant green mint chutney catch your eye. As you consider indulging in this savory treat, you might wonder about its origins, how it's made, and why it's become such a beloved appetizer in Indian cuisine. The story behind these crispy morsels and their refreshing accompaniment is as intriguing as their flavor profile.
Key Takeaways
- Crispy Spring Onion Bhajis are a popular Indian appetizer made with chopped spring onions and chickpea flour batter.
- The recipe requires five key ingredients: spring onions, chickpea flour, salt, water, and vegetable oil for frying.
- Achieving the perfect texture depends on the consistency of the batter and maintaining the correct oil temperature (350°F/175°C).
- Bhajis are best served immediately while hot and crispy, accompanied by a cool mint chutney for dipping.
- The dish can be customized with additional spices or herbs, and pairs well with various chutneys beyond mint.
History
Tracing the origins of bhajis takes us back to the Indian subcontinent, where they've been a beloved snack for centuries. You'll find these crispy fritters deeply rooted in Indian cuisine, particularly in the northern regions.
Bhajis, also known as pakoras, have evolved over time, with each region adding its own twist to the recipe. Originally, bhajis were made with whatever vegetables were readily available, but onions quickly became a favorite due to their abundance and flavor.
The use of chickpea flour, or besan, as a batter base is a hallmark of Indian cooking, providing a gluten-free option that's both nutritious and delicious.
As Indian cuisine spread globally, bhajis found their way into international kitchens. In the UK, for example, they've become a popular starter in Indian restaurants and a staple of British-Indian cuisine.
The spring onion variation you're learning to make is a modern twist on this classic snack, offering a milder, more delicate flavor than traditional onion bhajis. By mastering this recipe, you're participating in a culinary tradition that spans generations and continents.
Recipe
Crispy Spring Onion Bhajis are a popular Indian appetizer that combines the sharp flavor of spring onions with a light, crispy batter. These savory fritters are perfect for entertaining guests or as a tasty snack to enjoy with a cup of tea. The key to achieving the perfect texture lies in the consistency of the batter and the temperature of the oil during frying.
This simplified version of the classic recipe uses only five ingredients, making it accessible for home cooks while still delivering authentic flavors. When prepared correctly, these bhajis offer a satisfying crunch on the outside while remaining tender on the inside, making them a delightful addition to any meal or gathering.
- 2 cups (200g) spring onions, finely chopped
- 1 cup (120g) chickpea flour (besan)
- 1 teaspoon salt
- 1/2 cup (120ml) water
- Vegetable oil for deep frying
To prepare the bhajis, mix the chopped spring onions, chickpea flour, and salt in a bowl. Gradually add water, stirring to create a thick batter that coats the onions.
Heat oil in a deep pan or wok to 350°F (175°C). Drop spoonfuls of the batter into the hot oil and fry until golden brown and crispy, about 2-3 minutes per side. Remove with a slotted spoon and drain on paper towels. Serve hot with mint chutney.
For best results, ensure the oil is at the correct temperature before frying. If it's too hot, the bhajis will brown quickly on the outside but remain raw inside. If it's not hot enough, they'll absorb too much oil and become greasy.
Don't overcrowd the pan, as this will lower the oil temperature. Fry in small batches for the crispiest results. The bhajis can be made ahead and reheated in a hot oven for a few minutes to crisp them up before serving.
Cooking Steps
To create crispy spring onion bhajis, you'll start by combining the dry ingredients, then gradually incorporate water to form a thick batter.
Once your oil reaches 350°F, carefully drop spoonfuls of the batter into the hot oil, frying until golden brown.
After draining the bhajis on paper towels, you're ready to serve these delicious, crispy appetizers with mint chutney.
Step 1. Mix Dry Ingredients
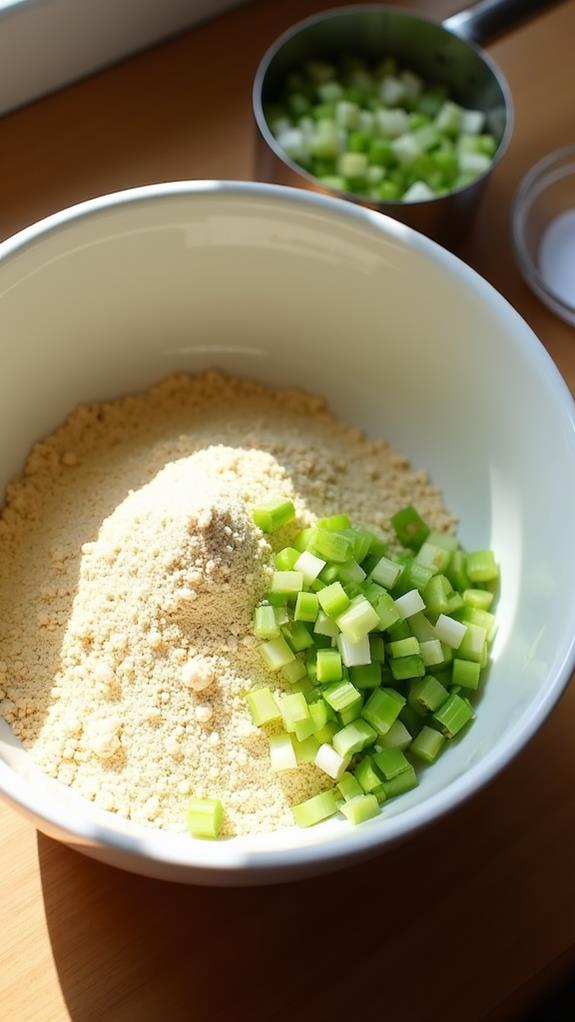
The initial step in creating these delectable bhajis is to combine the dry ingredients. You'll need to grab a large mixing bowl and measure out 1 cup (120g) of chickpea flour, also known as besan. This gluten-free flour forms the base of your batter and provides a nutty flavor that complements the spring onions perfectly.
Next, add 1 teaspoon of salt to the flour. The salt isn't just for flavor; it'll help draw out moisture from the onions, ensuring a crispy texture.
Once you've added the salt, it's time to whisk these dry ingredients together. Use a fork or a small whisk to thoroughly combine the flour and salt, ensuring there are no lumps. This step is crucial for creating a smooth batter later on.
As you mix, you might notice the enticing aroma of the chickpea flour. Take a moment to appreciate it – this scent is part of what makes bhajis so irresistible.
With your dry ingredients well combined, you're now ready to move on to the next step in your bhaji-making adventure.
Step 2. Add Water Gradually
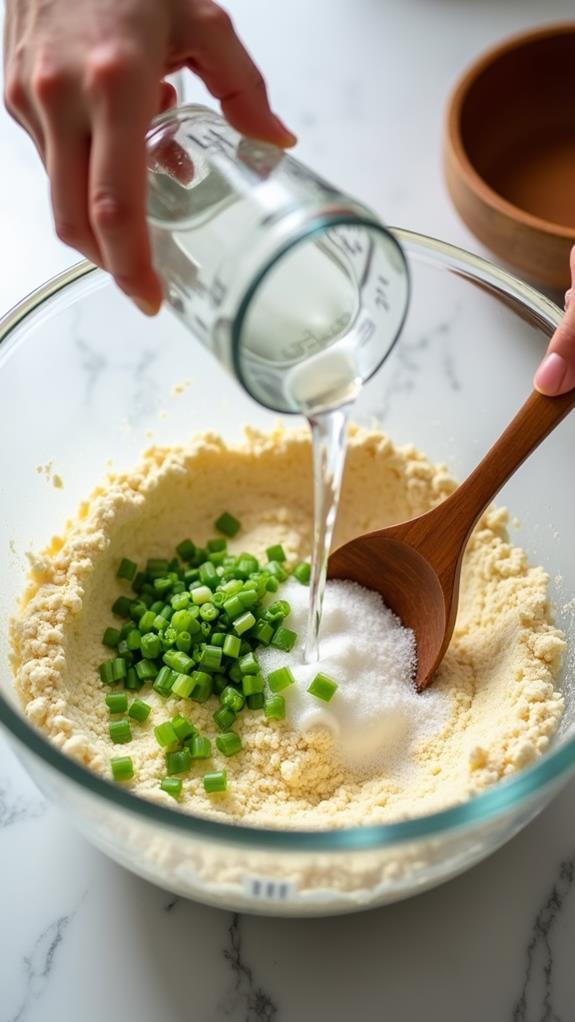
Now that you've combined the dry ingredients, it's time to add water to create the batter. Pour in the water gradually, about a tablespoon at a time, while stirring constantly. You'll want to achieve a thick, smooth consistency that coats the back of a spoon without running off too quickly. This gradual approach ensures you don't add too much water, which could result in a thin, runny batter.
As you mix, you'll notice the chickpea flour absorbing the water and forming a paste-like texture. Continue adding water and stirring until all the dry ingredients are fully incorporated and the chopped spring onions are evenly distributed throughout the batter.
The final consistency should be thick enough to hold its shape when dropped from a spoon but not so stiff that it's difficult to stir.
If you accidentally add too much water, don't panic. Simply sprinkle in a bit more chickpea flour to thicken the batter.
Step 3. Heat Oil to 350°F
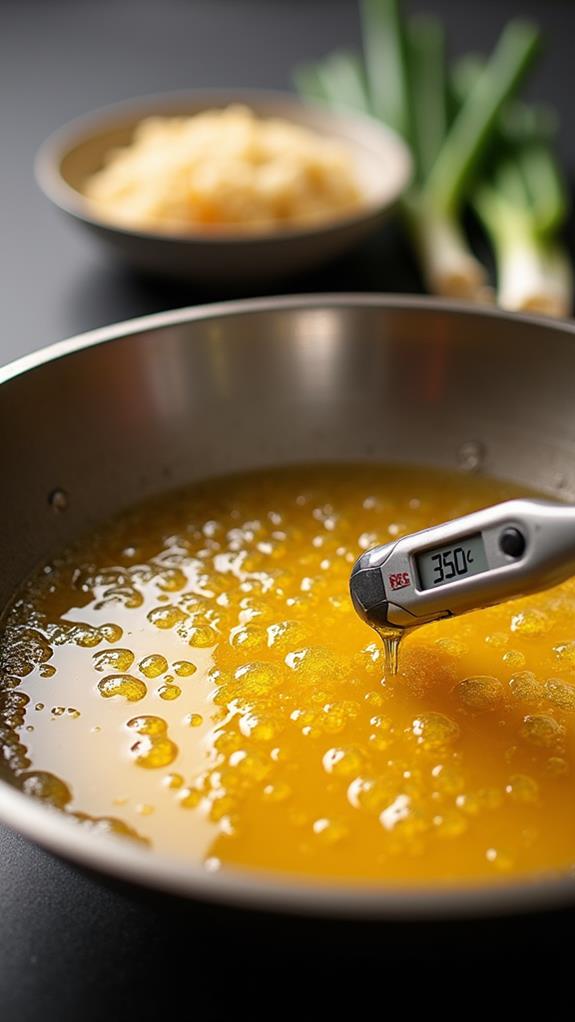
Preparing the oil is a crucial step in achieving perfectly crispy bhajis. You'll want to heat your vegetable oil to exactly 350°F (175°C) for optimal results. Use a deep, heavy-bottomed pan or wok to ensure even heat distribution. Fill it with enough oil to submerge the bhajis, but don't overfill, as the oil level will rise when you add the batter.
To check the temperature, use a kitchen thermometer if you have one. If not, you can test the oil by dropping a small amount of batter into it. If it sizzles and rises to the surface quickly, you're good to go.
Maintain this temperature throughout the frying process by adjusting your heat source as needed. If the oil gets too hot, your bhajis will brown too quickly on the outside while remaining undercooked inside. Conversely, if it's not hot enough, they'll absorb excess oil and become greasy.
Step 4. Drop Batter Into Oil
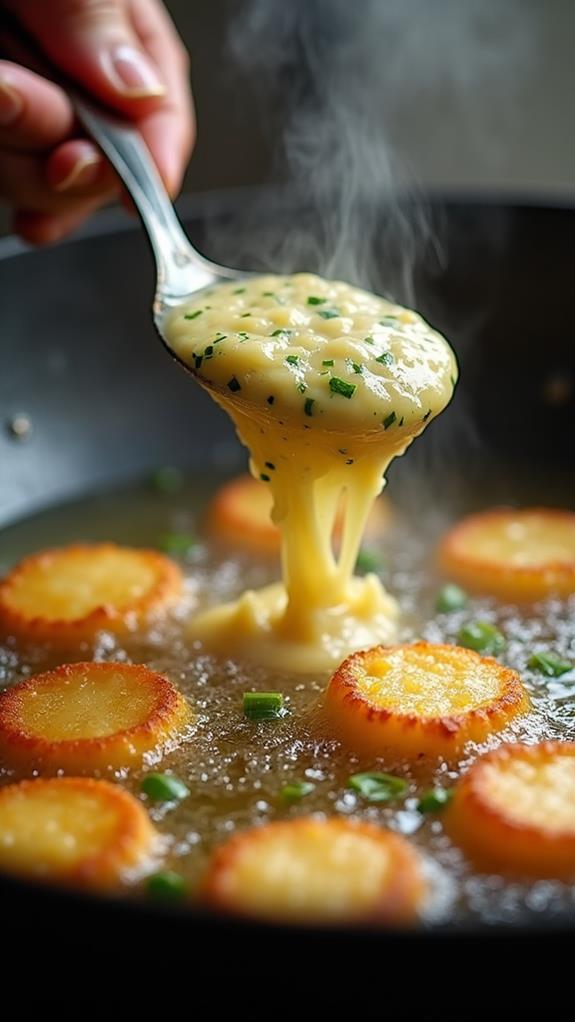
With your oil heated to the perfect temperature, it's time to start cooking your bhajis. Using a large spoon or a small ice cream scoop, carefully drop spoonfuls of the batter into the hot oil.
Don't overcrowd the pan; leave enough space between each bhaji to allow for even cooking and easy flipping. As the batter hits the oil, you'll notice it immediately start to sizzle and form a crispy exterior.
Allow the bhajis to fry for about 2-3 minutes on one side, or until they're golden brown. Then, using a slotted spoon or tongs, gently flip them over to cook the other side.
Keep a close eye on them, as they can quickly go from perfectly golden to burnt. Once both sides are evenly cooked and crispy, remove the bhajis from the oil using your slotted spoon.
Let them drain on a plate lined with paper towels to absorb any excess oil. Continue this process with the remaining batter, working in batches to maintain the oil's temperature and ensure consistently crispy results.
Step 5. Drain and Serve Bhajis
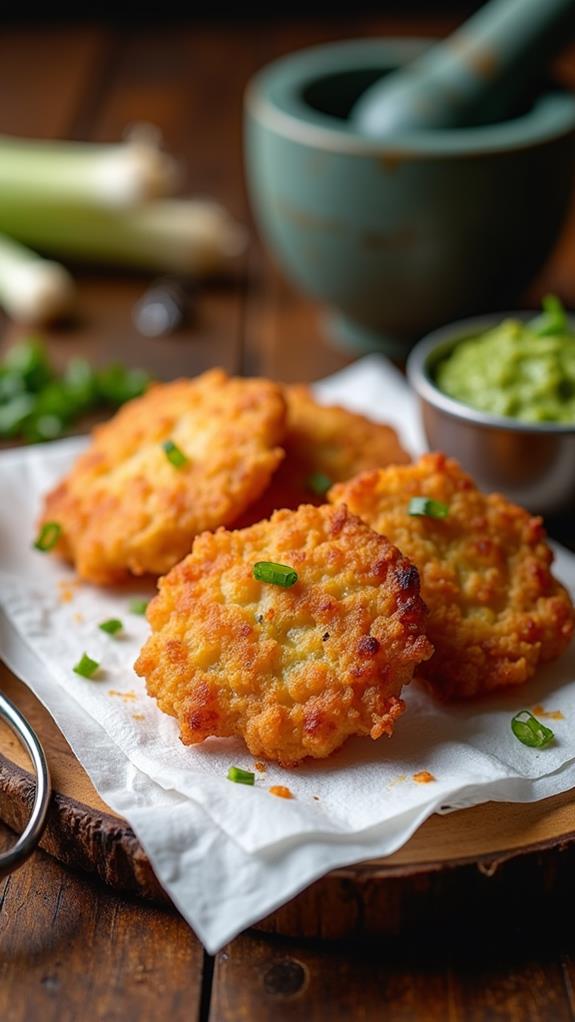
After frying your bhajis to a golden-brown perfection, it's crucial to drain them properly to ensure they remain crispy.
Using a slotted spoon or spider strainer, carefully remove the bhajis from the hot oil, allowing excess oil to drip back into the pan. Place them on a plate lined with paper towels, which will absorb any remaining oil.
Don't stack the bhajis; instead, arrange them in a single layer to prevent them from becoming soggy.
Once drained, transfer the bhajis to a serving platter. They're best enjoyed immediately while still hot and crispy.
If you're not serving them right away, you can keep them warm in a preheated oven at 200°F (95°C) for up to 30 minutes.
When you're ready to serve, arrange the bhajis attractively on the platter, and don't forget to include a small bowl of mint chutney on the side for dipping.
The contrast between the warm, crispy bhajis and the cool, refreshing chutney creates a delightful taste experience.
Serve your bhajis as an appetizer or snack, and watch them disappear quickly!
Final Thoughts
These crispy spring onion bhajis offer a delicious and easy-to-make snack that's sure to impress. You'll find that mastering this recipe opens up a world of possibilities for entertaining or simply treating yourself to a savory bite.
Remember, the key to perfect bhajis lies in the batter consistency and oil temperature. Don't be afraid to adjust the water content slightly if needed to achieve the ideal coating for your onions.
As you become more comfortable with the basic recipe, you can experiment with additional spices or herbs to customize the flavor profile. Consider adding a pinch of cumin or coriander for an extra dimension of taste.
You'll also find that these bhajis pair wonderfully with a variety of chutneys beyond mint, such as tamarind or mango.
If you're looking to make your bhajis ahead of time, they reheat beautifully in a hot oven, regaining their crispy exterior.
With practice, you'll soon be creating restaurant-quality bhajis in your own kitchen, impressing friends and family with your culinary skills.