Did you know that over 70% of home cooks struggle to achieve perfectly crispy chicken skin, making it one of the most challenging culinary techniques to master? You'll find that combining this sought-after texture with the buttery smoothness of Jersey Royal potatoes creates a meal that's both impressive and attainable. While many recipes focus solely on the chicken, it's the thoughtful pairing with these seasonal potatoes that elevates this dish from simple to sublime. If you're ready to transform your chicken game and discover why this classic British combination has stood the test of time, you're in for a treat.
Key Takeaways
- Pat chicken skin completely dry and season with salt to achieve maximum crispiness when roasting with Jersey Royal potatoes.
- Cook chicken skin-side down in a hot skillet first to render fat before transferring to roast with potatoes.
- Boil Jersey Royal potatoes until tender, then toss with olive oil and herbs before roasting alongside the chicken.
- Roast chicken and potatoes at 400°F (200°C) for 25-30 minutes until chicken reaches 165°F internal temperature.
- Let chicken rest 5-7 minutes after cooking while potatoes continue crisping, then baste with pan juices before serving.
History
The art of achieving crispy chicken skin dates back thousands of years to ancient China, where cooks developed techniques for rendering fat and drying the skin before cooking.
You'll find that this method spread throughout Asia, evolving as different cultures adapted it to their own cooking styles and available ingredients.
During the Middle Ages, you'd have discovered European cooks developing their own techniques for achieving crispy skin, often using butter and high-heat roasting methods.
In France, you'd have seen the emergence of techniques like "en crapaudine," where the bird is flattened before roasting to maximize skin exposure and crispiness.
Recipe
Achieving perfectly crispy chicken skin is one of the most satisfying culinary accomplishments, combining a crackling exterior with juicy, tender meat underneath. This classic preparation method transforms ordinary chicken into a restaurant-quality dish that delivers both texture and flavor in every bite.
The key to success lies in properly drying the skin and allowing it to render its fat during cooking. While this recipe works with any chicken pieces, it's particularly excellent with bone-in, skin-on chicken thighs or breasts. The result is golden-brown, crackly skin that provides a delightful contrast to the succulent meat beneath.
Ingredients:
- 4 bone-in, skin-on chicken pieces (thighs or breasts)
- 2 tablespoons (30ml) olive oil
- 1½ teaspoons (9g) kosher salt
- 1 teaspoon (5g) black pepper
- 1 teaspoon (5g) paprika
- ½ teaspoon (2.5g) garlic powder
- ½ teaspoon (2.5g) dried thyme
- ¼ teaspoon (1.25g) dried rosemary
Pat chicken pieces completely dry with paper towels and place them skin-side up on a wire rack. Season generously with the spice mixture. Let rest uncovered in the refrigerator for at least 2 hours or overnight.
Preheat oven to 425°F (220°C). Heat olive oil in an oven-safe skillet over medium-high heat. Place chicken skin-side down and cook for 8-10 minutes until golden brown. Flip chicken, transfer skillet to oven, and roast for 20-25 minutes or until internal temperature reaches 165°F (74°C). Let rest for 5-10 minutes before serving.
For best results, removing excess moisture from the skin is crucial. Avoid moving the chicken while it's cooking skin-side down in the pan, as this can tear the skin and prevent proper crisping.
If the chicken pieces are different sizes, larger pieces may need additional cooking time. Always use an instant-read thermometer to ensure proper doneness, and avoid overcrowding the pan, which can create steam and prevent proper crisping.
Cooking Steps
To create perfectly crispy-skinned chicken, you'll begin by preheating your oven to 400°F while marinating the chicken with your chosen herbs and seasonings.
Next, you'll need to boil the potatoes until they're fork-tender, while simultaneously browning the marinated chicken skin-side down in a heavy skillet over medium-high heat.
Once the chicken skin is golden brown and the potatoes are ready, you'll transfer everything to a roasting pan and cook in the oven until the chicken reaches an internal temperature of 165°F, allowing both components to finish cooking together for optimal results.
Step 1. Preheat Oven to 400°F
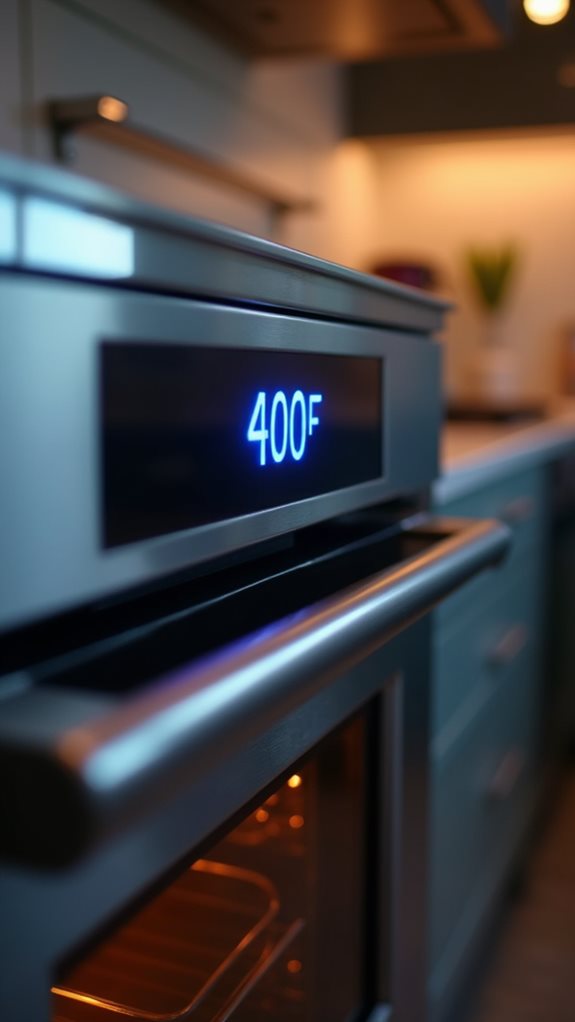
Start by cranking up your oven to 400°F (200°C) before handling any other prep work. You'll want to give your oven plenty of time to reach the proper temperature, which typically takes 10-15 minutes, ensuring even heat distribution throughout the cooking chamber.
While you're waiting, it's the perfect time to gather your ingredients and prep your equipment.
Proper preheating is crucial for achieving that coveted crispy chicken skin, as the initial blast of consistent heat helps render the fat and create a golden-brown exterior.
You'll know your oven's fully preheated when the indicator light turns off or it beeps, but for optimal results, wait an additional 5 minutes to ensure the oven walls have absorbed enough heat.
If you're using a conventional oven rather than convection, position your rack in the middle position for even cooking.
Don't forget to check your oven's accuracy with an oven thermometer, as many home ovens can be off by 25 degrees or more, which could significantly impact your cooking time and final results.
Step 2. Marinate Chicken With Herbs
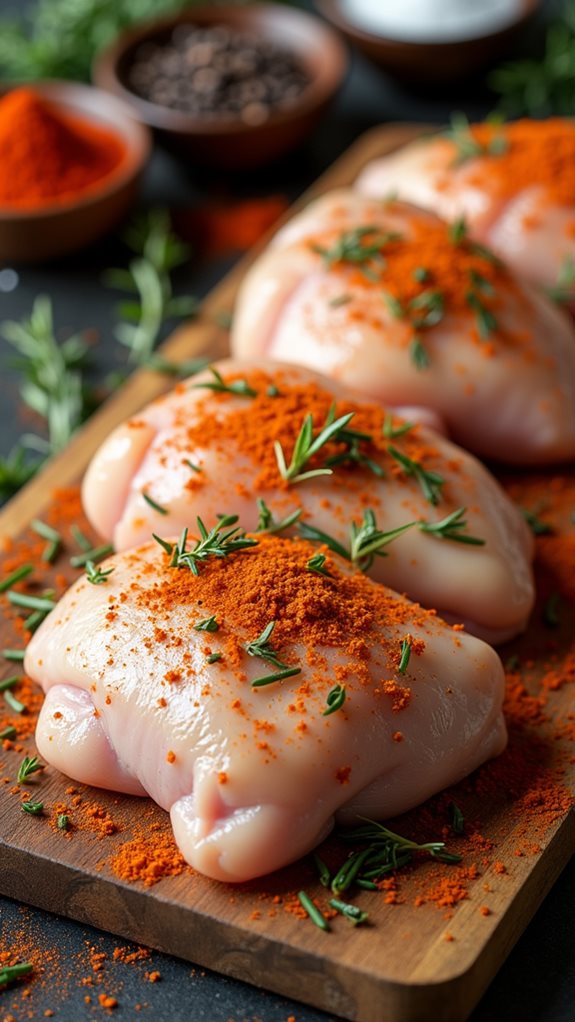
While your oven reaches the perfect temperature, you'll prepare a flavorful herb marinade that will infuse your chicken with incredible depth.
In a medium bowl, combine 4 tablespoons of extra virgin olive oil, 3 cloves of minced garlic, 2 tablespoons of fresh rosemary, and 2 tablespoons of chopped thyme. Add 1 teaspoon of sea salt, 1/2 teaspoon of freshly ground black pepper, and the zest of one lemon to create your aromatic base.
Pat your chicken pieces dry with paper towels, ensuring there's no excess moisture that could prevent the skin from crisping.
You'll want to gently lift the skin without detaching it completely, creating small pockets for the marinade. Using your fingers, carefully spread two-thirds of the herb mixture under the skin, making sure you're reaching all areas of the meat.
Rub the remaining third over the skin's surface and inside the cavity. If you're working with a whole chicken, tie the legs together with kitchen twine to ensure even cooking.
Let the chicken marinate at room temperature for 30 minutes, allowing the herbs and seasonings to penetrate the meat thoroughly.
Step 3. Boil Potatoes Until Tender
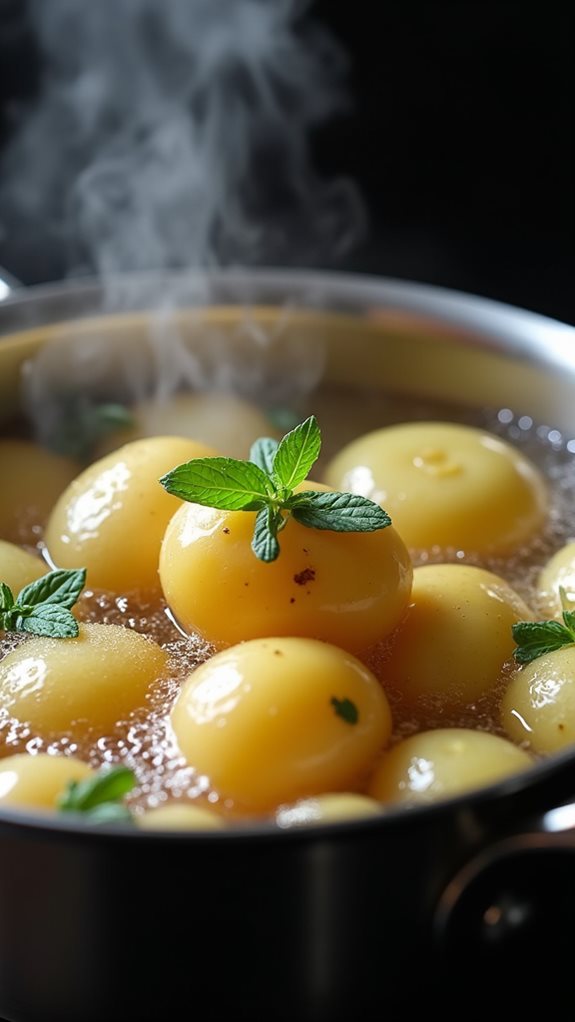
As your chicken marinates, fill a large pot with cold water and add 2 pounds of peeled Yukon Gold potatoes, cut into 2-inch chunks.
Place the pot over high heat and add 1 tablespoon of kosher salt to the water. Once the water begins to boil, reduce the heat to medium-high and cook the potatoes for 15-20 minutes.
You'll know the potatoes are done when you can easily pierce them with a fork, but they shouldn't be so soft that they fall apart.
While they're cooking, don't lift the lid too often, as this will release the steam and extend the cooking time. If you notice the water starting to foam up, you can add 1/2 teaspoon of olive oil to prevent boiling over.
Once tender, drain the potatoes in a colander and let them steam dry for 3-4 minutes.
Return them to the empty pot and give them a gentle shake to roughen up the edges – this will help create crispy exteriors when you roast them later.
For now, set them aside while you prepare the next steps of your crispy-skinned chicken dish.
Step 4. Brown Chicken on Stovetop
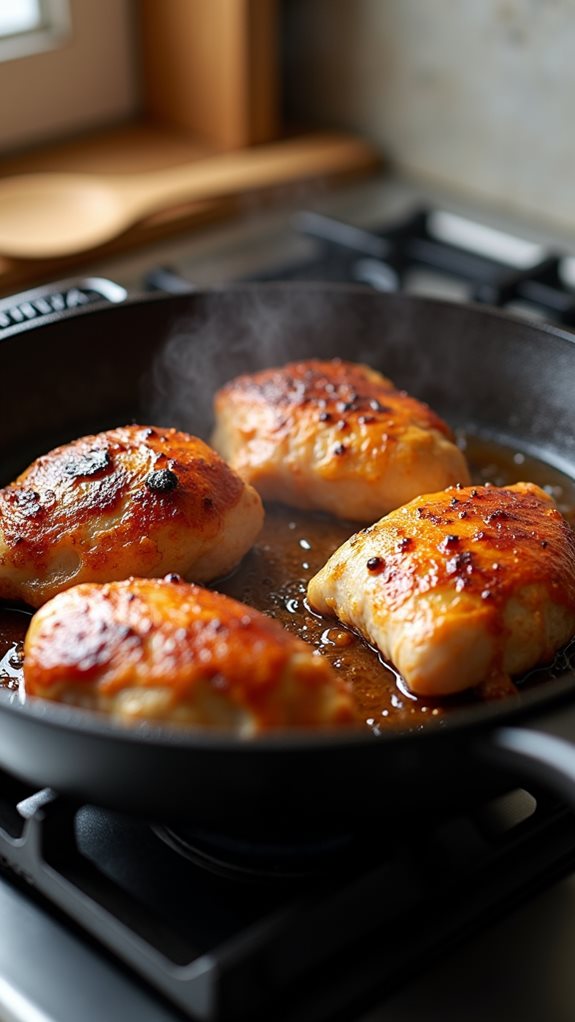
Now that your potatoes are resting, it's time to focus on achieving perfectly browned chicken skin.
Heat a large, heavy-bottomed skillet over medium-high heat, and add two tablespoons of vegetable oil. While your pan's heating up, pat the chicken pieces completely dry with paper towels, as any moisture will prevent proper browning.
Once your oil is shimmering, place the chicken pieces skin-side down in the pan, being careful not to overcrowd. You'll want to leave about an inch of space between pieces to ensure proper heat circulation.
Let the chicken cook undisturbed for 8-10 minutes, until the skin turns a deep golden brown. Don't be tempted to move the pieces around – this will interrupt the browning process and prevent that coveted crispy skin from developing. If you notice any hot spots in your pan, rotate it gently on the burner to promote even cooking.
When the skin's properly browned, use tongs to flip each piece carefully, and cook for an additional 5 minutes on the second side. The chicken won't be fully cooked at this point, but that's exactly what we want before moving to the next step.
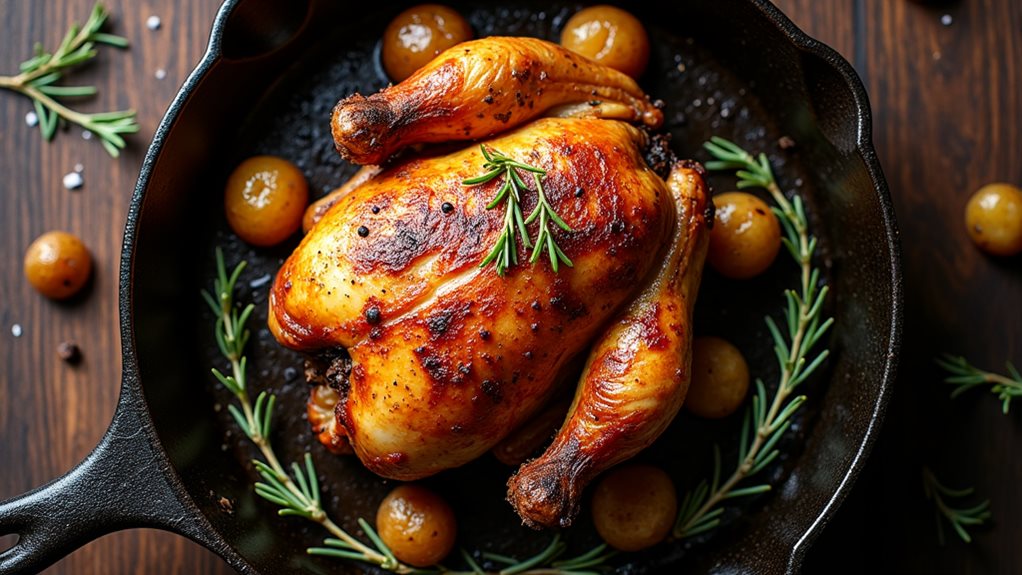
Step 5. Roast Together Until Done

Transfer your browned chicken pieces to a large roasting pan and nestle them among the potatoes, keeping the skin side up.
Pour any remaining fat and juices from the skillet over the chicken and potatoes, then add the fresh thyme sprigs and garlic cloves around the pan. You'll want to season everything with another light sprinkle of salt and black pepper.
Place the roasting pan in your preheated 400°F oven and roast for 25-30 minutes, or until the chicken's internal temperature reaches 165°F when tested with a meat thermometer at the thickest part.
During roasting, you'll notice the skin becoming even more golden and crispy, while the potatoes develop a beautiful caramelized exterior. If you'd like the skin extra crispy, switch your oven to broil for the final 2-3 minutes, watching carefully to prevent burning.
Let the chicken rest for 5-7 minutes after removing it from the oven. This resting period allows the juices to redistribute throughout the meat, ensuring each bite stays moist and flavorful.
While resting, baste the chicken with the pan juices once or twice.
Final Thoughts
With proper technique and attention to detail, achieving perfectly crispy chicken skin is an attainable goal for any home cook. You'll find that the key elements – patting the skin dry, allowing it to air-dry in the refrigerator, and maintaining the right cooking temperature – work together to create that coveted crispy exterior while keeping the meat juicy and tender.
Don't be discouraged if your first attempt isn't perfect. Like any cooking technique, mastering crispy chicken skin takes practice and patience. You'll want to pay attention to how your particular oven behaves, as temperature variations can affect cooking times and results.
Remember that quality ingredients matter too – fresh chicken with intact skin will generally produce better results than frozen alternatives.
Once you've mastered this basic technique, you can experiment with different seasonings and accompaniments. The principles you've learned here will serve you well whether you're preparing a whole chicken, individual pieces, or even other poultry dishes.
Keep in mind that consistently great results come from following the fundamental steps while making subtle adjustments based on your experience and preferences.