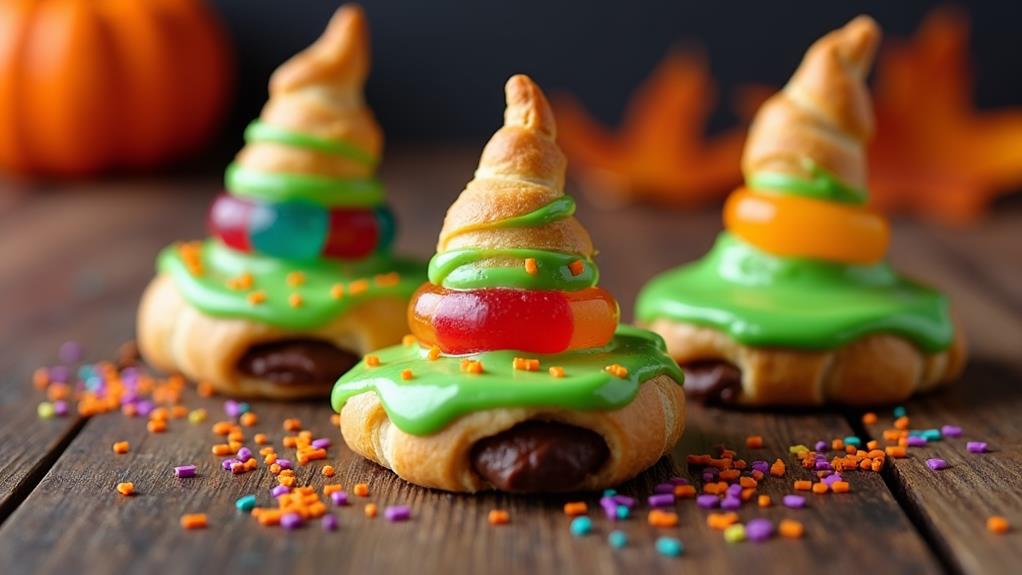
You've probably seen these adorable treats popping up at Halloween parties and on social media: Crescent Roll Witch Hats. These charming confections combine the convenience of store-bought crescent rolls with the whimsy of Halloween decor. But there's more to these festive snacks than meets the eye. From their humble beginnings to their rise in popularity, Crescent Roll Witch Hats have a story to tell. As you consider adding these to your Halloween spread, you might wonder about their origins, the best recipe to use, or how to put your own creative spin on them. Let's uncover the magic behind these bewitching treats.
Key Takeaways
- Crescent Roll Witch Hats are Halloween-themed treats made with crescent roll dough and chocolate chips.
- The recipe involves baking triangular crescent rolls with chocolate inside, then decorating to resemble witch hats.
- Green candy melts are used to coat the tops, creating the distinctive witch hat appearance.
- Gummy candies or licorice are added as decorative hat bands for a festive touch.
- These treats are easy to make, customizable, and perfect for Halloween parties or family baking activities.
History
When did Crescent Roll Witch Hats first appear on Halloween treat tables?
You'll find that these whimsical treats are a relatively recent addition to the Halloween culinary scene. They emerged in the early 2000s as home bakers sought creative ways to use pre-made crescent roll dough for festive occasions. The concept likely evolved from the popularity of crescent roll-based recipes and the desire for easy, kid-friendly Halloween snacks.
You'll notice that Crescent Roll Witch Hats combine elements of traditional Halloween imagery with convenient baking methods. They're part of a broader trend of transforming everyday ingredients into holiday-themed creations.
As social media and food blogs gained traction, these treats spread quickly, becoming a staple at Halloween parties and school events. Their appeal lies in their simplicity and visual impact, allowing even novice bakers to produce impressive results.
While not deeply rooted in Halloween folklore, Crescent Roll Witch Hats have become a modern tradition, embodying the playful spirit of the holiday. They've inspired variations and adaptations, cementing their place in contemporary Halloween treat repertoires.
Recipe
Crescent Roll Witch Hats are a whimsical and delicious treat perfect for Halloween or any festive occasion. These charming pastries combine the flaky texture of crescent rolls with the rich sweetness of chocolate, creating a delightful contrast that appeals to both kids and adults alike. Their witch hat shape adds a playful touch to any dessert table or party spread.
Making Crescent Roll Witch Hats is a simple process that allows for creativity and customization. The basic recipe can be easily adapted to suit different tastes or dietary needs, making it a versatile option for various events. Whether you're planning a Halloween party or just want to add a touch of magic to your baking, these witch hats are sure to cast a spell on everyone who tries them.
Ingredients:
- 1 can (8 oz / 227 g) refrigerated crescent rolls
- 1 cup (170 g) semisweet chocolate chips
- 1/2 cup (90 g) green candy melts
- 1 cup (150 g) gummy candies or licorice
- Edible glitter or sprinkles (optional)
Preheat the oven to 375°F (190°C) and line a baking sheet with parchment paper. Unroll the crescent dough and separate into triangles. Place a small handful of chocolate chips at the wide end of each triangle, then roll towards the pointed end to form a hat shape. Arrange the rolls on the prepared baking sheet and bake for 10-12 minutes until golden brown.
Allow to cool slightly before dipping the tops into melted green candy melts. Finish by attaching a gummy candy or piece of licorice as the hat's band.
For added flair, consider sprinkling edible glitter or Halloween-themed sprinkles on top of the green candy coating while it's still wet. Experiment with different fillings by adding a dollop of peanut butter or chopped nuts along with the chocolate chips.
To ensure even baking, rotate the baking sheet halfway through the cooking time. These witch hats are best served warm but can be stored in an airtight container for up to two days, though they may lose some of their crispness over time.
Cooking Steps
To create these spooky treats, you'll start by gathering your ingredients and tools. Then, unroll the crescent dough and separate it into triangles.
Next, you'll add chocolate chips to each triangle before rolling them up and baking until golden brown.
Step 1. Gather Ingredients and Tools
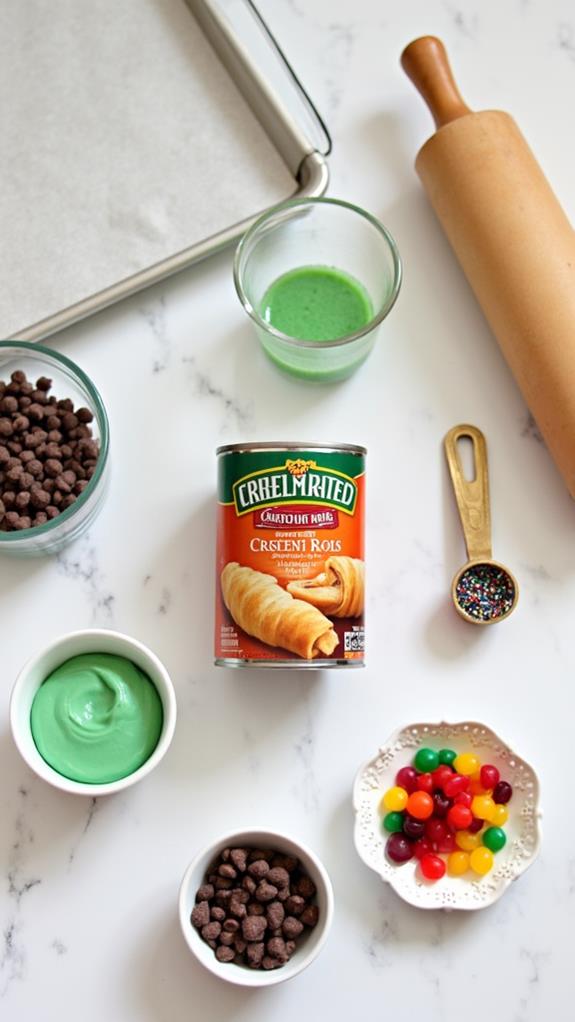
Before you start making your Crescent Roll Witch Hats, it's crucial to gather all the necessary ingredients and tools.
You'll need a can of refrigerated crescent rolls, semisweet chocolate chips, green candy melts, gummy candies or licorice, and optional edible glitter or sprinkles.
Don't forget to have a baking sheet, parchment paper, and a microwave-safe bowl on hand.
For tools, make sure you've got a rolling pin, a sharp knife, and a spatula.
You'll also need measuring cups and spoons to accurately portion your ingredients.
If you're planning to melt the candy melts, a double boiler or a microwave will be essential.
It's a good idea to have cooling racks ready for when your witch hats come out of the oven.
Once you've gathered everything, organize your workspace.
Lay out your ingredients in the order you'll use them, and place your tools within easy reach.
This preparation will make the baking process smoother and more enjoyable.
With everything in place, you're ready to start creating your spooky and delicious Crescent Roll Witch Hats.
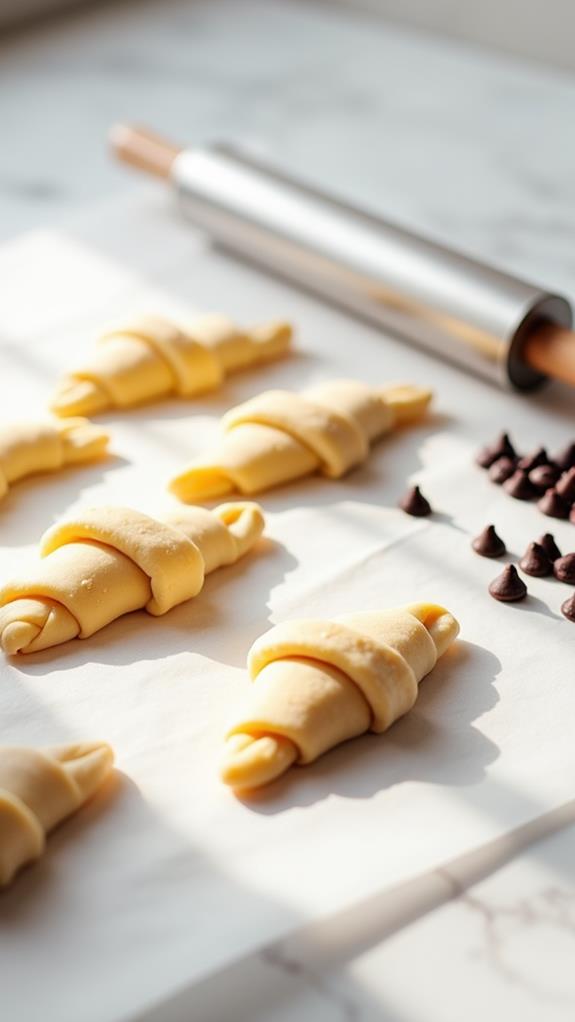
Step 2. Roll Dough Into Triangles
Now that you've gathered your ingredients and tools, it's time to start shaping the witch hats.
Begin by preheating your oven to 375°F (190°C) and lining a baking sheet with parchment paper.
Carefully unroll the can of crescent roll dough onto a clean, flat surface. You'll notice that the dough is pre-cut into triangles; if not, use a sharp knife to separate them.
Each triangle will form one witch hat, so handle them gently to avoid tearing.
If the dough feels sticky, lightly dust your work surface with flour to prevent it from adhering.
Ensure that each triangle is evenly separated and laid out flat.
At this stage, you can gently stretch the dough if needed to create more defined points, which will help form the classic witch hat shape.
Don't overwork the dough, as this can make it tough.
Once you've prepared all the triangles, you're ready to move on to the next step of adding the chocolate chips and shaping the hats.
Step 3. Add Chocolate Chips
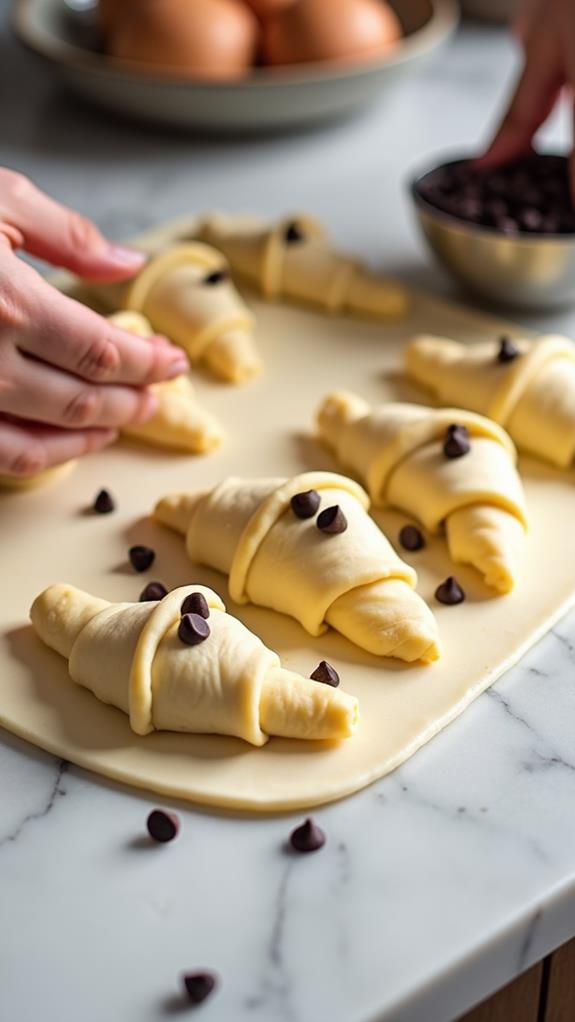
With your triangles of dough laid out, it's time to add the chocolate chips. Take a small handful of chips, roughly 1 to 2 tablespoons, and place them at the wider end of each triangle. Don't be tempted to overload the dough, as this could lead to chocolate spilling out during baking.
Spread the chips evenly across the base, leaving a small border around the edges to ensure a proper seal when you roll them up. For an extra touch of indulgence, you can mix in a few different types of chocolate chips.
Consider combining milk chocolate with dark chocolate or even white chocolate for a varied flavor profile. If you're feeling adventurous, try adding a sprinkle of sea salt over the chips to enhance the overall taste.
Step 4. Bake Until Golden Brown

Once you've rolled up your chocolate-filled dough triangles, it's time to bake them to perfection. Place your witch hat-shaped rolls on the prepared baking sheet, ensuring they're evenly spaced to allow for expansion.
Slide the sheet into your preheated oven and set a timer for 10 minutes.
Keep a close eye on your treats as they bake. You're looking for a golden-brown color and a puffed-up appearance. The exact baking time may vary depending on your oven, so start checking at the 10-minute mark. If they're not quite done, give them another minute or two, but be careful not to overbake.
When your witch hats are golden and puffed, remove them from the oven. They'll be hot, so use oven mitts and place the baking sheet on a heat-resistant surface.
Let the rolls cool for a few minutes before handling them. This cooling period is crucial as it allows the chocolate inside to set slightly, making the hats easier to decorate in the next steps.
Step 5. Decorate With Candy Melts
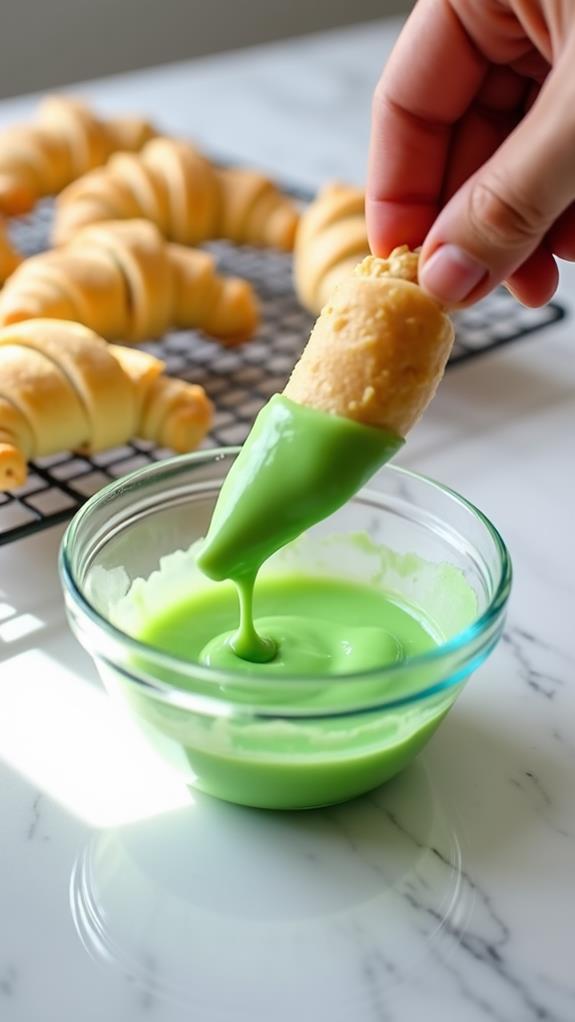
The transformation from simple crescent rolls to spooky witch hats begins with the candy melt decoration. Once your crescent rolls have cooled slightly, it's time to give them their distinctive witch hat appearance.
Start by melting the green candy melts in a microwave-safe bowl, stirring every 30 seconds until smooth. You'll want to work quickly, as the candy melts can harden if left too long.
Carefully dip the top of each crescent roll into the melted green candy, allowing any excess to drip off. You can use a spoon to help coat the rolls evenly if needed.
As you dip each hat, immediately add a gummy candy or piece of licorice around the base to create the hat's band. If you're feeling extra festive, sprinkle some edible glitter or Halloween-themed sprinkles on the green coating before it sets. This step not only adds visual appeal but also enhances the texture of your witch hats.
Work methodically, decorating one hat at a time to ensure the candy melt doesn't harden before you've added all the elements. Once you've finished, let the hats cool completely before serving.
Final Thoughts
As you've seen, Crescent Roll Witch Hats are a delightful and simple treat that'll bring a touch of Halloween magic to your table.
These whimsical snacks aren't only easy to make but also offer room for creativity in their decoration. You can experiment with different fillings, toppings, and colors to suit your taste or theme.
Remember, the key to success lies in following the basic steps carefully while allowing yourself the freedom to add personal touches. Don't be afraid to involve children in the process, as it's a great way to introduce them to baking and holiday traditions.
Keep in mind that while these treats are perfect for Halloween, you can adapt the concept for other occasions by changing the colors and decorations.
Lastly, always prioritize food safety. Ensure your ingredients are fresh, your workspace is clean, and you're following proper hygiene practices.
With these tips in mind, you're ready to create a batch of Crescent Roll Witch Hats that'll impress your guests and satisfy sweet tooths alike. Enjoy your baking adventure!