You might wonder if Crescent Mummy Dogs are truly as easy to make as people claim. While the concept seems simple, there's more to these festive treats than meets the eye. The combination of flaky crescent dough and savory hot dogs creates a texture contrast that's surprisingly complex. As you consider preparing these for your next Halloween gathering, you'll find that the real challenge lies not in the assembly, but in perfecting the balance between crispy exterior and juicy interior. The possibilities for customization are endless, and you'll soon discover why these spooky snacks have become a holiday favorite.
Key Takeaways
- Crescent Mummy Dogs are Halloween-themed snacks made with hot dogs wrapped in crescent roll dough to resemble mummies.
- They require simple ingredients: crescent roll dough, hot dogs, and optional decorations for eyes like mustard or pretzels.
- Preparation involves cutting dough into strips, wrapping hot dogs, and baking at 375°F (190°C) for about 12-15 minutes.
- These treats are easy to make, kid-friendly, and perfect for Halloween parties or game day gatherings.
- Decorating with "eyes" adds a fun touch, and they can be served with various dipping sauces for added enjoyment.
History
The origins of Crescent Mummy Dogs can be traced back to the classic American snack, pigs in a blanket. These beloved bite-sized treats have been a staple at parties and gatherings for decades, offering a perfect combination of savory sausage wrapped in flaky pastry.
As Halloween gained popularity as a festive occasion for themed foods, creative cooks began to reimagine traditional snacks with a spooky twist.
You'll find that Crescent Mummy Dogs emerged as a playful variation, incorporating the same basic concept but with a clever presentation. By using crescent roll dough instead of the typical pastry and wrapping it in a haphazard manner, these snacks took on the appearance of bandage-wrapped mummies.
The addition of eyes, often made with mustard or other condiments, completed the whimsical look. This transformation turned a simple appetizer into a conversation piece, perfect for Halloween parties or autumn-themed events.
The ease of preparation and kid-friendly appeal quickly made Crescent Mummy Dogs a hit among parents and party hosts, cementing their place in the pantheon of festive snack foods.
Recipe
Crescent Mummy Dogs are a delightful Halloween-inspired treat that combines the classic comfort of hot dogs with the fun of festive presentation. These adorable snacks are made by wrapping hot dogs in strips of crescent roll dough to create a mummy-like appearance, complete with gaps that resemble bandages. The result is a crispy, flaky exterior surrounding a juicy hot dog, making for a satisfying bite that's both visually appealing and delicious.
Perfect for Halloween parties, game day gatherings, or any occasion that calls for a playful twist on traditional finger foods, Crescent Mummy Dogs are sure to be a hit with both kids and adults alike. The beauty of this recipe lies in its simplicity and versatility, allowing for easy customization and creativity in presentation.
Whether you're looking to add a spooky touch to your snack spread or simply want to try a new take on the classic pigs in a blanket, these mummy dogs are an excellent choice.
Ingredients:
- 1 can (8 oz / 226 g) refrigerated crescent roll dough
- 8 hot dogs
- 1 large egg (optional, for egg wash)
- Mustard or small pretzel pieces for eyes (optional)
- Cooking spray or parchment paper
Preheat your oven to 375°F (190°C). Unroll the crescent dough and separate it into triangles, then cut each triangle lengthwise into thin strips. Take one hot dog at a time and wrap it with the dough strips, leaving small gaps to create a mummy-like appearance.
Place the wrapped hot dogs on a baking sheet lined with parchment paper or lightly coated with cooking spray. If desired, lightly beat the egg and brush it over the dough for a golden finish. Bake for 12-15 minutes or until the dough is golden brown and the hot dogs are heated through.
For best results, serve the Crescent Mummy Dogs warm, straight from the oven. To enhance the mummy effect, add small dots of mustard or tiny pretzel pieces for eyes after baking.
Feel free to experiment with different types of hot dogs or sausages to suit your taste preferences. If preparing for a party, you can assemble the mummy dogs ahead of time and refrigerate them until ready to bake. Serve with a variety of dipping sauces such as ketchup, mustard, or barbecue sauce to add extra flavor and fun to this already delightful snack.
Cooking Steps
To create these spooky-cute Crescent Mummy Dogs, you'll start by preheating your oven to 375°F and unrolling the crescent dough, cutting it into thin strips.
Next, you'll carefully wrap each hot dog with the dough strips, leaving small gaps to achieve the mummy effect, before placing them on a prepared baking sheet and cooking for 12-15 minutes until golden brown.
Once they're out of the oven and have cooled slightly, you can add two small dots of mustard for eyes, bringing your edible mummies to life.
Step 1. Preheat Oven to 375°F

Before you begin assembling your spooky snacks, it's crucial to preheat your oven to 375°F (190°C). This step is essential for ensuring your Crescent Mummy Dogs cook evenly and achieve that perfect golden-brown exterior.
While your oven is heating up, you'll have time to gather your ingredients and prepare your workspace. Don't skip this important step, as a properly preheated oven will help the crescent dough rise and become flaky, while also cooking the hot dogs thoroughly.
If you're using a conventional oven, allow about 10-15 minutes for it to reach the desired temperature. For convection ovens, you may need to adjust the temperature slightly lower, to about 350°F (175°C), as they tend to cook more efficiently.
Once your oven has reached the correct temperature, it'll typically signal with a beep or by turning off the preheating light. At this point, you're ready to start wrapping your hot dogs in the crescent dough strips and create your mummy-like appearance.
Step 2. Unroll and Cut Dough

The dough-handling process is a crucial step in creating your spooky Crescent Mummy Dogs.
Begin by carefully unrolling the can of crescent roll dough onto a clean, flat surface. You'll notice that the dough is perforated into triangles; gently separate these along the perforations.
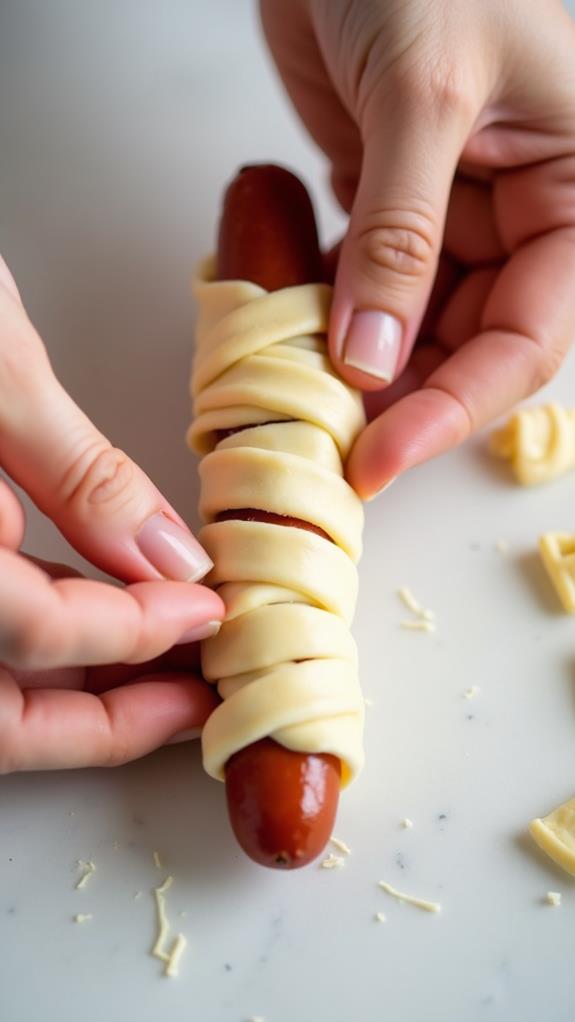
Next, take each triangle and, using a sharp knife or pizza cutter, slice it lengthwise into thin strips, about 1/4 inch wide. Don't worry if they're not perfectly even; slight variations will add to the mummy's wrapped appearance.
As you cut, keep the strips organized to prevent them from sticking together. If the dough becomes too warm and difficult to handle, place it in the refrigerator for a few minutes to firm up. Remember, you'll need enough strips to wrap each hot dog, so aim for about 4-5 strips per triangle.
Once all your dough is cut, you're ready to move on to the wrapping stage. This preparation ensures you'll have the right amount of "bandages" to create your delightfully spooky mummy dogs.
Step 3. Wrap Hot Dogs
Continue this process for all your hot dogs, placing each wrapped mummy on your prepared baking sheet.
If you're using an egg wash for a golden finish, now's the time to lightly brush it over the dough.
Remember, the key to a successful mummy dog lies in the irregularity of the wrapping, so embrace the imperfections.
Once all your hot dogs are wrapped and placed on the baking sheet, they're ready for their transformation in the oven.
This simple yet creative wrapping technique will result in a batch of delightfully spooky treats that are sure to impress your guests.
Step 4. Bake for 12-15 Minutes
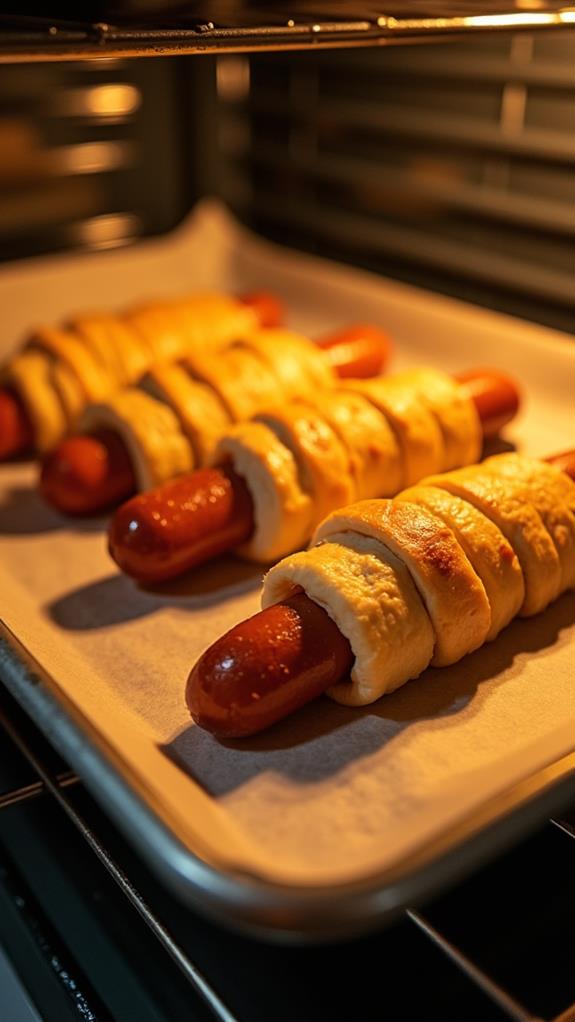
Once you've wrapped all your hot dogs and placed them on the baking sheet, it's time to bake your mummy dogs to golden perfection.
Preheat your oven to 375°F (190°C) if you haven't already done so. Slide the baking sheet into the middle rack of your oven, ensuring there's enough space for the dough to expand slightly.
Set your timer for 12 minutes initially. During this time, the crescent roll dough will begin to puff up and turn a light golden color.
At the 12-minute mark, check on your mummy dogs. If they're not quite golden enough, let them bake for an additional 1-3 minutes. Keep a close eye on them to prevent over-browning.
You'll know they're done when the dough is a rich golden color and feels firm to the touch. The hot dogs inside should be heated through as well.
Once baked, remove the sheet from the oven carefully using oven mitts. Let the mummy dogs cool for a few minutes before serving, as they'll be extremely hot straight from the oven.
Step 5. Add Eyes With Mustard

After removing your Crescent Mummy Dogs from the oven and allowing them to cool slightly, it's time to bring them to life with their signature eyes.
Grab a small bowl of yellow mustard and carefully add two small dots to each mummy dog, positioning them near the top of the wrapped hot dog. If you're using a squeeze bottle, you'll have more precise control over the size and placement of the eyes. For a fun variation, try using ketchup or mayonnaise instead of mustard to create different colored eyes.
To make the eyes even more realistic, consider using tiny pieces of black olives or poppy seeds as pupils.
Simply place these dark elements in the center of each mustard dot. If you're feeling extra creative, you can use small pretzel pieces or candy eyes for a more pronounced effect.
Final Thoughts
Throughout the process of making Crescent Mummy Dogs, you'll find that they're not just a tasty treat but also a fun activity for the whole family.
Kids will love helping wrap the "mummies" and adding the eyes, while adults can appreciate the simplicity and nostalgia of this Halloween-inspired snack.
As you serve these adorable creations, you'll notice how they become an instant conversation starter, bringing smiles to faces young and old alike.