You've probably encountered chocolate truffles at upscale gatherings or specialty chocolate shops, but you might not know their fascinating origins or why they command such reverence in the culinary world. These small spheres of pure indulgence, first crafted in France's belle époque, represent far more than just another chocolate confection. While their exterior may seem simple—often just a dusting of cocoa powder—the artistry and precision required to achieve that perfect ganache center have captivated master chocolatiers for over a century. Let's uncover what makes these luxurious treats worthy of their namesake, the rare and coveted truffle fungus.
Key Takeaways
- Chocolate truffles are luxurious confections made from chocolate ganache, cream, and butter, traditionally coated in cocoa powder.
- Created in 1895 by French chef Auguste Escoffier, they're named for their resemblance to black truffle fungus.
- The basic recipe requires dark chocolate, heavy cream, butter, vanilla extract, and cocoa powder for coating.
- Truffles require careful temperature control during preparation and should be chilled until firm before shaping.
- When properly stored in airtight containers, chocolate truffles last up to two weeks in the refrigerator.
History
According to culinary history, chocolate truffles were first created in 1895 by French pastry chef Auguste Escoffier when one of his apprentices accidentally poured hot cream into a bowl of chocolate chunks instead of into a bowl of sugared eggs.
What seemed like a costly mistake turned into a revolutionary confectionery discovery, as the resulting ganache mixture became the foundation for modern chocolate truffles.
You'll find that the name "truffle" comes from these chocolate delicacies' striking resemblance to the expensive black truffle fungus found in European forests.
The irregular, round shape and dark coating of cocoa powder mimic the appearance of their namesake.
After Escoffier's discovery, chocolate truffles quickly gained popularity throughout France and eventually spread across Europe.
By the early 1900s, you'd have found prestigious chocolatiers crafting their own versions of these luxurious treats.
Today's chocolate truffles have evolved to include countless variations, from traditional dark chocolate to more exotic flavors like lavender, sea salt caramel, and champagne.
While the basic technique remains largely unchanged, modern chocolatiers continue to innovate with unique flavor combinations and decorative finishes.
Recipe
Chocolate Truffles
Chocolate truffles are the epitome of chocolate decadence, offering a silky-smooth center enrobed in rich cocoa powder. These bite-sized confections capture the essence of luxury while requiring just a handful of quality ingredients and basic kitchen equipment.
Despite their sophisticated appearance, homemade chocolate truffles are surprisingly simple to prepare. The magic lies in the ganache center, created by combining hot cream with chopped chocolate, which transforms into a velvety mixture that can be shaped into perfect spheres once chilled.
Ingredients:
- 8 ounces (225g) dark chocolate, finely chopped
- 2/3 cup (160ml) heavy cream
- 3 tablespoons (45g) unsalted butter, room temperature
- 1 teaspoon (5ml) vanilla extract
- 1/2 cup (50g) cocoa powder for coating
Heat the heavy cream and butter in a saucepan until just simmering, then pour over the chopped chocolate in a bowl. Let stand for 5 minutes, then add vanilla extract and stir until completely smooth and glossy.
Refrigerate for 2 hours or until firm. Using a small scoop or spoon, portion the chilled mixture and roll into balls with your hands. Roll each truffle in cocoa powder until fully coated, then place in an airtight container.
For optimal results, ensure all ingredients are high-quality, especially the chocolate, which should have at least 60% cocoa content. Work quickly when rolling the truffles, as they'll soften from hand heat. If the mixture becomes too soft, return it to the refrigerator for 15 minutes.
While truffles can be stored in the refrigerator for up to two weeks, they should be served at room temperature for the best taste and texture experience.
Cooking Steps
You'll want to start by gathering all your ingredients and equipment before heating the cream and butter mixture to a gentle simmer in a saucepan.
Once you've poured the hot cream mixture over your chopped chocolate and added vanilla, let everything chill overnight in the refrigerator until it's firm enough to handle.
When the mixture is properly set, you can roll small portions into balls and dust them with cocoa powder, working quickly to prevent the chocolate from becoming too soft in your hands.
Step 1. Gather Ingredients Beforehand
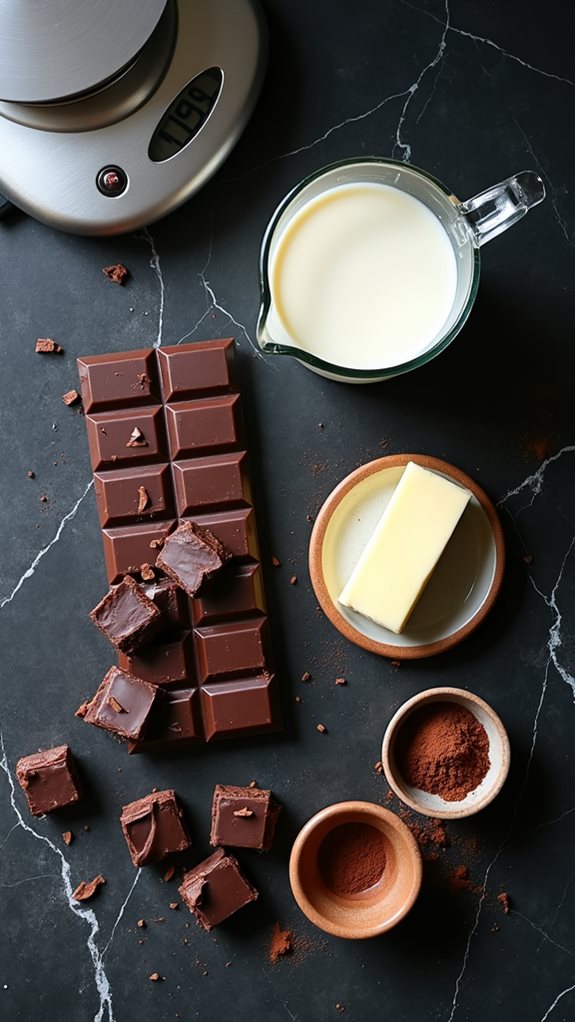
Before starting your truffle-making adventure, gathering all ingredients ensures a smooth and uninterrupted process. You'll need high-quality dark chocolate with at least 60% cocoa content, heavy cream, unsalted butter at room temperature, pure vanilla extract, and cocoa powder for coating. Make sure you've measured everything precisely: 8 ounces of chocolate, 2/3 cup of cream, 3 tablespoons of butter, and 1/2 cup of cocoa powder.
While assembling your ingredients, check that your chocolate is finely chopped to ensure even melting when combined with the heated cream. Your butter should be soft enough to incorporate smoothly but not melted.
If you're planning to add any optional flavorings like liqueurs or espresso powder, have these measured and ready as well. You'll also want to prepare your workspace by laying out the necessary equipment: a saucepan for heating the cream, a heat-safe mixing bowl for combining ingredients, measuring tools, and a baking sheet lined with parchment paper for the finished truffles.
Having everything within arm's reach will help you maintain the proper timing and temperature control that's crucial for perfect truffles.
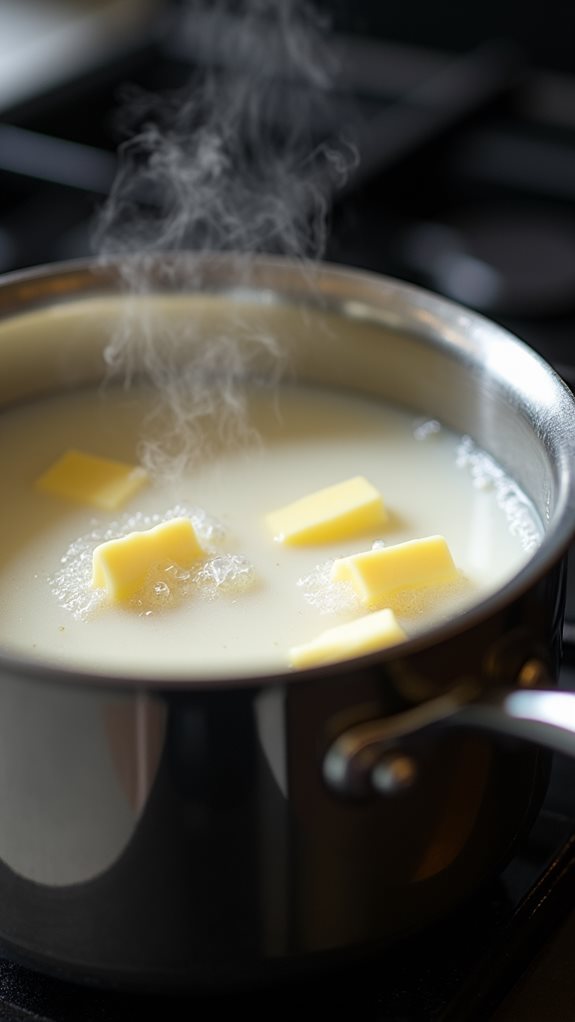
Step 2. Heat Cream and Butter
The initial step of creating truffles involves heating the cream and butter mixture with precision.
You'll want to combine the heavy cream and room temperature butter in a small saucepan, placing it over medium-low heat. Watch the mixture carefully as it warms, and don't let it come to a full boil.
As you heat the ingredients, you'll notice the butter beginning to melt and incorporate into the cream. Stir occasionally with a rubber spatula or wooden spoon to ensure even heating and prevent the cream from scorching on the bottom of the pan.
You're looking for small bubbles to form around the edges of the pan – this indicates that the mixture is approaching the proper temperature. When you see these bubbles and the mixture is steaming, but not boiling, it's ready.
You'll know you've reached the right point when the surface begins to simmer gently and the butter has completely melted into the cream, creating a uniform, silky mixture.
Remove the pan from heat immediately at this stage, as overheating can cause the cream to separate or scorch, which would affect the texture of your finished truffles.
Step 3. Combine Chocolate and Cream
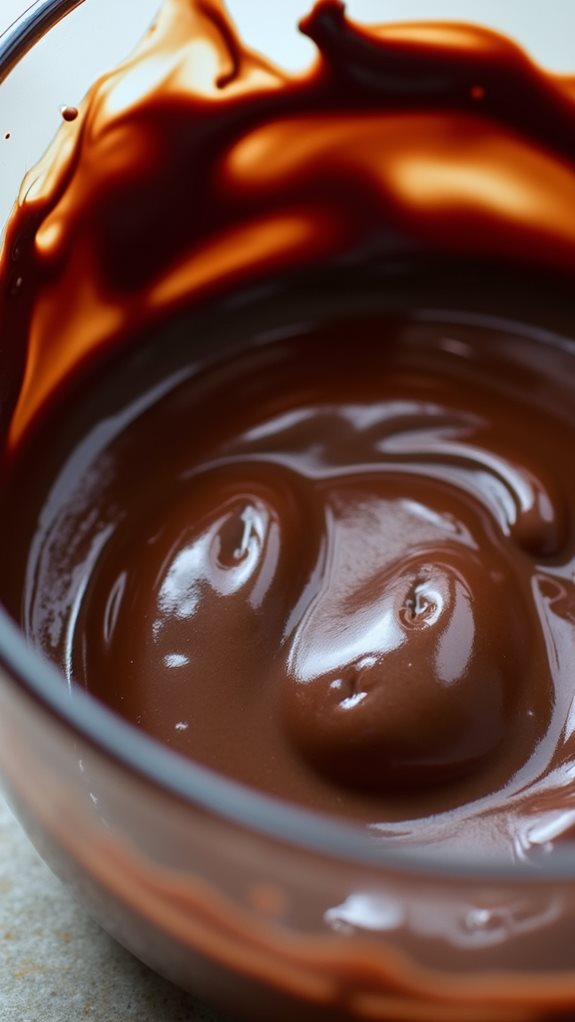
Pouring the hot cream mixture over chopped chocolate marks a crucial moment in truffle-making. You'll want to ensure your chocolate is finely chopped and placed in a heat-safe bowl before introducing the cream mixture. When you pour the hot cream over the chocolate, make sure it completely covers all the chocolate pieces for even melting.
Once you've combined the ingredients, you'll need to resist the urge to stir immediately. Let the mixture sit undisturbed for 5 minutes, allowing the hot cream to fully melt the chocolate. This waiting period is essential for achieving the smoothest possible texture.
After 5 minutes, add the vanilla extract and begin stirring slowly from the center outward, incorporating all ingredients until you've created a uniform, glossy mixture with no streaks or unmelted pieces.
If you notice any stubborn chunks of chocolate that haven't melted completely, you can place the bowl over a pan of barely simmering water for 30 seconds at a time, stirring gently until smooth. The finished mixture, known as ganache, should be silky and without any lumps before you proceed to the chilling step.
Step 4. Chill Chocolate Mixture Overnight
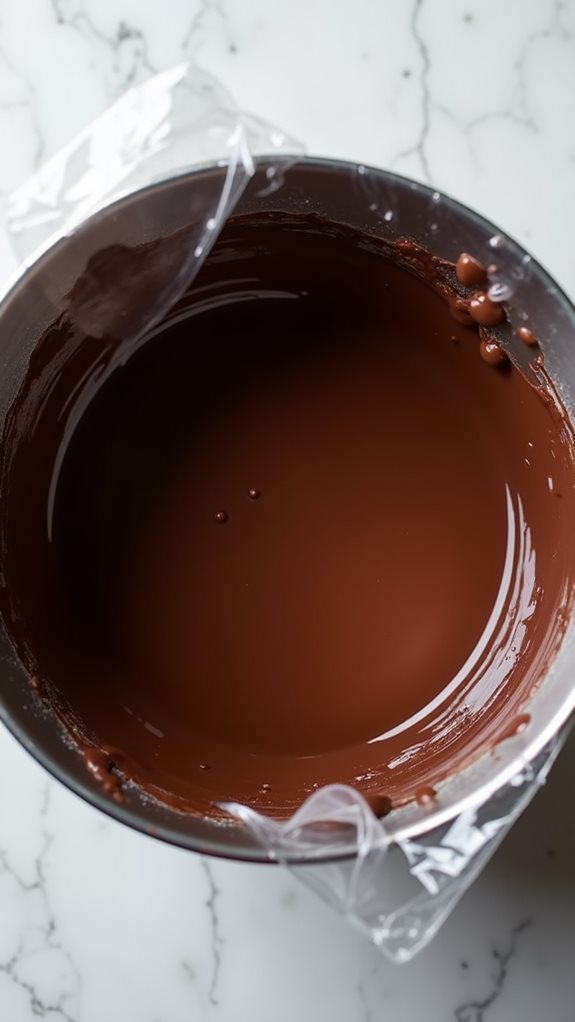
After achieving a silky smooth ganache, transfer the chocolate mixture to a shallow container or dish for optimal chilling.
Press plastic wrap directly onto the surface of the chocolate to prevent condensation and the formation of a skin, ensuring your truffles will have a perfectly smooth texture once set.
Place the covered container in your refrigerator, making sure it's sitting on a flat surface.
You'll want to let the mixture chill for at least 8 hours, though overnight chilling is ideal for achieving the perfect consistency.
During this time, the ganache will gradually firm up to a scoopable texture that's essential for forming your truffles.
You'll know the mixture has chilled properly when it's firm enough to hold its shape but still pliable enough to roll into balls.
If you're short on time, you can speed up the process by placing the mixture in the freezer for 2-3 hours, but be careful not to let it freeze completely.
The gradual cooling in the refrigerator typically yields better results, giving the chocolate crystals time to form properly and ensuring a superior texture in your finished truffles.
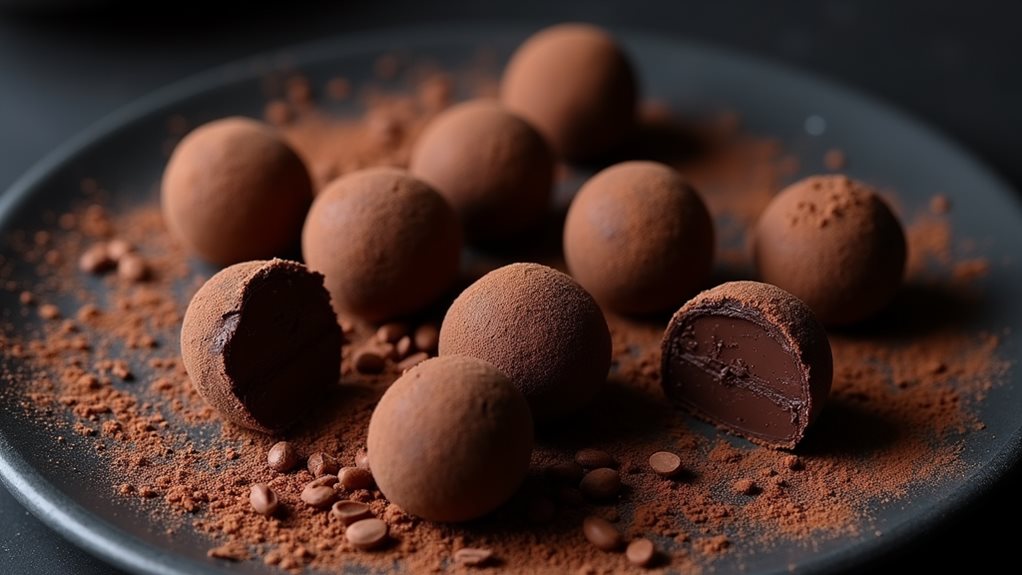
Step 5. Roll and Dust Truffles
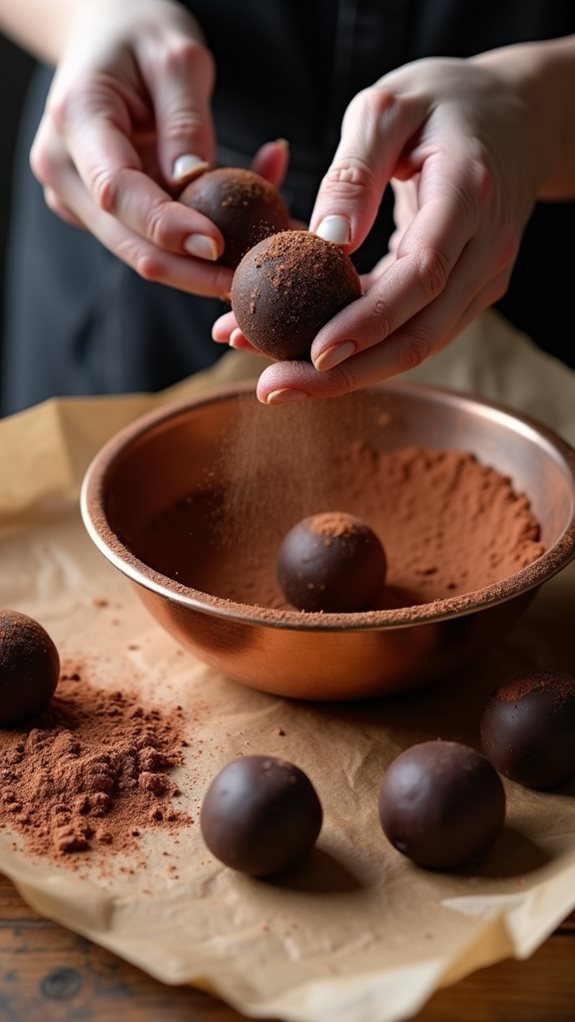
Once your ganache has fully set, remove it from the refrigerator and let it stand at room temperature for 10-15 minutes until slightly softened.
While you're waiting, sift the cocoa powder into a shallow bowl to ensure there aren't any lumps, and line a baking sheet with parchment paper.
Using a melon baller or small spoon, scoop out portions of the ganache about 1-inch in diameter. Work quickly to roll each portion between your palms to form smooth balls, and don't worry if they're not perfectly round.
If the chocolate begins to stick to your hands, dust them lightly with cocoa powder or wear food-safe gloves. Drop each truffle into the bowl of cocoa powder and gently roll it around until it's completely coated.
Place the finished truffles on your lined baking sheet, making sure they don't touch each other.
Once you've rolled and dusted all the truffles, return them to the refrigerator for 15-20 minutes to firm up. You'll know they're ready when the coating is dry to the touch and the truffles hold their shape well at room temperature.
Final Thoughts
Making chocolate truffles lets you create elegant, luxurious treats that rival any professional confection. You'll discover that with just a few quality ingredients and some patience, you can produce impressive results that will delight family and friends.
The key to success lies in using high-quality dark chocolate and following the temperature guidelines carefully throughout the process.
Remember that practice makes perfect when it comes to achieving uniform truffle shapes, and you shouldn't worry if your first batch isn't perfectly round. As you work with the chocolate mixture more frequently, you'll develop a better feel for the ideal rolling temperature and pressure.
While these homemade truffles will keep for up to two weeks when properly stored in the refrigerator, you'll want to bring them to room temperature before serving to experience their full, rich flavor profile.
Don't hesitate to experiment with different coatings beyond cocoa powder, such as chopped nuts or shredded coconut, once you've mastered the basic technique. You'll find that making chocolate truffles becomes an enjoyable cooking project that yields consistently impressive results.