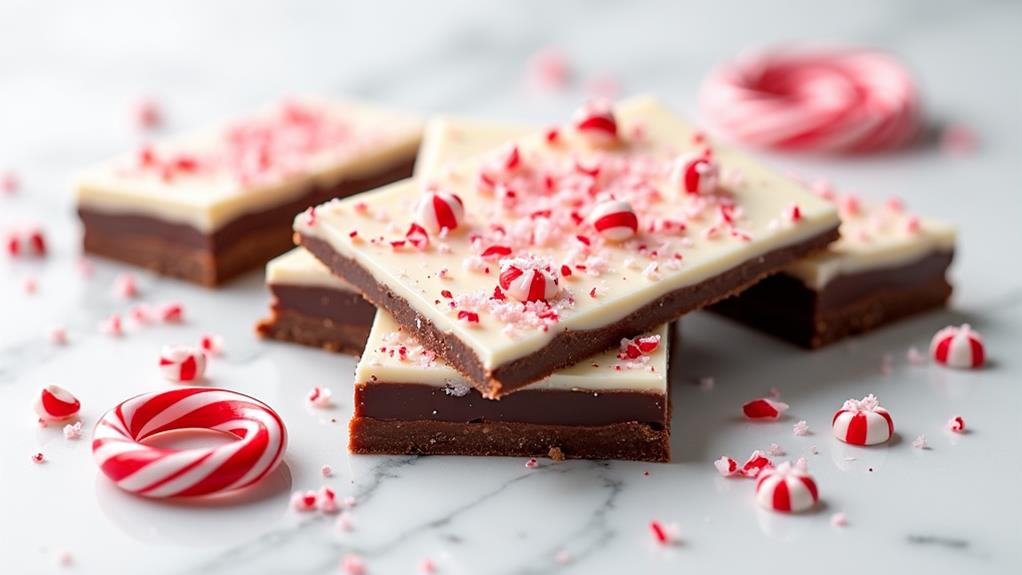
Did you know that chocolate peppermint bark's popularity as a holiday treat soared in the 1960s? This festive confection, with its layers of dark and white chocolate studded with crushed candy canes, has become a staple of winter celebrations. You'll find it's not just delicious, but also surprisingly simple to make at home. Whether you're looking for a last-minute gift idea or a crowd-pleasing dessert for your next holiday gathering, chocolate peppermint bark might just be the answer. Let's explore the history, recipe, and steps to create this beloved seasonal indulgence.
Key Takeaways
- Chocolate Peppermint Bark combines layers of dark and white chocolate with crushed candy canes for a festive holiday treat.
- Core ingredients include dark and white chocolate chips, peppermint extract, vegetable oil, and crushed candy canes.
- The preparation involves melting and layering chocolates, adding peppermint flavor, and topping with crushed candy canes.
- High-quality chocolate and proper melting techniques are crucial for achieving the best flavor and texture.
- The bark can be customized with additional ingredients and makes an excellent homemade gift during the holiday season.
History
The origins of chocolate peppermint bark can be traced back to the early 20th century. As candy-making techniques evolved, confectioners began experimenting with combining chocolate and peppermint flavors. You'll find that this delightful treat gained popularity in the United States during the 1960s and 1970s, coinciding with the rise of homemade holiday gifts.
Initially, chocolate peppermint bark was a simple creation of melted chocolate topped with crushed candy canes. Over time, creative cooks added layers of dark and white chocolate, enhancing both the flavor profile and visual appeal. The addition of peppermint extract intensified the minty taste, making it a quintessential holiday confection.
You'll notice that chocolate peppermint bark has become a staple in many households during the festive season. Its popularity has led to mass production by major confectionery companies, but homemade versions remain a cherished tradition.
The recipe's simplicity and adaptability have contributed to its enduring appeal, allowing you to customize it with different chocolates, nuts, or even dried fruits. Today, you'll find countless variations of this classic treat, each offering a unique twist on the original concept.
Recipe
Chocolate Peppermint Bark is a festive and indulgent treat that combines the rich flavors of dark and white chocolate with the refreshing taste of peppermint. This no-bake dessert is perfect for holiday gatherings, gift-giving, or simply enjoying as a special treat during the winter season.
With its striking layers of chocolate and sprinkle of crushed candy canes, this bark is as visually appealing as it's delicious. The recipe is straightforward and requires minimal ingredients, making it an ideal project for both novice and experienced cooks alike.
- 12 oz (340g) dark chocolate chips
- 12 oz (340g) white chocolate chips
- 1/2 teaspoon peppermint extract
- 1/4 cup (60ml) vegetable oil
- 1/2 cup (85g) crushed candy canes
Line a baking sheet with parchment paper. Melt the dark chocolate chips with half of the vegetable oil in a microwave-safe bowl, stirring every 30 seconds until smooth. Spread the melted dark chocolate evenly on the prepared baking sheet and refrigerate until set, about 15 minutes.
In another bowl, melt the white chocolate chips with the remaining oil and peppermint extract. Pour the white chocolate mixture over the set dark chocolate layer and quickly sprinkle the crushed candy canes on top. Refrigerate until completely set, about 1 hour. Break or cut into pieces and serve.
For best results, use high-quality chocolate chips and be careful not to overheat the chocolate when melting. If the chocolate seizes or becomes grainy, try adding a little more oil and stirring vigorously.
To achieve clean breaks when cutting the bark, allow it to come to room temperature for a few minutes after refrigeration. Store the bark in an airtight container in a cool, dry place for up to two weeks, or in the refrigerator for up to a month.
Cooking Steps
To create your Chocolate Peppermint Bark, you'll start by preparing your workspace and melting the dark chocolate.
Next, you'll spread the melted dark chocolate on a lined baking sheet and refrigerate it until set, before moving on to the white chocolate layer.
Step 1. Line Baking Sheet
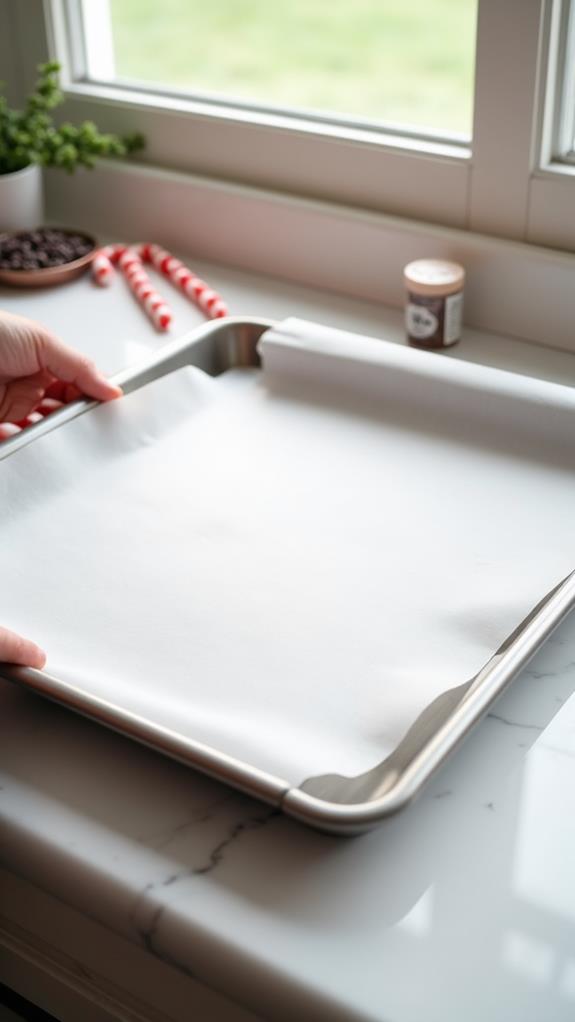
Before diving into the chocolate melting process, you'll need to prepare your work surface. Start by selecting a baking sheet that's large enough to accommodate your desired bark size.
You'll want to line this sheet with parchment paper, which serves multiple purposes in this recipe. First, it prevents the chocolate from sticking to the pan, ensuring easy removal once it's set. Second, it creates a smooth surface for spreading the chocolate, resulting in a more polished final product.
When lining your baking sheet, cut a piece of parchment paper slightly larger than the sheet itself. This extra margin will make it easier to lift the finished bark from the pan.
Smooth out any wrinkles or bubbles in the paper to create an even surface. If the paper curls at the edges, you can secure it with small dabs of cooking spray or by creasing the corners.
Once your baking sheet is properly lined, you're ready to move on to melting the chocolate. This simple preparation step is crucial for achieving professional-looking results and will make the rest of the process much smoother.
Step 2. Melt Dark Chocolate Chips
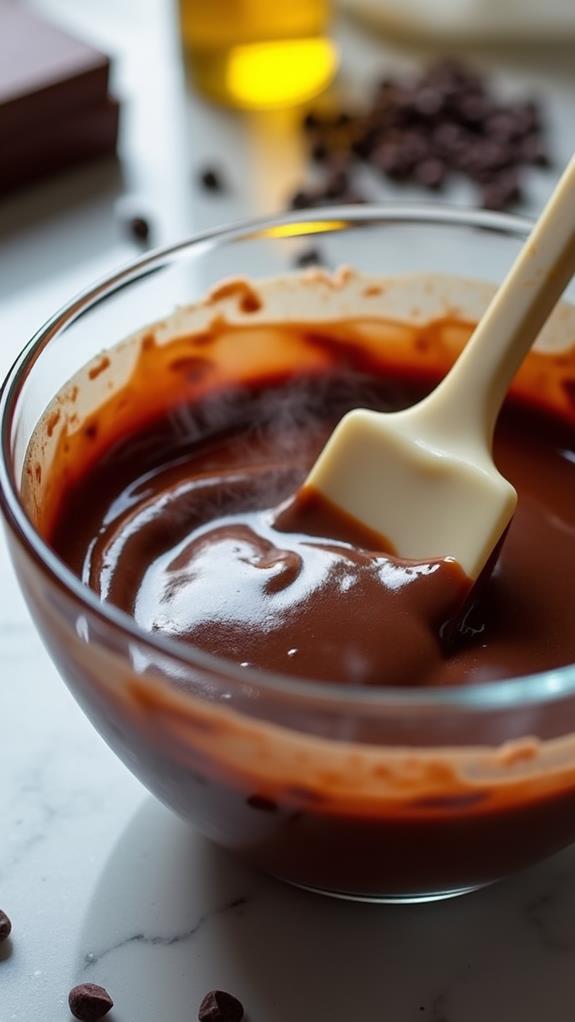
With your baking sheet prepared, it's time to focus on the star of the show: the dark chocolate.
Begin by measuring out 12 ounces (340g) of dark chocolate chips and placing them in a microwave-safe bowl. Add 2 tablespoons (30ml) of vegetable oil to the chips; this will help achieve a smooth, glossy texture.
Next, microwave the mixture in 30-second intervals, stirring thoroughly between each session. This method prevents overheating and ensures even melting. You'll notice the chips starting to lose their shape and becoming more fluid with each stir.
Continue this process until the chocolate is completely melted and silky smooth, which typically takes about 2-3 minutes total. Be careful not to overheat the chocolate, as it can easily burn or seize. If you're unsure, it's better to microwave for shorter intervals and stir more frequently.
Once your dark chocolate is perfectly melted, you're ready to create the foundation of your peppermint bark. This smooth, rich layer will provide a delicious contrast to the white chocolate and peppermint toppings that will follow.
Step 3. Refrigerate Dark Chocolate Layer
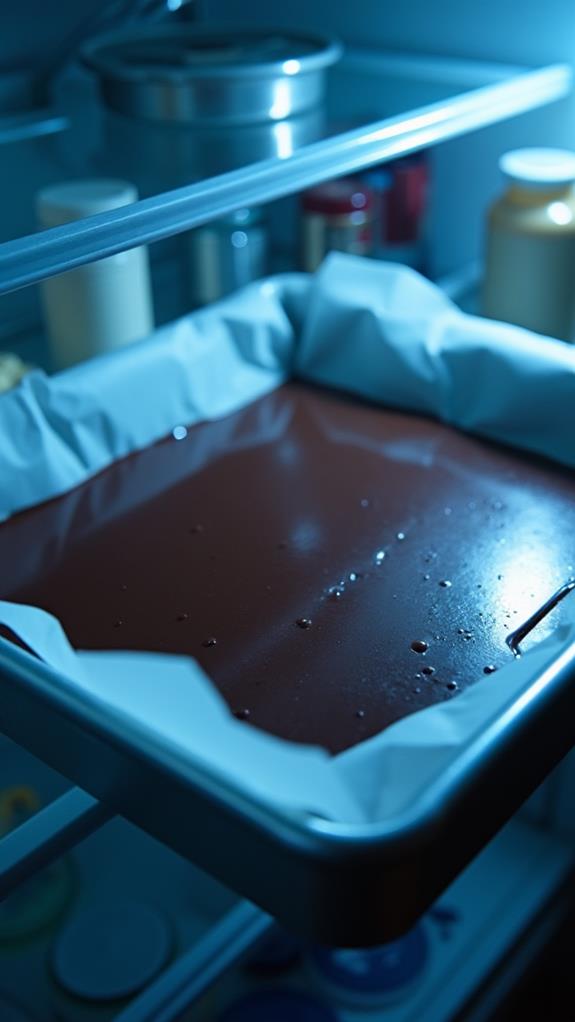
Once you've melted the dark chocolate to perfection, it's time to create the base layer of your peppermint bark. Pour the smooth, glossy chocolate onto your prepared baking sheet, ensuring it's lined with parchment paper for easy removal later.
Using a spatula or the back of a spoon, spread the chocolate evenly across the surface, aiming for a thickness of about 1/8 inch. Don't worry if it's not perfectly rectangular; the rustic edges add charm to the final product.
Now, it's crucial to let this layer set completely before moving on to the next step. Place the baking sheet with the chocolate in the refrigerator for approximately 15 minutes. During this time, the chocolate will cool and harden, providing a stable foundation for the white chocolate layer.
You'll know it's ready when the surface is no longer shiny and feels firm to the touch. Don't rush this process, as a properly set base layer is key to achieving distinct layers in your bark.
While you wait, you can begin preparing your white chocolate mixture for the next step.
Step 4. Melt White Chocolate Mixture
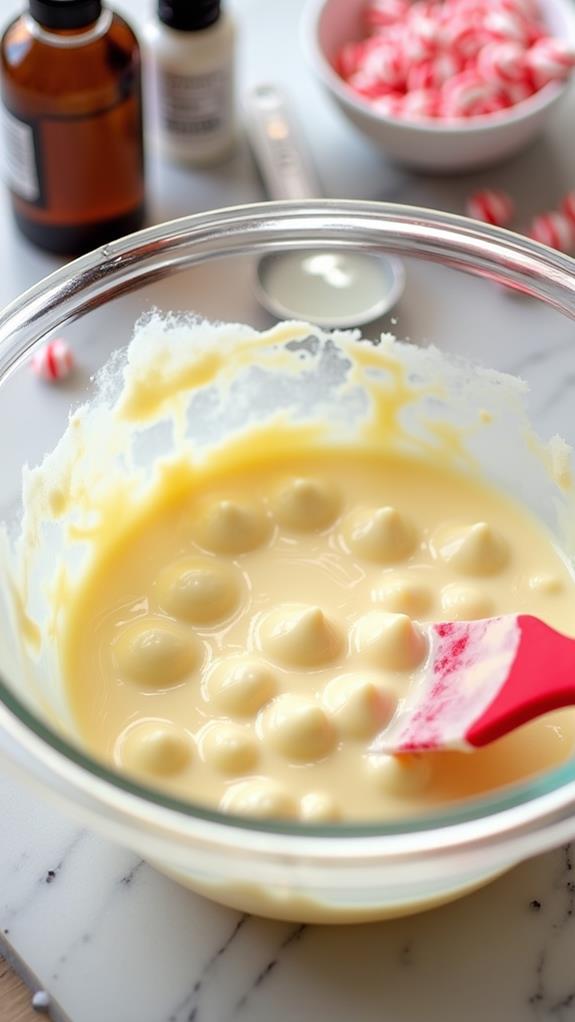
While the dark chocolate layer sets in the refrigerator, you'll want to prepare the white chocolate mixture. In a clean, microwave-safe bowl, combine the white chocolate chips with the remaining vegetable oil. It's crucial to use a dry bowl to prevent any water from causing the chocolate to seize.
Add the peppermint extract to the bowl, which will infuse the white chocolate with a refreshing minty flavor.
Place the bowl in the microwave and heat the mixture in 30-second intervals, stirring thoroughly between each round. This method ensures even melting and prevents the chocolate from burning.
You'll notice the chips beginning to soften and lose their shape as you stir. Continue this process until the white chocolate is completely smooth and free of lumps.
Be patient, as rushing this step can result in overheated, grainy chocolate. Once melted, give the mixture a final stir to incorporate the oil and peppermint extract fully. The white chocolate should now be glossy and have a pourable consistency, ready to be layered over the set dark chocolate base.
Step 5. Pour and Sprinkle Toppings
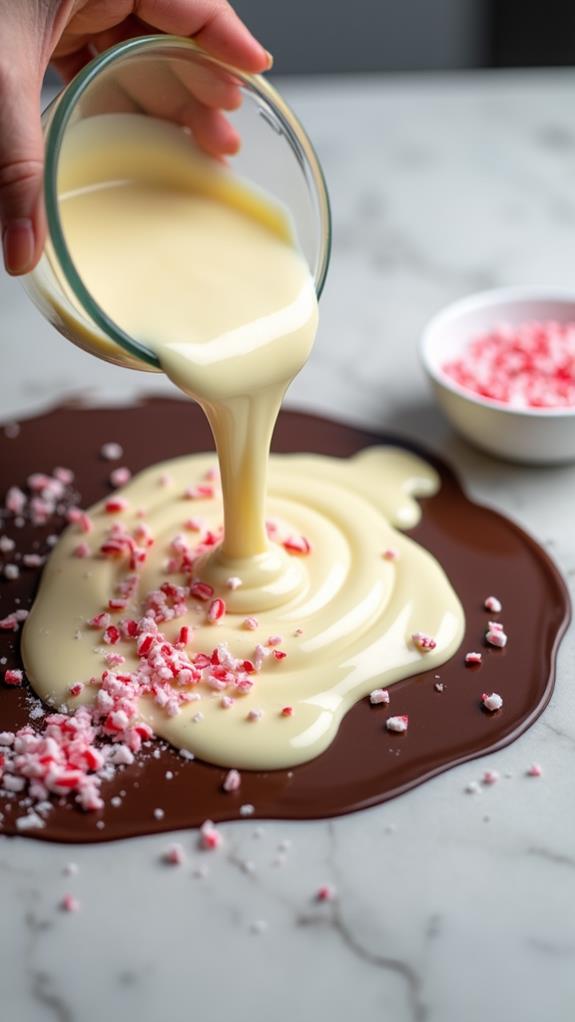
The melted white chocolate mixture is now ready for the next step in creating your Chocolate Peppermint Bark.
Take the baking sheet with the set dark chocolate layer out of the refrigerator and place it on a stable surface. Carefully pour the white chocolate mixture over the dark chocolate, ensuring an even distribution across the entire surface. Use an offset spatula or the back of a spoon to spread the white chocolate, creating a smooth, uniform layer.
Working quickly, before the white chocolate sets, sprinkle the crushed candy canes over the entire surface.
Make sure to distribute them evenly for a consistent appearance and flavor in every bite. If you'd like, gently press the candy pieces into the white chocolate to ensure they adhere well. This step not only adds a festive touch but also introduces a delightful crunch to your bark.
Once you've added the candy canes, return the baking sheet to the refrigerator. Allow the bark to set completely, which typically takes about an hour.
This final chilling ensures that both chocolate layers are firm and well-bonded, making it easier to break or cut into pieces later.
Final Thoughts
Crafting Chocolate Peppermint Bark is a delightful way to celebrate the holiday season. As you've seen, this recipe is simple yet elegant, allowing you to create a professional-looking treat with minimal effort.
Remember to use high-quality chocolate for the best results, and don't rush the cooling process. Your patience will be rewarded with perfectly set layers that snap satisfyingly when broken.
Don't be afraid to experiment with variations. You might try using different types of chocolate, such as milk chocolate instead of dark, or adding crushed nuts for extra texture. If you're not a fan of peppermint, consider other festive flavors like orange or cinnamon. This versatile recipe can be adapted to suit your taste preferences.
When gifting your Chocolate Peppermint Bark, consider packaging it in clear cellophane bags tied with colorful ribbons. It's an impressive homemade gift that's sure to delight friends and family.
With its long shelf life, you can make it well in advance of the holiday rush, ensuring you're prepared for unexpected guests or last-minute gift needs.