You'll find that chocolate mousse represents more than just a dessert—it's a testament to culinary artistry that has captivated diners for over two centuries. While its origins trace back to French kitchens of the 1800s, this airy confection has become a global symbol of sophistication and indulgence. Whether you're a seasoned chef or an ambitious home cook, understanding the nuances of creating the perfect chocolate mousse can transform your dessert repertoire. From temperature control to proper folding techniques, there's an intricate dance of methods that elevates this seemingly simple dessert into something extraordinary.
Key Takeaways
- Chocolate mousse is a classic French dessert made by folding melted chocolate with whipped cream and egg whites for an airy texture.
- The dessert requires four main ingredients: high-quality semi-sweet chocolate, eggs, heavy cream, and sugar.
- Proper technique involves gently folding ingredients to maintain airiness and chilling for at least 4 hours before serving.
- Garnish with chocolate shavings, fresh berries, or mint leaves and serve chilled in individual portions for optimal presentation.
- Store covered in the refrigerator to prevent skin formation and preserve the smooth, creamy texture.
History
The origins of chocolate mousse can be traced back to late 19th century France, where chefs first combined chocolate with whipped cream to create a light, airy dessert.
You'll find that French culinary artists perfected this technique during the 1800s, although similar desserts had existed in various forms throughout Europe.
When you look at historical cookbooks, you'll notice that chocolate mousse gained significant popularity in the United States during the 1930s, as more Americans began experimenting with French cuisine.
You'll discover that early recipes often called for raw eggs, a practice that's less common today due to food safety concerns.
During the 1960s, you'd have found chocolate mousse becoming a staple on fine dining menus across America and Europe.
In the culinary world, you'll see that chocolate mousse has evolved considerably, with chefs developing variations that incorporate different chocolates, flavorings, and stabilizers.
Today, you can find countless adaptations of the classic recipe, though the fundamental principle remains unchanged: creating an airy chocolate mixture that's both rich and delicate.
Recipe
Chocolate mousse is a luxurious French dessert that transforms simple ingredients into an airy, silky confection. The combination of rich chocolate, eggs, and cream creates a sophisticated dessert that's both elegant and deeply satisfying.
The key to perfect chocolate mousse lies in the technique of carefully melting chocolate and properly incorporating air into the mixture. While the ingredient list is relatively short, each component plays a crucial role in achieving the characteristic light, fluffy texture that makes chocolate mousse so distinctive.
Ingredients:
- 8 oz (226g) semi-sweet chocolate, finely chopped
- 4 large eggs, separated
- 2 tablespoons (30g) granulated sugar
- 1 cup (240ml) heavy cream
- 1/4 teaspoon cream of tartar
- 1/8 teaspoon salt
- 1 teaspoon vanilla extract
Melt the chocolate using a double boiler or microwave in short bursts until smooth. While chocolate cools slightly, whip heavy cream until soft peaks form and set aside.
Beat egg whites with cream of tartar and salt until foamy, gradually add sugar, and continue beating until stiff peaks form. Stir egg yolks into the cooled chocolate, then gently fold in whipped cream. Finally, fold in egg whites in three additions until just combined.
Divide into serving dishes and refrigerate for at least 4 hours or overnight.
When making chocolate mousse, temperature control is crucial – chocolate must be cooled enough not to deflate the whipped ingredients but still fluid enough to blend smoothly.
For food safety, use fresh, properly refrigerated eggs or pasteurized eggs if concerned about raw egg consumption. The mousse can be made up to 24 hours in advance and will keep its texture best if covered with plastic wrap directly touching the surface.
Cooking Steps
Begin your chocolate mousse preparation by melting high-quality chocolate over a gentle steam bath, ensuring it's smooth and glossy.
Meanwhile, separately whip both egg whites and heavy cream until they form stiff peaks.
You'll need to carefully fold the egg yolks into the melted chocolate, followed by gently incorporating first the whipped cream and then the beaten egg whites, using a figure-eight motion to maintain the mixture's airiness.
For the perfect texture and firmness, transfer your mousse into serving dishes and let it chill overnight in the refrigerator, allowing the flavors to develop fully and the structure to set properly.
Step 1. Melt Chocolate Over Steam
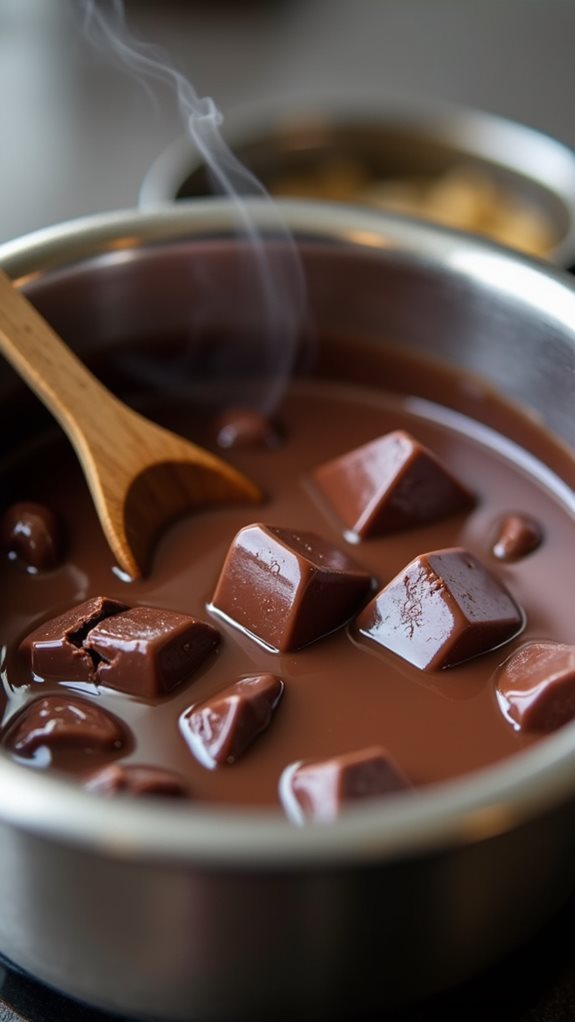
First steps of making chocolate mousse involve melting chocolate using a double boiler setup. You'll need to break your chocolate into small, uniform pieces and prepare a pot with about two inches of simmering water.
Place a heat-safe bowl on top of the pot, ensuring it doesn't touch the water, as direct contact can burn your chocolate.
Once your setup is ready, add the chocolate pieces to the bowl and let them begin to soften. You'll want to stir occasionally with a rubber spatula, making sure to scrape the sides of the bowl to prevent any chocolate from hardening.
Don't rush this process – it's crucial to maintain gentle, even heat. The steam's temperature should hover around 110-120°F (43-49°C) to ensure your chocolate melts smoothly without becoming grainy or seizing up.
If you notice the water boiling too vigorously, reduce the heat. You'll know your chocolate is properly melted when it's completely smooth and glossy, with no remaining lumps. This typically takes about 5-7 minutes, depending on your chocolate quantity and type.
Step 2. Whip Cream Until Stiff Peaks
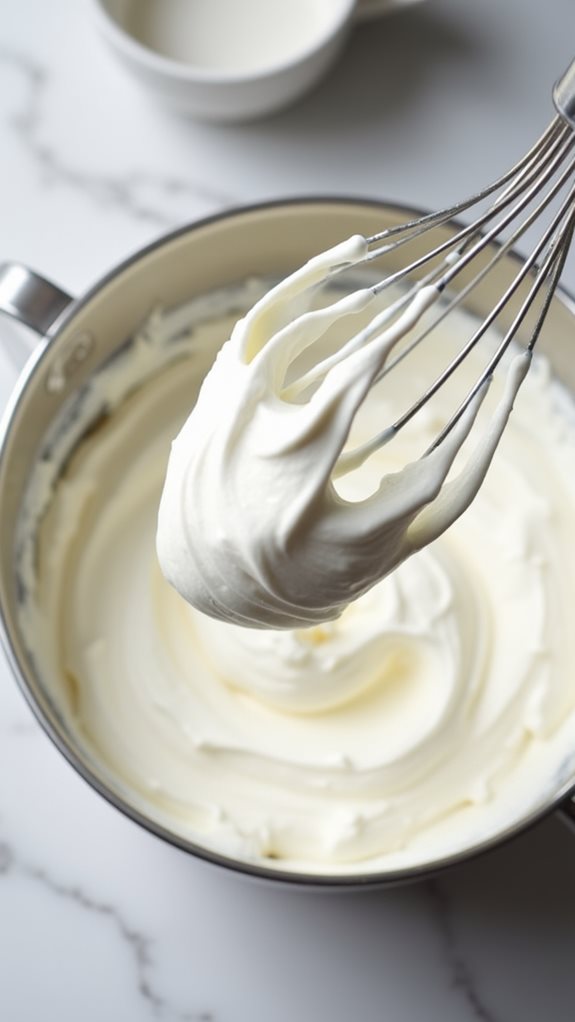
While your chocolate cools slightly, you'll need heavy whipping cream that's been thoroughly chilled – the colder the better.
Pour the cream into a large mixing bowl, making sure you've measured the exact amount specified in your recipe, as too much or too little will affect your mousse's final texture.
Using an electric mixer with whisk attachments, begin whipping the cream at medium speed. You'll notice the cream starting to thicken after about a minute, but don't stop there.
Continue whipping while gradually increasing the speed to medium-high, watching carefully as soft peaks begin to form. You're looking for stiff peaks, which means when you lift the whisk, the cream should stand up firmly with tips that hold their shape without flopping over.
Don't overwhip, though, or you'll end up with butter! If you're unsure, it's better to stop slightly early than too late – you can always whip a bit more, but you can't fix overwhipped cream.
The whole process typically takes 2-3 minutes, depending on your mixer's power and the cream's temperature.
Step 3. Fold Yolks Into Chocolate
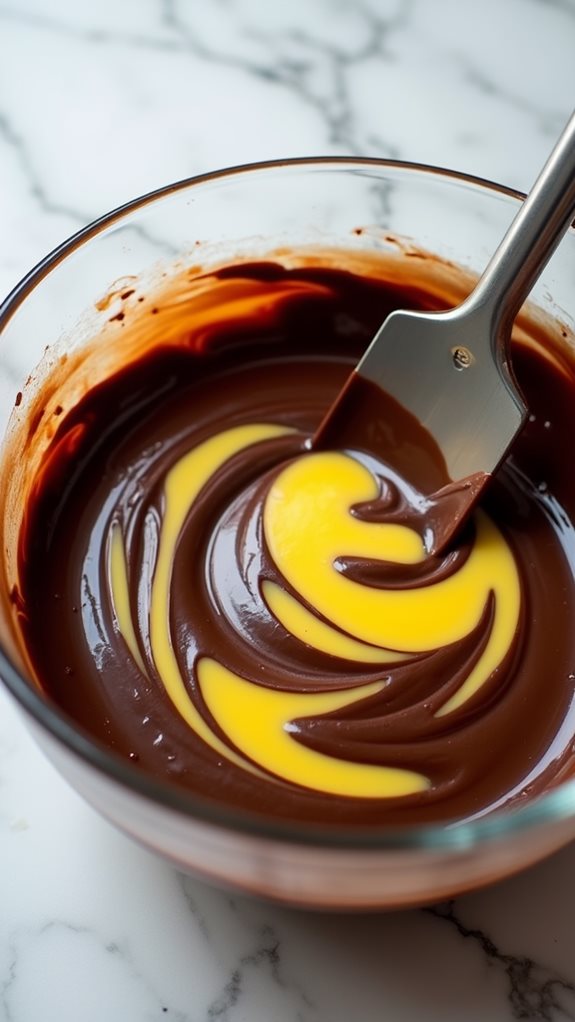
The marriage of chocolate and egg yolks marks a crucial stage in creating your mousse's rich foundation. You'll need to work quickly but carefully to ensure the chocolate mixture maintains its optimal temperature for proper incorporation.
Take your melted chocolate mixture, which should still be warm but not hot, and add a small portion of the beaten egg yolks. Using a rubber spatula, gently fold the yolks into the chocolate with a down-and-up motion, maintaining a steady rhythm as you work around the bowl.
You'll want to scrape the bottom and sides thoroughly, ensuring no streaks of yolk remain visible. Continue adding the remaining yolks in small increments, folding after each addition until you've achieved a uniform mixture.
Don't rush this process – proper incorporation prevents the chocolate from seizing or becoming grainy. If you notice the chocolate starting to stiffen, place the bowl over a warm water bath for a few seconds to maintain workability.
The final texture should be smooth and glossy, with no visible streaks of either component. This careful combination creates the backbone of your mousse's structure.
Step 4. Fold Whites Into Mixture
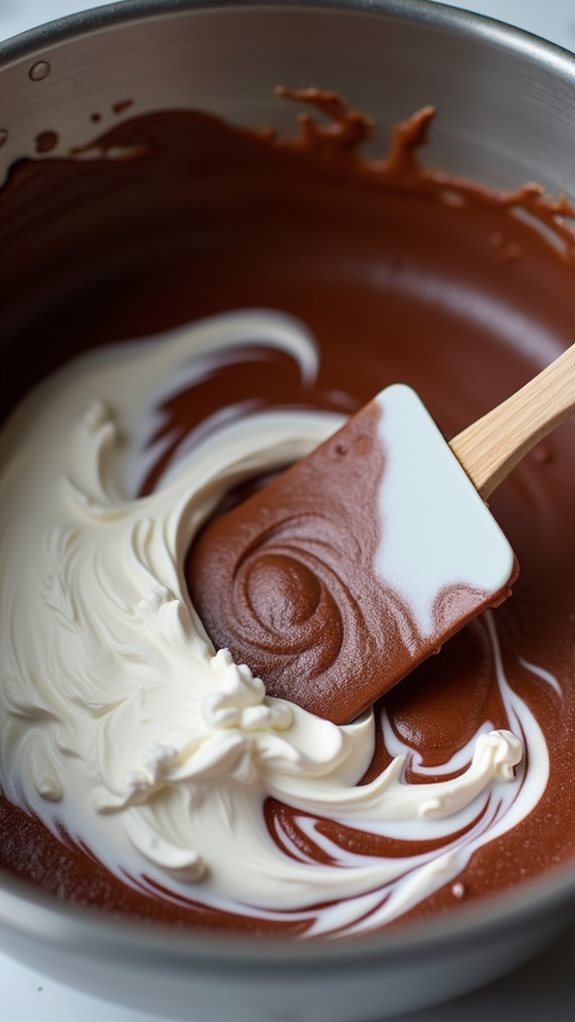
Lightness and texture come alive as you begin incorporating the whipped egg whites into your chocolate base. Using a large rubber spatula, gently add one-third of the beaten whites to your chocolate mixture, folding with smooth, deliberate strokes to lighten the base. You'll notice the color becoming slightly paler as you work.
Now, add the remaining whites in two more additions, maintaining a delicate touch as you cut through the center and fold the mixture over itself. Your spatula should move in a figure-eight pattern, rotating the bowl as you work to ensure even incorporation.
Don't rush this process – proper folding typically takes 3-4 minutes to achieve the right consistency. You'll know you're done when the mixture shows no visible white streaks and maintains a uniform chocolate color throughout.
The texture should appear light and airy, with small bubbles visible throughout. If you're seeing large air pockets, continue folding gently until they disappear. Stop folding as soon as the mixture is homogeneous – overworking will deflate your mousse and compromise its final texture.
Step 5. Chill Overnight for Firmness
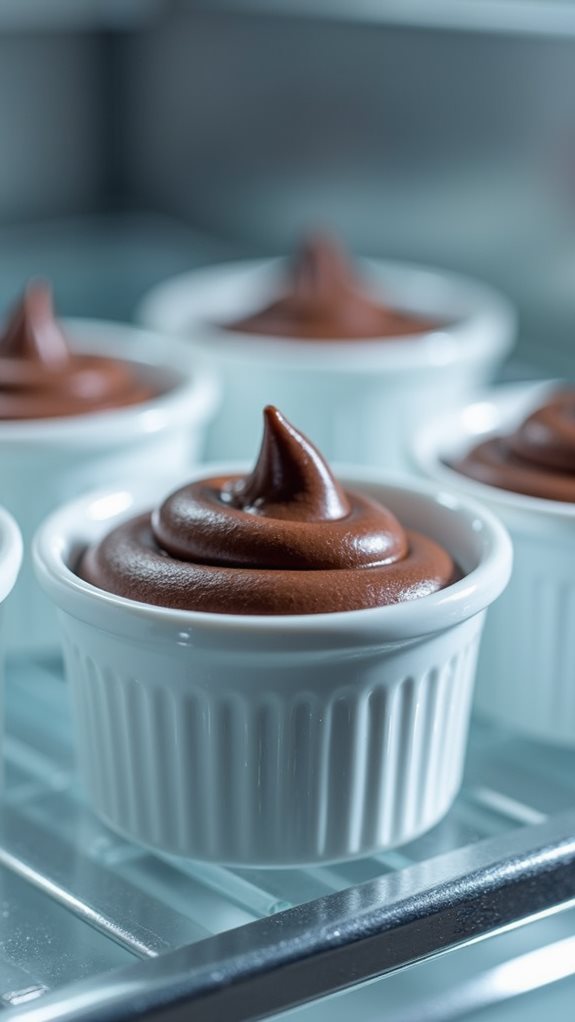
Setting up your mousse for its final transformation requires careful attention to timing and temperature. After you've transferred the mixture into individual serving dishes or a large bowl, you'll need to cover each container tightly with plastic wrap, ensuring it makes direct contact with the mousse's surface to prevent a skin from forming.
Place your covered mousse in the refrigerator where it'll need at least 8 hours to achieve the perfect consistency, though overnight chilling will yield the best results. During this time, the chocolate will continue to set while the air bubbles you've incorporated will stabilize, creating that signature light and airy texture.
You'll want to position the containers on a flat surface where they won't be disturbed, as any jostling can affect the final texture.
Before serving, remove the mousse from the refrigerator and let it sit at room temperature for 10-15 minutes. This brief warming period will enhance the chocolate's flavor and ensure the perfect spoonable consistency.
If you've added any garnishes, such as chocolate shavings or whipped cream, they should only be added just before serving.
Final Thoughts
Making chocolate mousse at home rewards you with a luxurious dessert that surpasses most store-bought versions. You'll find that mastering this classic French dessert isn't as daunting as it might seem, and the techniques you'll learn will serve you well in other culinary endeavors.
While patience and attention to detail are essential, the end result is worth every careful step. Don't be discouraged if your first attempt isn't perfect – chocolate mousse is a dessert that improves with practice.
You'll discover that the quality of your chocolate makes a significant difference, so it's worth investing in premium ingredients. Remember that you can adjust the sweetness and intensity to your taste, making each batch uniquely yours.
If you're planning to serve the mousse at a dinner party, you'll appreciate how you can prepare it a day ahead, leaving you free to focus on other dishes.
Consider garnishing your mousse with fresh berries, mint leaves, or chocolate shavings to elevate its presentation. With this recipe in your repertoire, you're well-equipped to create an impressive dessert that will delight your family and guests.