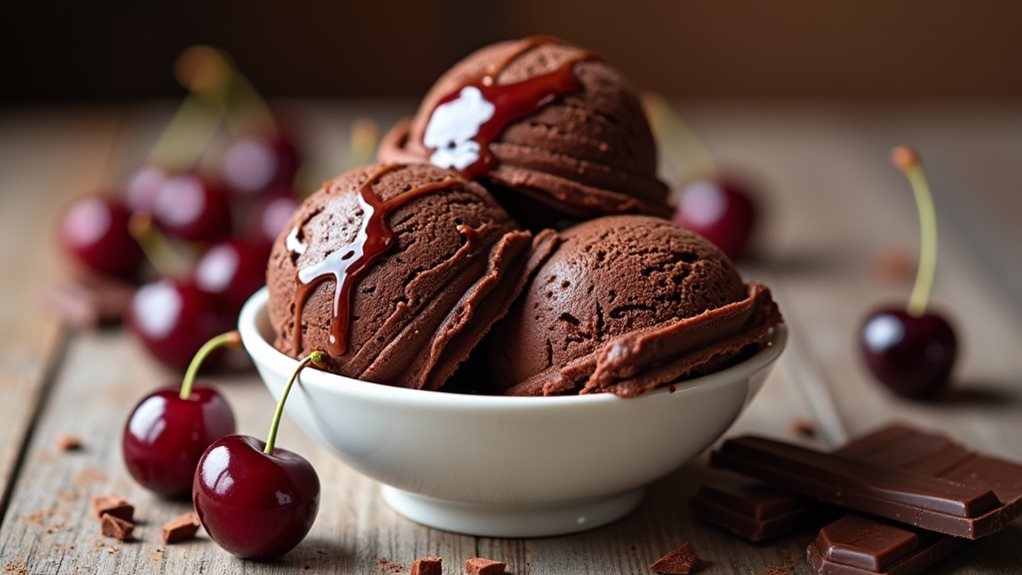
Like Willy Wonka's most enchanting creation, Brandied Cherry Chocolate Ice Cream offers you a glimpse into dessert perfection that you won't find in ordinary frozen treats. You'll discover that this European-inspired confection brings together the bold richness of dark chocolate with brandied cherries that have been lovingly soaked to release their complex flavors. While you might think such an elegant dessert requires professional equipment or advanced skills, this no-churn recipe puts luxury within your reach. Let's explore how this sophisticated combination came to grace our dessert tables and why it continues to captivate both casual and refined palates alike.
Key Takeaways
- A no-churn ice cream combining dark chocolate and brandy-soaked cherries, made with heavy cream and sweetened condensed milk.
- Soak fresh pitted cherries in brandy for 30 minutes before incorporating them into the whipped cream and chocolate mixture.
- The alcohol from brandied cherries helps maintain softness while preventing ice crystallization in the finished dessert.
- Freeze mixture for at least 6 hours or overnight, and let stand 5-10 minutes at room temperature before serving.
- Use dark chocolate with minimum 60% cocoa content and store in an airtight container for up to two weeks.
History
Many dessert historians trace brandied cherry chocolate ice cream back to European confectionery traditions of the late 1800s, when both ice cream making and alcohol-preserved fruits gained popularity among the upper class.
You'll find that Victorian-era confectioners often combined preserved fruits with cream-based desserts, creating luxurious treats that showcased their technical skills and access to exotic ingredients.
You can trace the evolution of this dessert through French and Italian gelaterias, where master ice cream makers began experimenting with liqueur-soaked fruits as both flavoring and textural elements.
By the early 1900s, you'd have found brandied cherry chocolate ice cream in upscale European hotels and restaurants, where it became a symbol of sophistication.
The combination particularly flourished in regions known for cherry production, such as France's Loire Valley and Germany's Black Forest area, where local brandies and cherries were readily available.
The dessert's popularity in America grew during the mid-20th century, when European-trained pastry chefs brought these traditions to high-end American establishments, helping to establish brandied cherry chocolate ice cream as a classic flavor combination that you'll still find celebrated today.
Recipe
Brandied Cherry Chocolate Ice Cream
This decadent no-churn ice cream combines the luxurious flavors of dark chocolate and brandy-soaked cherries for an elegant dessert that requires no special equipment. The smooth, creamy base gets its richness from heavy cream and sweetened condensed milk, while the brandied cherries provide bursts of sophisticated sweetness throughout.
The addition of brandy serves two purposes – it infuses the cherries with complex flavor and helps maintain a perfectly scoopable texture straight from the freezer. Dark chocolate adds depth and intensity to complement the fruit, creating a balanced dessert that's sophisticated enough for special occasions yet simple enough to make any time.
Ingredients:
- Heavy whipping cream – 2 cups (480ml)
- Sweetened condensed milk – 14 oz (397g)
- Dark chocolate chips – 1 cup (175g)
- Brandy – 1 cup (240ml)
- Fresh cherries, pitted – 2 cups (300g)
Whip heavy cream in a large bowl until stiff peaks form. In a separate bowl, melt chocolate chips and combine with sweetened condensed milk until smooth. Gently fold whipped cream into chocolate mixture until well incorporated.
Soak pitted cherries in brandy for 30 minutes, then drain. Fold brandied cherries into ice cream mixture, transfer to a freezer-safe container, and freeze for at least 6 hours or overnight until firm.
For optimal results, use dark chocolate with at least 60% cocoa content and allow ingredients to reach room temperature before beginning. Fresh cherries are preferred, but frozen cherries can be substituted if thawed and drained thoroughly.
Let ice cream sit at room temperature for 5-10 minutes before scooping. Store in an airtight container for up to 2 weeks in the freezer. Reserve drained brandy for other culinary uses or cocktails.
Cooking Steps
You'll start by whipping the heavy cream until stiff peaks form while simultaneously melting the chocolate chips and combining them with sweetened condensed milk in a separate bowl.
Next, you'll need to soak your cherries in brandy for 30 minutes, drain them, and gently fold them into the mixture of whipped cream and chocolate.
Finally, transfer your combined ingredients into a freezer-safe container and let it firm up for at least 6 hours or overnight, ensuring a perfectly scoopable consistency.
Step 1. Whip Cream Until Peaks Form
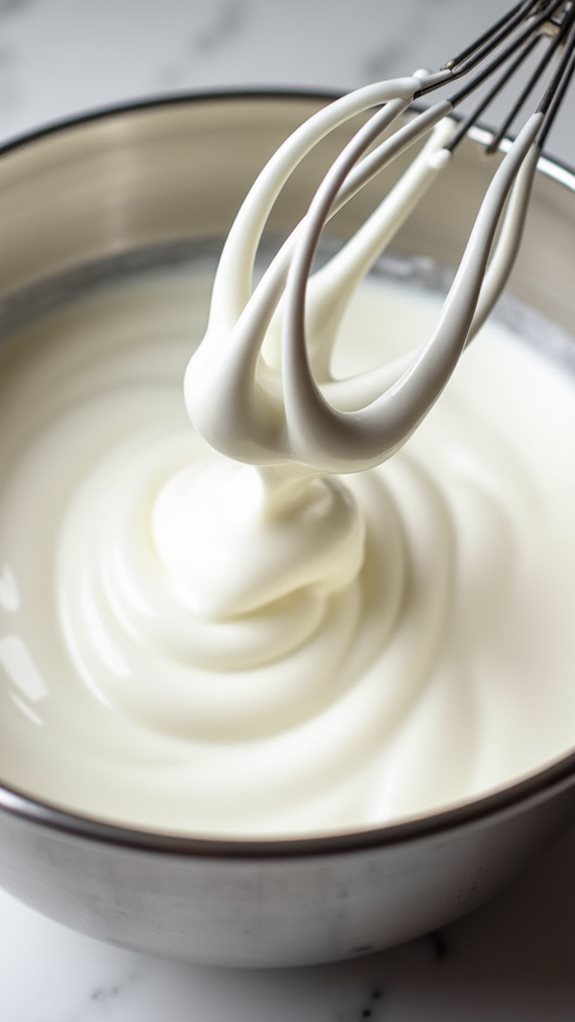
Pour the cold heavy whipping cream into a large, clean mixing bowl. You'll want to ensure both your bowl and beaters are thoroughly chilled, as this helps achieve the perfect whipped consistency.
Using an electric mixer set to medium-high speed, begin whipping the cream with steady, consistent movements.
As you whip, you'll notice the cream progressing through several stages. First, it'll become foamy, then start to thicken slightly. Continue whipping while watching carefully for the formation of soft peaks, which occurs when the cream begins to hold its shape but still folds over gently.
Don't stop here – you'll need to keep going until you achieve stiff peaks, where the cream stands firmly upright when you lift the beaters.
Be cautious not to over-whip, as this can quickly turn your cream into butter. You'll know you've reached the right consistency when the peaks are firm and glossy, holding their shape completely.
This process typically takes 3-4 minutes with an electric mixer, though timing can vary based on your cream's temperature and fat content. The whipped cream should now be ready to fold into your chocolate mixture.
Step 2. Combine Milk and Chocolate
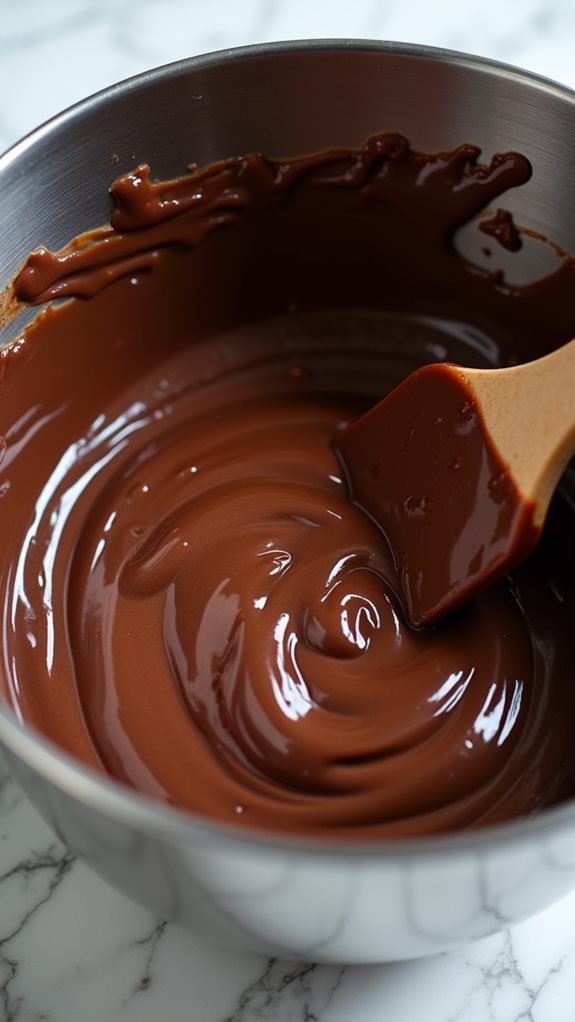
Precision matters when combining the sweetened condensed milk and chocolate to create a silky base for your ice cream.
You'll want to melt your dark chocolate chips first, either using a double boiler or microwaving in 30-second intervals, stirring between each interval until the chocolate is completely smooth. Once melted, let it cool for 2-3 minutes to prevent the sweetened condensed milk from curdling.
In a medium bowl, pour your sweetened condensed milk, ensuring you scrape every bit from the can, as this ingredient provides crucial sweetness and texture.
Add your melted chocolate to the condensed milk, and using a rubber spatula, fold them together with steady, deliberate strokes. You'll notice the mixture becoming uniformly brown and taking on a glossy appearance.
Don't rush this step – thorough incorporation ensures even chocolate distribution throughout your finished ice cream. If you see any chocolate streaks remaining, continue folding until the mixture is completely homogeneous.
The resulting base should be thick, smooth, and free of any lumps, ready to be combined with your whipped cream in the next step.
Step 3. Soak Cherries in Brandy
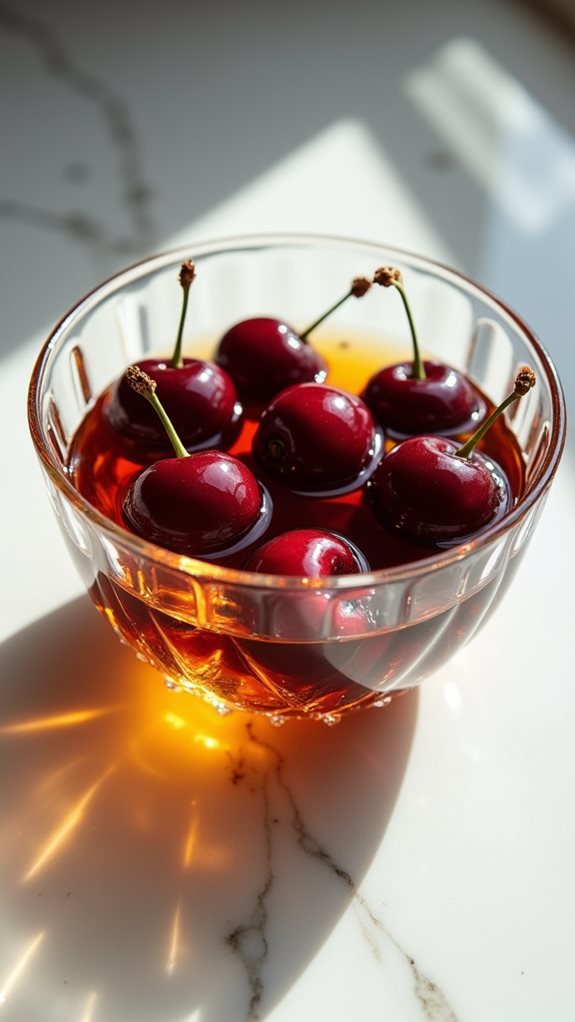
While your chocolate base chills slightly, begin preparing the cherries for their brandy bath. Place your pitted cherries in a medium-sized bowl, ensuring they're clean and free from stems. Pour the brandy over the cherries until they're completely submerged, and let them soak for exactly 30 minutes – this timing is crucial for optimal flavor absorption without making the cherries too boozy.
During the soaking process, you'll notice the cherries gradually darkening as they take on the brandy's rich amber hue. After 30 minutes, drain the cherries through a fine-mesh strainer, but don't discard the brandy – it's now infused with cherry flavor and can be used in cocktails or other desserts.
Gently pat the cherries with paper towels to remove excess moisture, as too much liquid can affect your ice cream's texture. You'll know they're ready when they're still plump but not dripping wet. The cherries should have a subtle sheen and maintain their shape while carrying the distinct aroma of brandy. This process ensures they'll provide bursts of sophisticated flavor throughout your finished ice cream.
Step 4. Fold Ingredients Together Smoothly
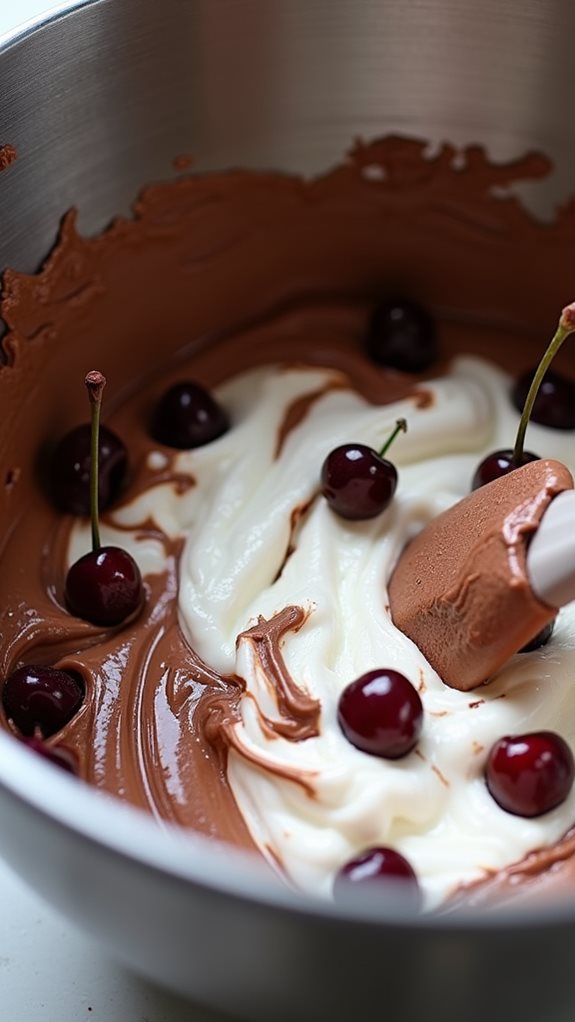
The gentle folding technique makes all the difference in achieving the perfect ice cream texture.
You'll want to start by transferring your whipped cream into the chocolate-condensed milk mixture using a large rubber spatula. Cut through the center of the mixture, then scrape along the bottom of the bowl and fold the ingredients over themselves. Rotate the bowl a quarter turn and repeat this motion until you've achieved a uniform color with no white streaks.
When incorporating the brandied cherries, you'll need to maintain the same careful approach. Scatter the drained cherries across the surface of your chocolate base, then use your spatula to fold them in with the same gentle motion.
Don't stir or mix aggressively, as this will deflate the air bubbles you've carefully incorporated into the whipped cream. Instead, continue folding until the cherries are evenly distributed throughout the mixture.
You'll know you've achieved the right consistency when the cherries are suspended throughout the base rather than sinking to the bottom, and the mixture maintains its light, mousse-like texture.
Step 5. Freeze Mixture Until Firm
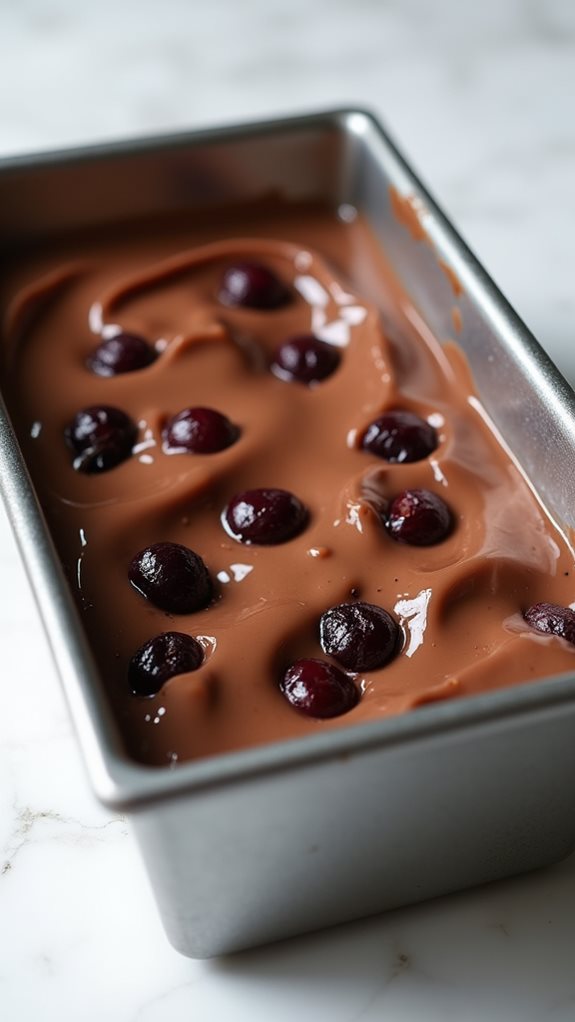
Once you've properly folded all ingredients together, transfer your ice cream mixture into a freezer-safe container that allows for at least an inch of headspace.
Smooth the top with a spatula to create an even surface, which will help prevent ice crystals from forming during the freezing process. Cover the container tightly with a lid or plastic wrap pressed directly against the surface of the mixture.
Place the container in the back of your freezer where the temperature remains most consistent, and let it freeze for at least 6 hours or overnight until firm.
During this time, the alcohol from the brandied cherries will help maintain a softer consistency, while the fat content from the heavy cream and chocolate creates a rich, smooth texture.
If you notice any ice crystals forming on the surface, don't worry – this won't affect the overall quality of your ice cream.
When you're ready to serve, remove the container from the freezer and let it sit at room temperature for 5-10 minutes to achieve the perfect scooping consistency.
The ice cream will maintain its quality for up to two weeks when stored properly in an airtight container.
Final Thoughts
Making brandied cherry chocolate ice cream delivers a luxurious homemade dessert that rivals any premium store-bought variety.
You'll find that the combination of dark chocolate and brandy-soaked cherries creates a sophisticated flavor profile that's both rich and complex, while the no-churn method ensures a consistently smooth texture without special equipment.
For the best results, don't rush the process of soaking your cherries in brandy, as this step infuses them with essential flavor and helps prevent ice crystallization.
You'll want to ensure your heavy cream is thoroughly whipped to stiff peaks, as this provides the essential air incorporation that makes your ice cream light and creamy.
When folding in your ingredients, use gentle motions to maintain the whipped cream's structure.
Remember that while this ice cream will keep for up to two weeks, its peak flavor and texture occur within the first week.
You can experiment with different dark chocolate percentages to find your preferred balance of sweetness and intensity, though staying above 60% cocoa content will guarantee the most luxurious results.
Store your ice cream in an airtight container to prevent freezer burn and maintain its optimal texture.