You're about to discover how a simple combination of chocolates can transform into an impressive Easter treat that'll have everyone asking for your secret. While traditional chocolate bark has graced European candy shops for generations, this festive variation adds a modern twist with its pastel colors and playful toppings. As you consider making this no-bake confection, you'll find it's more than just melted chocolate—it's a canvas for creativity that can elevate your holiday celebrations. The best part? You won't need any special equipment or culinary expertise to master this crowd-pleasing dessert.
Key Takeaways
- Easter Chocolate Bark is a no-bake dessert combining melted chocolate with festive toppings like mini eggs, sprinkles, and crushed cookies.
- The treat requires minimal skills and takes under an hour to prepare, excluding setting time in the refrigerator.
- Properly melted chocolate should be heated in 30-second intervals at 50% power, stirring between each until smooth and silky.
- Decorative elements must be added while chocolate is still wet, and the bark needs overnight refrigeration for proper setting.
- Store finished bark in an airtight container for up to two weeks at room temperature or one month refrigerated.
History
Traditionally, chocolate bark dates back to European confectionery practices, though Easter-themed variations didn't emerge until the mid-20th century.
You'll find that early chocolate makers would spread melted chocolate on marble slabs, allowing it to cool before breaking it into irregular pieces. This technique gained popularity among home confectioners who appreciated its simplicity and versatility.
When you look at Easter chocolate bark specifically, you'll discover it emerged as families sought creative ways to celebrate the holiday with homemade treats.
In the 1950s and 1960s, as chocolate became more accessible to home cooks, you'd see magazines and cookbooks featuring recipes for decorated chocolate bark with pastel colors and spring-themed additions.
The advent of candy melts and decorative sprinkles in the 1970s made it even easier for you to create festive designs.
Today, you're part of a growing trend where Easter chocolate bark has evolved to include everything from mini eggs and jellybeans to crushed cookies and dried fruits, reflecting both traditional Easter imagery and modern candy innovations.
Recipe
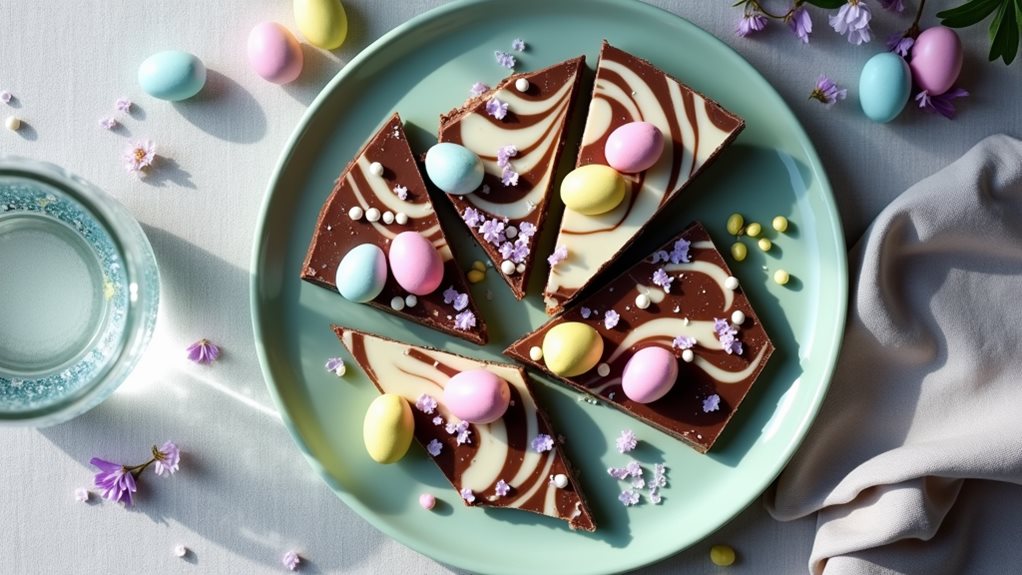
Easter Chocolate Bark is a festive and customizable treat that combines the rich, smooth texture of melted chocolate with colorful Easter-themed toppings. This no-bake dessert creates a visually stunning presentation that's perfect for holiday gatherings, gift-giving, or simply enjoying as a special springtime treat.
Making chocolate bark requires minimal cooking skills and can be completed in under an hour, not counting setting time. The magic lies in selecting high-quality chocolate as your base and combining various toppings that add both visual appeal and complementary flavors. This recipe uses a combination of dark and white chocolate for maximum visual impact.
Ingredients:
- 16 oz (450g) dark chocolate, chopped
- 8 oz (225g) white chocolate, chopped
- 1 cup (150g) mini candy-coated eggs
- ½ cup (60g) pastel sprinkles
- ½ cup (50g) crushed Easter cookies
- ¼ cup (30g) dried edible flower petals (optional)
- ¼ teaspoon sea salt
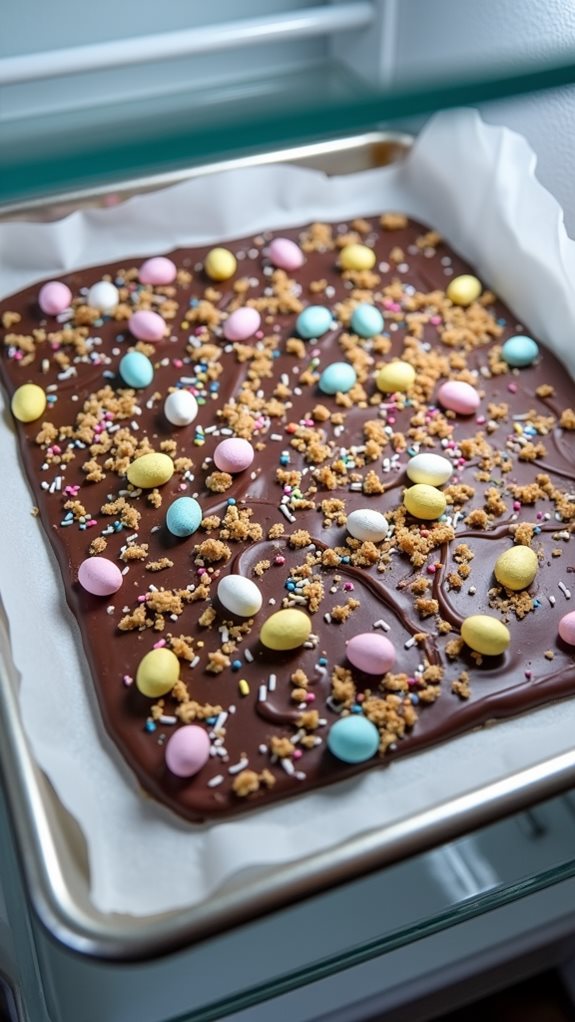
Line a large baking sheet with parchment paper. Melt the dark chocolate using a double boiler or microwave in 30-second intervals, stirring between each interval until smooth. Pour onto the prepared baking sheet and spread into a rectangle about ¼-inch thick.
Melt the white chocolate using the same method, then drizzle over the dark chocolate. Use a toothpick or skewer to create swirls. While the chocolate is still wet, sprinkle the toppings evenly across the surface. Allow to set completely at room temperature (approximately 2 hours) or in the refrigerator (about 30 minutes). Once set, break or cut into irregular pieces.
For best results, use high-quality chocolate with at least 60% cocoa content for the dark chocolate base. Avoid overheating the chocolate, as this can cause it to seize or become grainy. If adding any moisture-containing toppings, ensure they're completely dry to prevent the chocolate from seizing.
Store the finished bark in an airtight container at room temperature for up to two weeks, or in the refrigerator for up to one month.
Cooking Steps
You'll begin by melting your chocolate in the microwave using 30-second intervals, stirring between each until smooth and completely melted.
Once melted, spread the chocolate evenly on a parchment-lined baking sheet, then immediately decorate with your choice of colorful Easter candies, sprinkles, or themed decorations.
After adding all your toppings, place the bark in the refrigerator overnight until fully set, at which point you can break it into festive, irregular pieces for serving.
Step 1. Melting Chocolate in Microwave
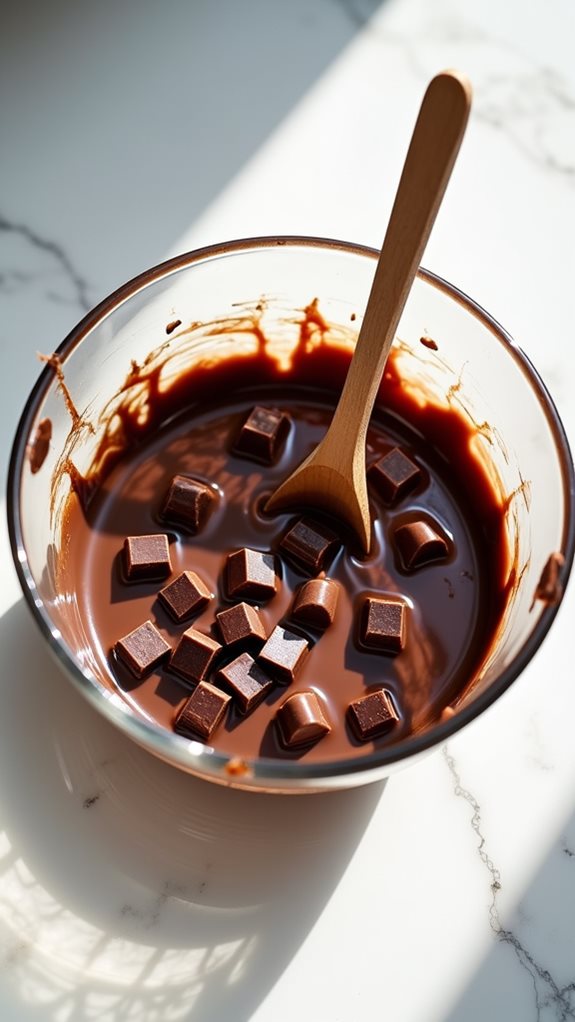
Breaking down chocolate into small, uniform pieces is crucial before starting the melting process. You'll want to chop your chocolate bars into pieces no larger than a quarter, ensuring they'll melt evenly and prevent scorching.
Place your chopped chocolate in a microwave-safe bowl that's completely dry, as any water droplets can cause your chocolate to seize.
You'll need to microwave the chocolate in 30-second intervals at 50% power, stirring thoroughly between each interval. Don't rush this process – patience is key to achieving smooth, glossy results. When you're stirring, make sure you're scraping the sides and bottom of the bowl where chocolate tends to stick.
You'll know your chocolate is properly melted when it's completely smooth and has a silky consistency. If you notice any small lumps, continue microwaving in 10-second bursts, stirring after each interval.
The entire process typically takes 2-3 minutes, depending on your chocolate quantity. Remember, it's better to slightly undermelt than to overheat, as you can always continue warming, but burnt chocolate can't be saved.
Step 2. Spreading Melted Chocolate Evenly
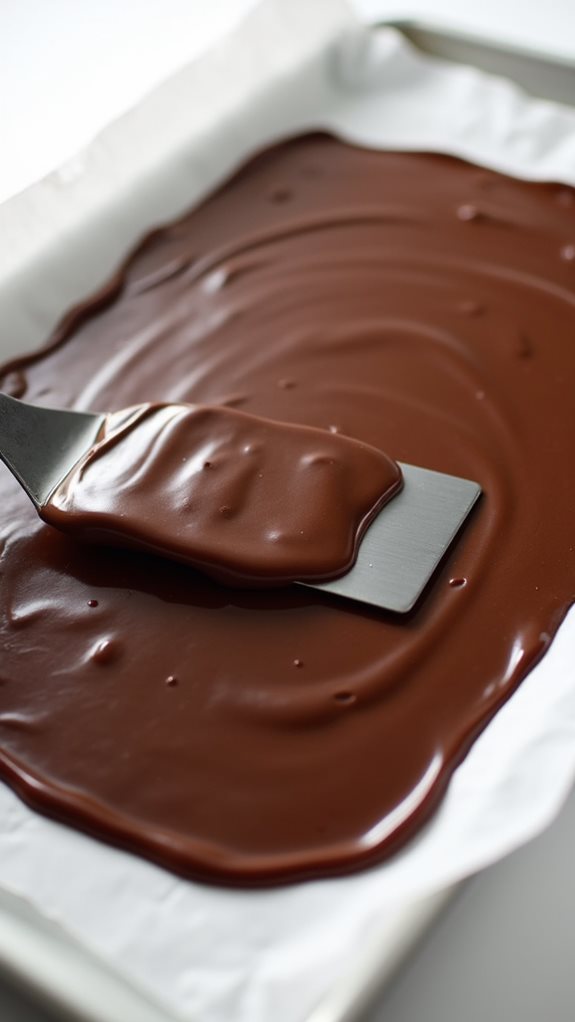
The chocolate's smooth, glossy perfection now needs careful spreading to create your bark's signature appearance. You'll want to pour the melted chocolate onto a parchment-lined baking sheet, ensuring you're working quickly while it's still fluid and manageable.
Using an offset spatula, spread the chocolate from the center outward in smooth, even strokes until you've achieved a thickness of approximately 1/4 inch. As you're spreading, tilt the baking sheet slightly in different directions to help the chocolate reach the corners and create an even layer.
Don't worry if the shape isn't perfectly rectangular or square – chocolate bark's rustic appearance is part of its charm. If you notice any air bubbles forming, gently tap the baking sheet against your work surface a few times to release them.
For the smoothest finish, make your final spreading strokes in the same direction, creating subtle lines that'll give your bark a professional appearance. The edges should be slightly thinner than the center, which will make breaking the bark easier once it's set.
Step 3. Adding Colorful Candy Decorations

Ready to transform your chocolate bark into an eye-catching treat? While your melted chocolate is still wet, you'll want to work quickly to add your decorative Easter candy elements.
Start by sprinkling pastel-colored M&Ms, mini chocolate eggs, and crushed Easter-themed candies across the surface, gently pressing them into the chocolate to ensure they'll stick once it sets.
For a more sophisticated design, create deliberate patterns with your candy decorations. You can arrange jelly beans in neat rows, form flower shapes with pastel chocolate chips, or scatter sprinkles in strategic clusters.
Don't forget to incorporate seasonal elements like candy-coated mini eggs or Easter-themed sugar decorations. If you're using multiple types of candies, try to maintain an even distribution across the bark's surface to ensure every piece will have a good mix of decorative elements.
Remember that you can also add a final touch by drizzling contrasting colored chocolate over the top of your decorations. Work systematically from one edge to the other to avoid missing spots or creating overcrowded areas that might make cutting difficult later.
Step 4. Cooling in Refrigerator Overnight
Once you've finished adding all your decorative elements, carefully transfer your baking sheet to the refrigerator for overnight cooling.
Make sure the surface is completely level to prevent your chocolate bark from settling unevenly, and clear enough space so the tray won't be disturbed by other items. You'll want to maintain a temperature between 35-40°F (2-4°C) for optimal results.
During the cooling process, your chocolate will undergo proper crystallization, which is essential for achieving that satisfying snap when you break the bark into pieces.
Don't be tempted to speed up the process by placing it in the freezer, as this can cause condensation and affect the chocolate's texture and appearance. If you've used multiple layers of chocolate, this overnight cooling period ensures they've properly bonded together.
You'll know your bark is ready when it's completely firm and has a uniform matte finish across the surface.
If you touch it gently, there shouldn't be any give or tackiness. The overnight cooling also allows the decorative candies to fully set into the chocolate, ensuring they won't fall off when you break the bark apart.
Step 5. Breaking Into Festive Pieces
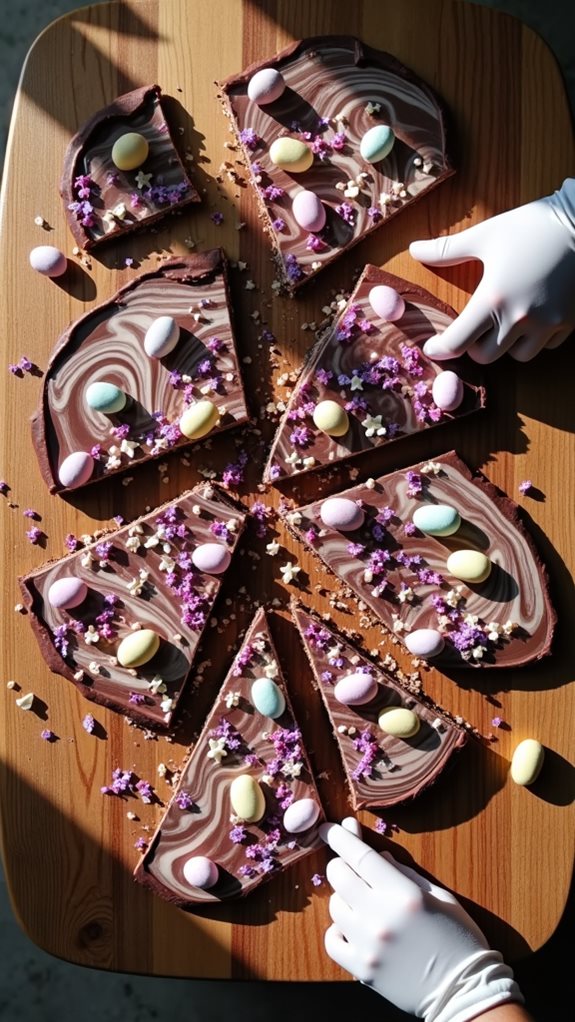
After proper overnight cooling, breaking your Easter chocolate bark requires a delicate touch and careful planning.
You'll want to start by removing the bark from the refrigerator and letting it rest at room temperature for about 5 minutes, which prevents the chocolate from shattering too unpredictably.
Begin breaking the bark by identifying natural breaking points where your toppings create natural divisions. Using a sharp chef's knife, score light lines across these points to guide your breaks.
When you're ready to separate the pieces, place the blade's tip at one end of your scored line and apply gentle, steady pressure until you hear a satisfying snap. For more irregular pieces that capture the rustic charm of homemade bark, you can carefully drop the sheet from a few inches above your counter, allowing it to break naturally.
Create pieces that range from 2 to 4 inches in size, which are ideal for serving and sharing. As you work, handle the bark by its edges to avoid leaving fingerprints on the chocolate's surface.
If any pieces break too small, don't worry – these make perfect sampling pieces for quality control.
Final Thoughts
This festive Easter chocolate bark makes the perfect homemade treat for spring celebrations and gift-giving.
You'll find that this versatile recipe allows for endless creativity with your choice of toppings, colors, and decorative elements, making each batch uniquely yours. Whether you're planning an Easter basket surprise or hosting a springtime gathering, this chocolate bark offers a delightful way to share holiday cheer.
Remember to store your finished bark in an airtight container at room temperature, where it'll stay fresh for up to two weeks. If you're making it ahead for gifting, you can extend its shelf life by keeping it in the refrigerator for up to a month.
Don't forget that this recipe can be easily doubled or tripled for larger gatherings or multiple gift packages. You'll also discover that the basic technique you've learned can be adapted for other holidays by simply changing the colors and toppings.
With practice, you'll develop an eye for creating beautiful patterns and color combinations that'll make your chocolate bark stand out at any celebration.