If you've been hesitant to explore alternative cooking methods, you're about to discover a game-changing approach to preparing your favorite cut of beef. Your air fryer isn't just for wings and fries – it's actually a remarkable tool for creating a perfectly cooked beef joint that'll rival traditional oven results. While you might think this modern appliance couldn't possibly match the depth of flavor you're accustomed to, you'll find that the combination of rapid air circulation and precise temperature control offers something special. Let's examine why this method isn't just convenient, but might become your preferred way to prepare a succulent Sunday roast.
Key Takeaways
- Air fryers cook beef joints faster than traditional ovens, producing a crusty exterior and juicy interior in about 15 minutes per side.
- Choose smaller beef cuts (2-4 pounds) like ribeye or top round roast, ensuring they fit comfortably in your air fryer basket.
- Preheat air fryer to 400°F (200°C), season meat with oil and spices, and let rest at room temperature before cooking.
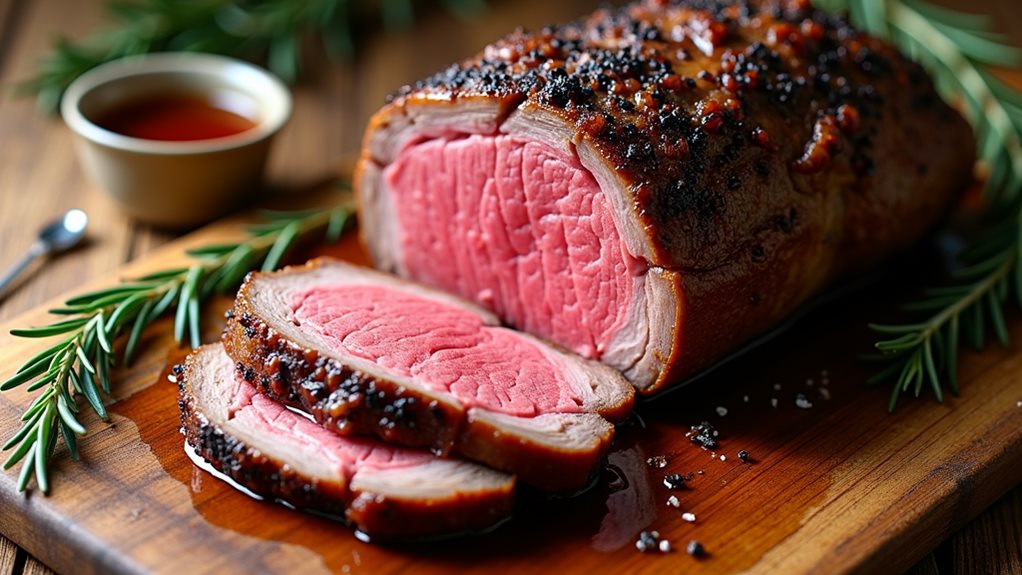
- Cook until internal temperature reaches 145°F (63°C) for medium-rare, then rest for 10 minutes under foil before slicing.
- Position the beef joint fat-side up in the air fryer basket to allow natural basting during the cooking process.
History
While traditional beef roasting methods date back centuries, air fryer beef joints emerged in the 2010s alongside the rising popularity of air fryers. You'll find that this modern cooking method gained traction as home cooks discovered they could achieve results similar to conventional roasting in less time, using significantly less energy and oil.
The concept builds on the Rapid Air Technology patented by Philips Electronics N.V. in 2010, which revolutionized how you can cook larger cuts of meat. Before air fryers, you'd need to rely on conventional ovens or slow cookers to prepare beef joints, which often took several hours and consumed considerable energy.
The air fryer's efficient circulation of super-heated air around the meat has changed how you can approach cooking these cuts.
You'll notice that early air fryer models weren't large enough to accommodate substantial beef joints, but manufacturers quickly responded to consumer demand. By 2015, larger capacity air fryers hit the market, making it possible for you to cook family-sized roasts while maintaining the benefits of rapid air circulation technology.
Recipe
Cooking a beef joint in an air fryer is a modern twist on the traditional Sunday roast, offering a faster cooking time while still achieving a delicious crusty exterior and juicy interior. This method is particularly effective for smaller joints of beef, typically ranging from 2-4 pounds, making it perfect for small family dinners or intimate gatherings.
The success of this dish relies heavily on selecting the right cut of beef and proper seasoning. While various cuts can be used, a ribeye roast or top round roast works exceptionally well in an air fryer. The circulating hot air creates a beautiful crust while maintaining the meat's natural juices, resulting in a tender and flavorful meal.
Ingredients:
- 2-4 lb beef joint (ribeye or top round)
- 2 tablespoons (30 ml) olive oil
- 2 teaspoons (10 g) sea salt
- 1 teaspoon (5 g) black pepper
- 1 teaspoon (5 g) garlic powder
- 1 teaspoon (5 g) dried thyme
- 1 teaspoon (5 g) dried rosemary
- 1/2 cup (120 ml) beef stock
Remove the beef from the refrigerator 30 minutes before cooking to reach room temperature. Rub the joint with olive oil and season thoroughly with the salt, pepper, and herbs. Preheat the air fryer to 400°F (200°C).
Place the beef in the air fryer basket and cook for 15 minutes at 400°F, then reduce temperature to 360°F (180°C) and cook for approximately 15 minutes per pound for medium-rare, or until desired doneness is reached. Let rest for 10-15 minutes before slicing.
For best results, use a meat thermometer to check the internal temperature – 135°F (57°C) for medium-rare, 145°F (63°C) for medium. The cooking time may vary depending on the size and shape of your beef joint, so adjust accordingly.
Spraying the meat with oil every 15 minutes during cooking will help achieve a better crust, and adding a small amount of beef stock to the bottom of the air fryer can help maintain moisture levels during cooking.
Cooking Steps
Start your air fryer beef joint by preheating to 400°F and thoroughly coating your meat with your chosen spices.
When the air fryer has reached temperature, carefully place your seasoned joint in the basket and cook for approximately 15 minutes per side, ensuring even browning and cooking throughout.
Once cooked to your desired doneness, remove the joint and let it rest for ten minutes, allowing the juices to redistribute throughout the meat before slicing and serving.
Step 1. Set Temperature to 400°F
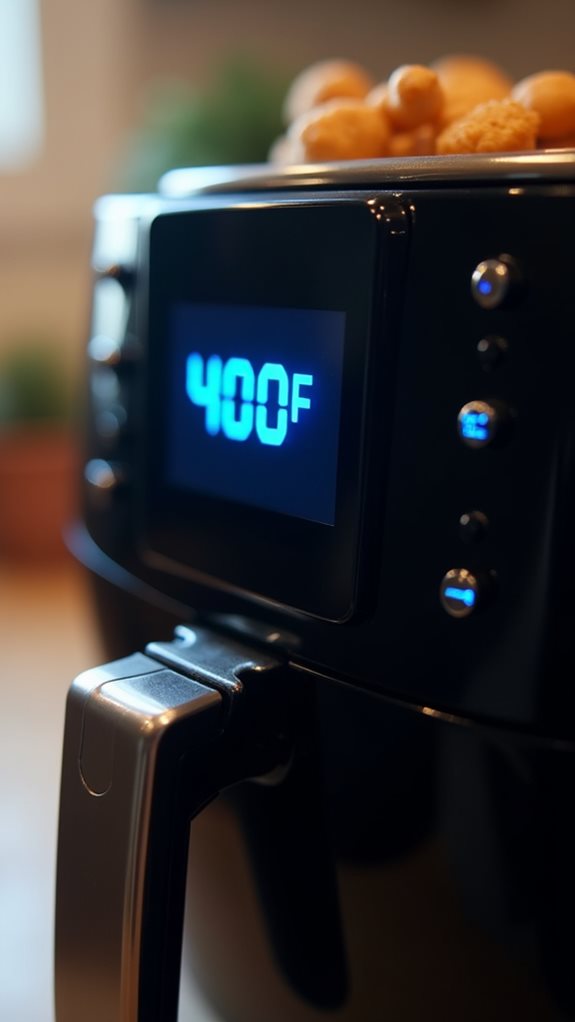
The air fryer needs to reach the optimal cooking temperature of 400°F (200°C) before you place the beef joint inside.
You'll want to set your air fryer to preheat for approximately 3-5 minutes, ensuring it's thoroughly heated for even cooking throughout your roast. While you're waiting, this is the perfect time to double-check that your seasoned beef joint is ready to go.
Once your air fryer displays that it's reached 400°F, you'll notice it might make a beeping sound or show an indicator light, depending on your model.
It's crucial to maintain this temperature throughout the cooking process, as it's ideal for creating that perfect brown crust while keeping the inside juicy.
If you're using a manual air fryer without a digital display, you can usually tell it's ready when the heating indicator light turns off.
Don't worry if the temperature fluctuates slightly during cooking – your air fryer's built-in thermostat will work to maintain the target temperature, but avoid opening the basket unnecessarily, as this can cause significant heat loss and extend cooking time.
Step 2. Season Joint With Spices
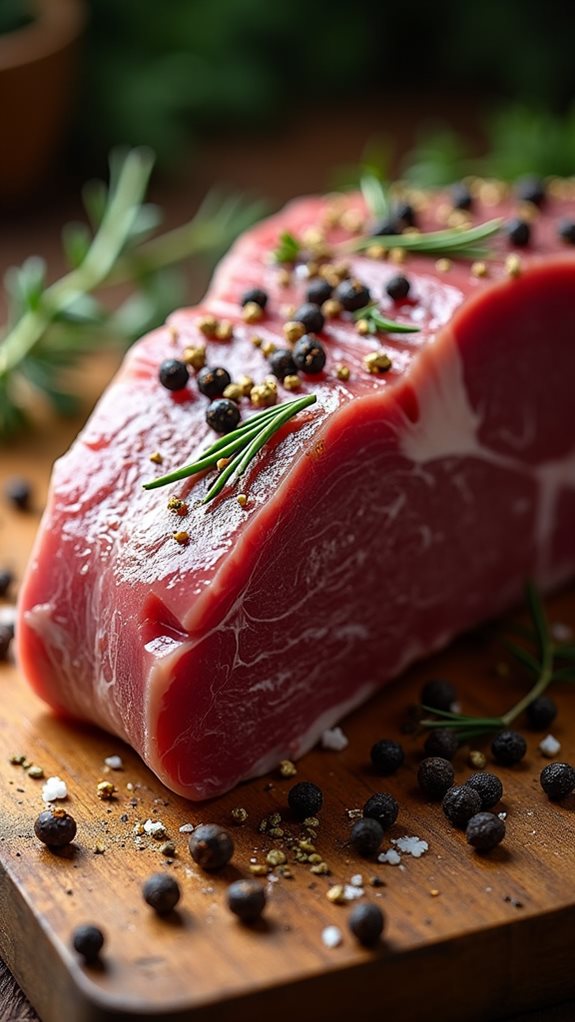
Proper seasoning of your beef joint transforms it from ordinary to extraordinary.
Begin by patting the meat dry with paper towels to ensure the spices adhere properly to the surface. You'll want to drizzle a generous amount of olive oil over the joint, making sure to coat all sides evenly.
For a classic seasoning blend, combine 2 tablespoons of kosher salt, 1 tablespoon of freshly ground black pepper, 2 teaspoons of garlic powder, and 1 tablespoon of dried rosemary in a small bowl. If you're feeling adventurous, you can add 1 teaspoon of dried thyme and a pinch of paprika for extra depth.
Using your hands, massage the spice mixture thoroughly into the meat, ensuring you don't miss any spots, including the ends and any natural folds in the joint.
Don't rush this process – take your time to work the seasonings into the meat's surface, creating a flavorful crust that'll develop during cooking.
For best results, let the seasoned joint rest at room temperature for 30 minutes before cooking, allowing the spices to penetrate the meat more effectively.
Step 3. Place Joint in Basket
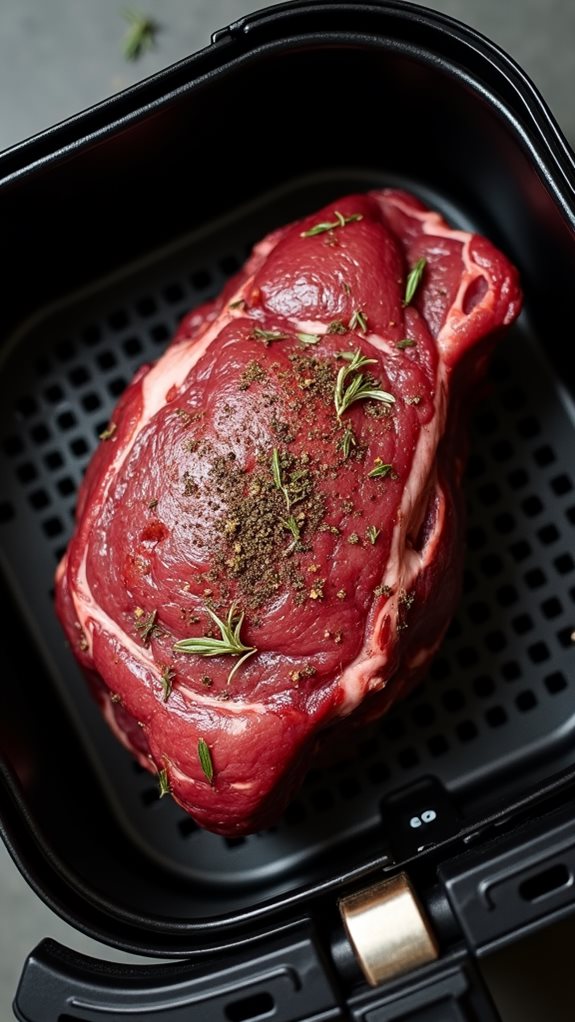
Once your joint is perfectly seasoned, it's time to place it in your air fryer basket. Position the meat in the center of the basket, ensuring there's adequate space around all sides for proper air circulation.
If you're using an air fryer with a removable basket, you'll find it easier to place the joint while the basket is outside the unit.
Before placing the meat, you'll want to preheat your air fryer to 400°F (200°C) for optimal results. If your joint has a fat cap, position it fat-side up to allow the rendering fat to baste the meat as it cooks.
For larger joints that might be a tight fit, don't force them into the basket – you can always cut the meat into smaller portions if necessary.
Make sure the basket's bottom rack is properly inserted, as this elevates the meat and prevents it from sitting in its own juices.
You might also want to line the bottom of your air fryer with a small piece of foil to catch any drippings, but don't cover the entire basket as this will impede air circulation.
Step 4. Cook 15 Minutes Per Side
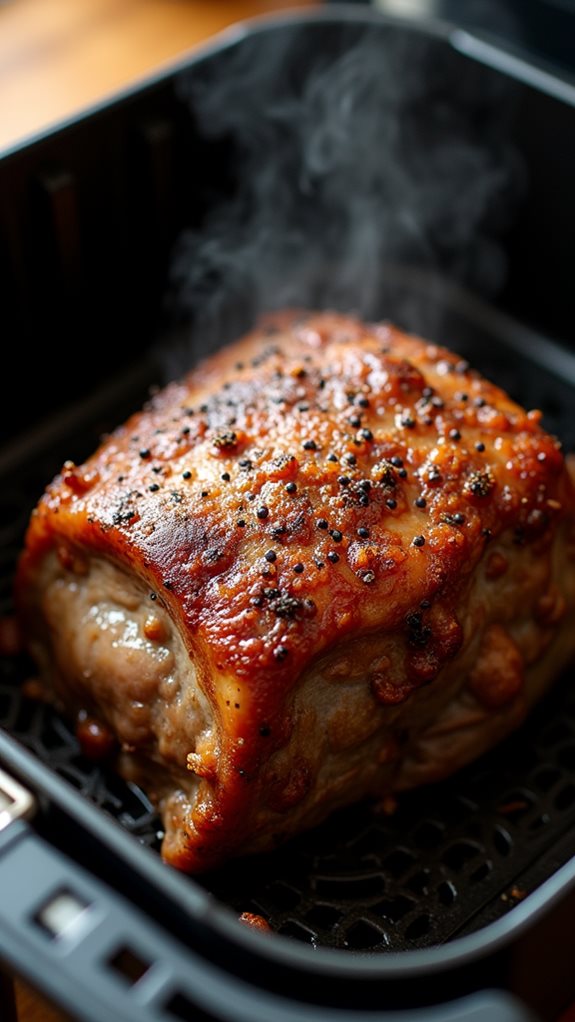
Following your preheated air fryer setup, start cooking your beef joint by setting a timer for 15 minutes on the first side.
You'll want to maintain a temperature of 200°C (400°F) throughout the cooking process, ensuring the meat develops a nicely browned exterior while retaining its internal moisture.
During this time, don't open the air fryer basket unnecessarily, as this will release valuable heat and disrupt the cooking process.
Once the first 15 minutes are complete, you'll need to carefully flip the joint using tongs or meat forks, being mindful of the hot surfaces.
After flipping, set another 15-minute timer for the second side. This balanced cooking time helps achieve even browning and proper internal temperature distribution.
While cooking the second side, you can start preparing your meat thermometer, as you'll need it to check the internal temperature when the time's up.
If you're aiming for medium-rare, you'll want the internal temperature to reach 63°C (145°F), though you should expect some carryover cooking after removing the joint from the air fryer.
Step 5. Let Rest Ten Minutes
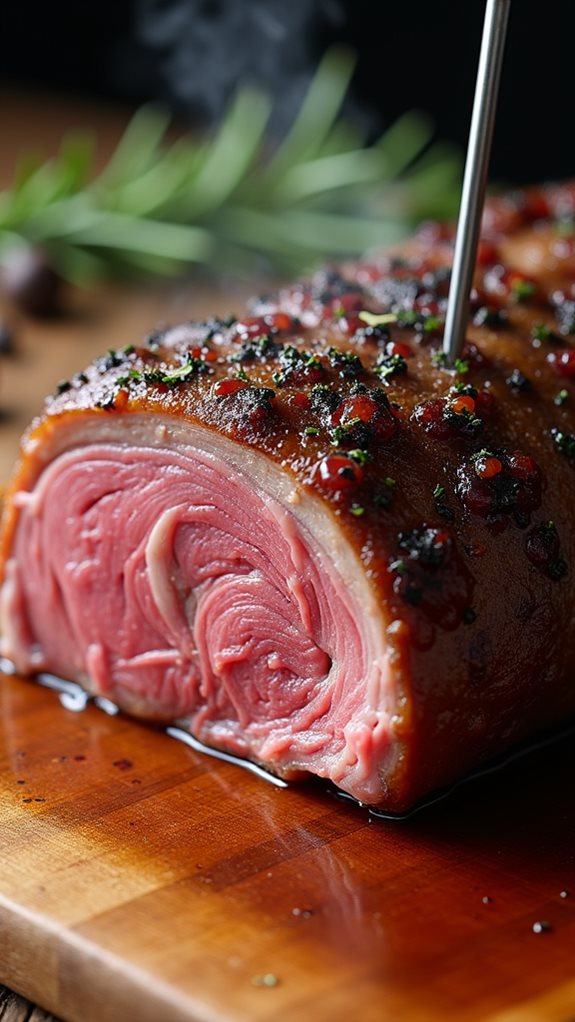
After reaching your target internal temperature, take the beef joint out of the air fryer and place it on a warm plate or cutting board.
You'll want to tent the meat loosely with aluminum foil to help retain heat while allowing excess steam to escape, preventing the outer layer from becoming soggy.
During this crucial resting period, the meat's internal temperature will continue to rise slightly, and the natural juices will redistribute throughout the joint.
If you cut into the meat immediately after cooking, you'll notice those flavorful juices running onto your cutting board instead of staying in the meat where they belong.
The ten-minute rest ensures you'll get the most tender, juicy result possible.
While you're waiting, you can use this time to prepare your sides or warm your serving plates.
Once the resting time is complete, remove the foil and check that the meat's exterior has remained crispy.
You'll know your beef joint is ready to slice when it feels firm but still yields slightly to gentle pressure.
Remember to cut against the grain for the most tender serving experience.
Final Thoughts
With proper timing and temperature control, cooking a beef joint in an air fryer can produce exceptional results that rival traditional oven roasting.
You'll find that this method not only saves time and energy but also creates a wonderfully crispy exterior while maintaining the meat's internal juiciness. The key to success lies in selecting the right size joint for your air fryer and following the temperature guidelines carefully.
Remember that you're not limited to basic seasonings – you can experiment with different herb combinations, marinades, and rubs to create your perfect roast.
While some cooks might be skeptical about preparing larger cuts in an air fryer, you'll discover that the results can be remarkably consistent once you've mastered the technique.
Don't forget that the benefits extend beyond the cooking process itself – you'll enjoy easier cleanup compared to traditional roasting methods, and you won't heat up your entire kitchen.
Whether you're cooking for a family dinner or preparing a special meal, your air fryer can become your go-to method for creating delicious, perfectly cooked beef joints that'll impress your guests every time.


