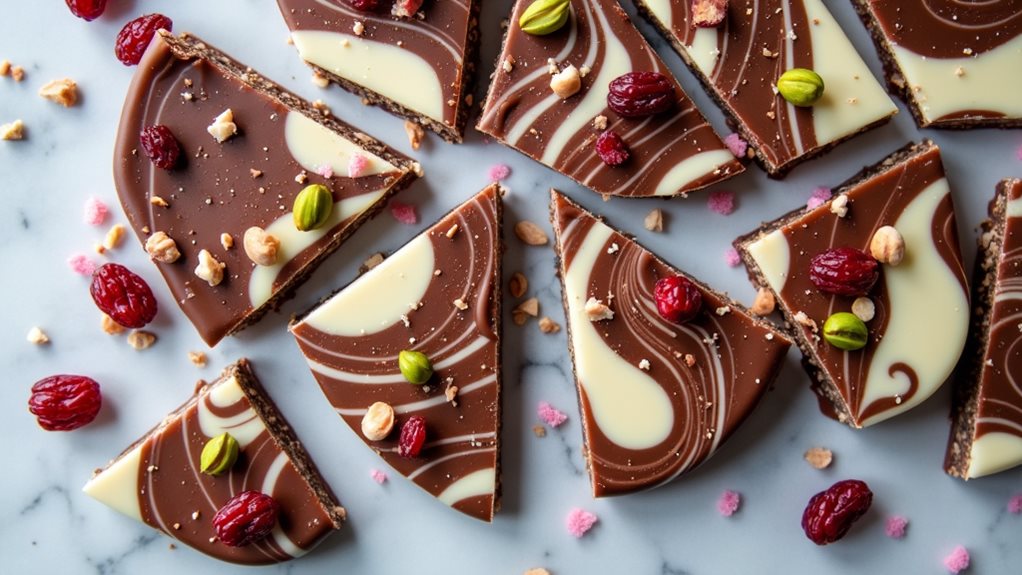
Like a love letter sealed with a sweet promise, Sweetheart Chocolate Bark captures the essence of heartfelt confectionery. You'll discover that this elegant treat isn't just another chocolate dessert, but rather a canvas where dark and white chocolate dance together in marbled perfection. While its origins can be traced to traditional chocolate bark variations, this romantic twist has become a Valentine's Day favorite, combining dried cranberries and pistachios for both visual appeal and sophisticated taste. There's more to this tempting creation than meets the eye, from its rich history to the techniques that make it uniquely special.
Key Takeaways
- Sweetheart Chocolate Bark combines dark and white chocolate marbled together, topped with cranberries, pistachios, and pink sugar sprinkles.
- Melt dark chocolate first, spread on parchment paper, then drizzle white chocolate over it to create decorative swirls.
- Add toppings while chocolate is still wet for proper adhesion, then refrigerate for one hour until completely firm.
- Break the chilled bark into rustic pieces and store in an airtight container with parchment paper between layers.
- Perfect for Valentine's Day gifting, the bark stays fresh for up to two weeks when refrigerated.
History
Tracing its roots back to European confectionery traditions, chocolate bark emerged as a practical way to use leftover chocolate while creating an attractive treat.
You'll find its origins primarily in chocolate-making regions like Belgium and Switzerland, where chocolatiers wouldn't let any precious chocolate go to waste. Instead, they'd melt down the remnants, spread them thin, and add various toppings to create a new confection.
As you explore chocolate bark's evolution, you'll discover that it gained popularity in the early 20th century when home candy-making became more accessible.
The introduction of reliable temperature-controlled ovens and better-quality commercial chocolate made it easier for home cooks to experiment with this versatile treat.
You'll notice that while traditional European versions often featured nuts and dried fruits, modern interpretations have expanded to include everything from candy pieces to exotic spices.
The technique has remained largely unchanged, though today's methods often incorporate decorative swirls and patterns that weren't common in earlier versions.
This adaptability has helped chocolate bark maintain its appeal, as you can easily customize it for different seasons, holidays, or personal preferences.
Recipe
Sweetheart Chocolate Bark
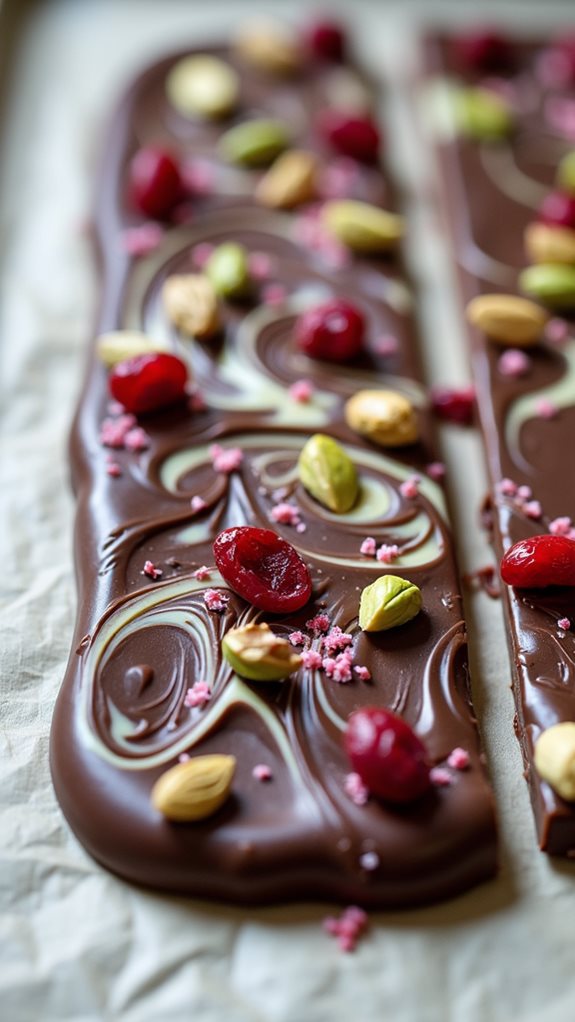
This elegant chocolate bark combines the rich flavors of dark and white chocolate with the vibrant addition of dried cranberries, pistachios, and festive pink sugar sprinkles. The contrasting colors create a visually stunning treat that's perfect for romantic occasions or special celebrations.
The beauty of this recipe lies in its simplicity, requiring just a handful of quality ingredients and minimal equipment. The marbled effect created by swirling the two types of chocolate together produces a professional-looking finish that belies the ease of preparation.
Ingredients:
- 12 ounces (340g) dark chocolate, chopped
- 6 ounces (170g) white chocolate, chopped
- 1/4 cup (60g) dried cranberries
- 1/4 cup (60g) shelled pistachios
- 1 tablespoon (15g) pink sugar sprinkles
Line a baking sheet with parchment paper. Begin by melting the dark chocolate using either a double boiler or microwave in 30-second intervals, stirring between each until completely smooth. Spread the melted dark chocolate onto the parchment paper in a rectangle approximately 1/4 inch thick.
Next, melt the white chocolate using the same method and drizzle it over the dark chocolate layer. Using a toothpick or skewer, create decorative swirls by dragging through both chocolates. Quickly sprinkle the surface with cranberries, pistachios, and pink sugar sprinkles before the chocolate begins to set.
Refrigerate for 1 hour until completely firm, then break into pieces. For optimal results, ensure all chocolate is finely and uniformly chopped before melting to promote even heating. Keep all equipment and utensils completely dry, as even a small amount of water can cause the chocolate to seize.
If making ahead, store the bark in an airtight container in the refrigerator for up to two weeks, but allow it to sit at room temperature for 10 minutes before serving to achieve the best flavor and texture.
Cooking Steps
To create your beautiful chocolate bark, you'll start by carefully melting the dark chocolate until it's perfectly smooth, spreading it on parchment paper, and then drizzling melted white chocolate on top to create elegant swirls.
Next, you'll scatter the dried cranberries, pistachios, and pink sugar sprinkles across the surface while the chocolate is still wet, ensuring they'll stick firmly when set.
Once you've completed your design, let the bark chill in the refrigerator until completely firm, then break it into rustic pieces perfect for serving or gifting.
Step 1. Melting Dark Chocolate Carefully
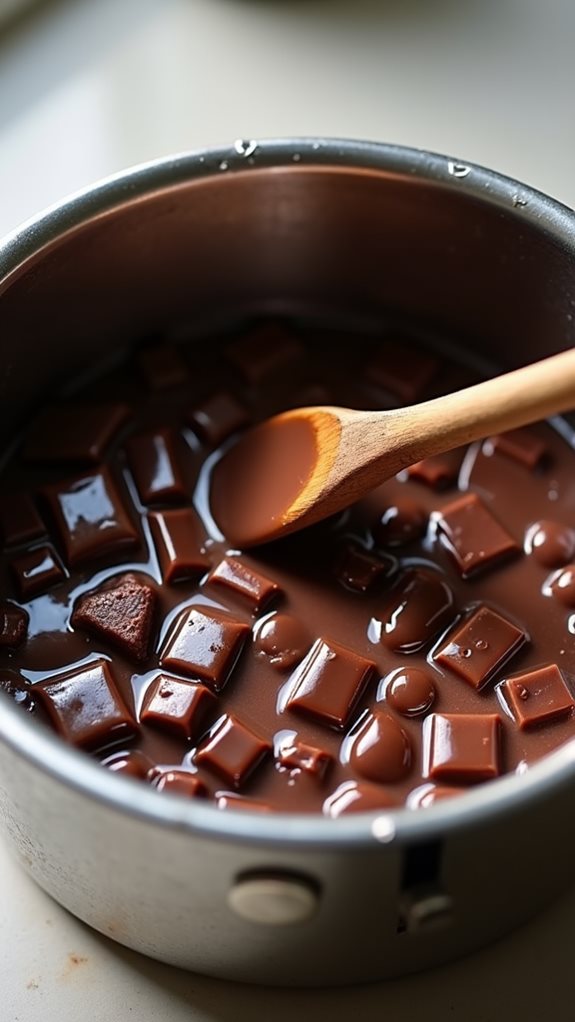
Breaking down the dark chocolate into uniform pieces kicks off the crucial melting process. You'll want to chop your chocolate into pieces roughly the same size – about 1/2 inch each – to ensure they'll melt evenly and prevent scorching.
Once you've prepared your chocolate, you've got two reliable methods to choose from.
For the double boiler method, you'll need to fill a saucepan with about an inch of water and place a heat-safe bowl on top, making sure it doesn't touch the water. Heat the water until it's simmering, not boiling, and add your chopped chocolate to the bowl. You'll need to stir constantly with a rubber spatula until it's completely smooth.
If you're using the microwave method, place your chocolate in a microwave-safe bowl and heat it in 30-second intervals at 50% power. Don't skip stirring between each interval – this prevents hot spots and ensures even melting. Your chocolate is ready when it's completely smooth and glossy, with no remaining lumps.
Step 2. Adding White Chocolate Swirls
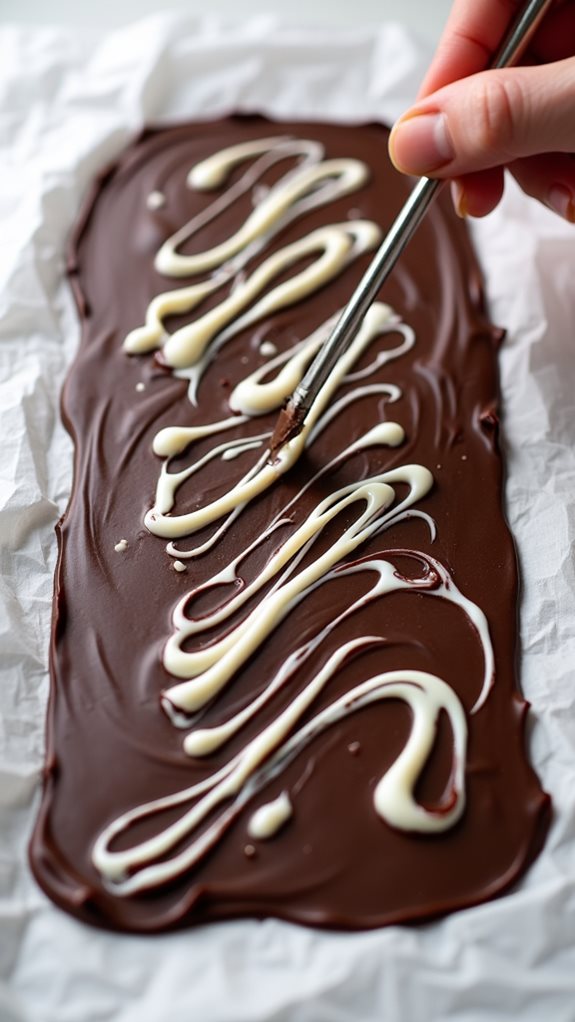
Once your dark chocolate base is perfectly smooth and spread, it's time to create those eye-catching white chocolate swirls.
Working quickly but carefully, melt your white chocolate using the same double boiler or microwave method you used for the dark chocolate, ensuring it reaches a smooth, pourable consistency without any lumps.
Hold your melted white chocolate about 6 inches above the dark chocolate base and drizzle it in a steady back-and-forth motion, creating thin, continuous lines across the surface.
Don't worry about making them perfectly straight – slight irregularity adds to the handcrafted appeal.
Once you've drizzled all the white chocolate, grab a clean toothpick or the tip of a sharp knife.
Starting from one end, drag your tool through both layers of chocolate, creating elegant swirls by moving in alternating directions.
You'll want to make these swirls while both chocolates are still wet and workable.
Move the toothpick in various patterns – try figure eights, gentle curves, or zigzags – but avoid overworking the design, as this can muddy the distinct contrast between the dark and white chocolates.
Step 3. Topping With Dried Fruits
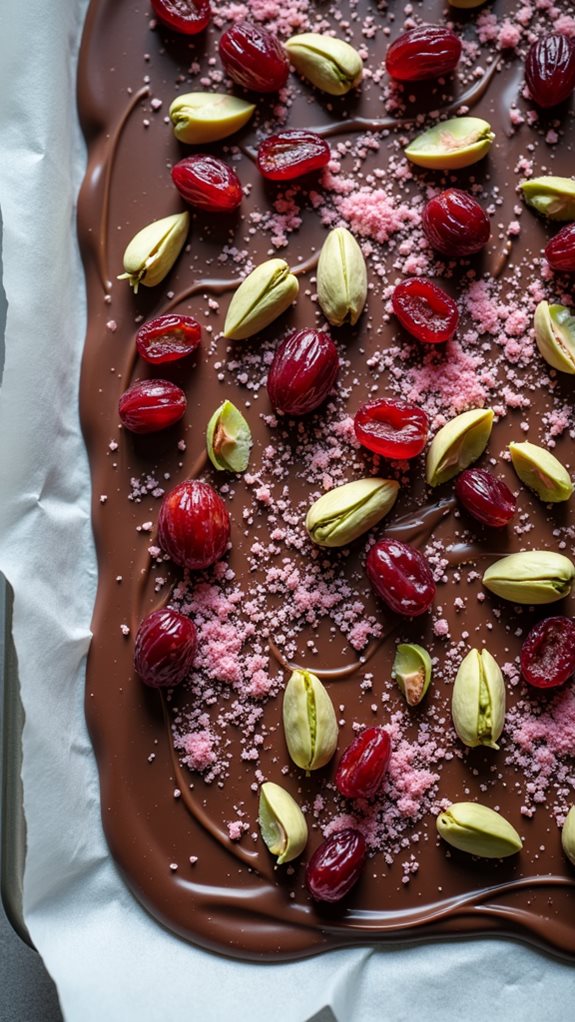
The dried fruits add both vibrant color and natural sweetness to your chocolate bark creation. When sprinkling the cranberries onto your melted chocolate layers, you'll want to work quickly while the surface is still wet to ensure proper adherence.
Distribute the cranberries evenly across the surface, making sure they're not too clustered in any one area. You can press the cranberries down slightly with the back of a clean spoon to embed them into the chocolate, but don't push too hard or you'll disrupt your beautiful swirl pattern.
If you're finding that your dried cranberries are sticking together, separate them with your fingers before sprinkling to achieve better distribution. For optimal visual impact, you'll want to alternate between adding cranberries and pistachios, creating an appealing pattern across the bark's surface.
While cranberries are specified in this recipe, you're not limited to just one type of dried fruit. You could substitute or add dried cherries, which offer a similar red hue and tart flavor profile, or incorporate small pieces of dried apricots for a contrasting golden color.
Step 4. Setting Until Firm
After adding all toppings, place your chocolate bark in the refrigerator and let it set completely undisturbed for one hour. During this crucial setting period, the chocolate will gradually firm up and develop the perfect snappy texture that's characteristic of premium chocolate bark.
You'll know it's properly set when the surface appears completely matte and feels firm to the touch.
Once the hour has passed, remove your bark from the refrigerator and let it stand at room temperature for about two minutes. This brief waiting period prevents the chocolate from becoming too brittle when you break it.
To create serving pieces, lift the parchment paper from the baking sheet and carefully break the bark into irregular shapes using your hands. If you prefer more uniform pieces, you can score the chocolate with a sharp knife before it's completely set, then break along these lines once firm.
For storage, transfer your broken pieces to an airtight container, placing parchment paper between layers to prevent sticking. While refrigeration will extend the bark's shelf life to two weeks, you'll want to let it warm slightly before serving to enhance its flavor profile.
Step 5. Breaking Into Serving Pieces
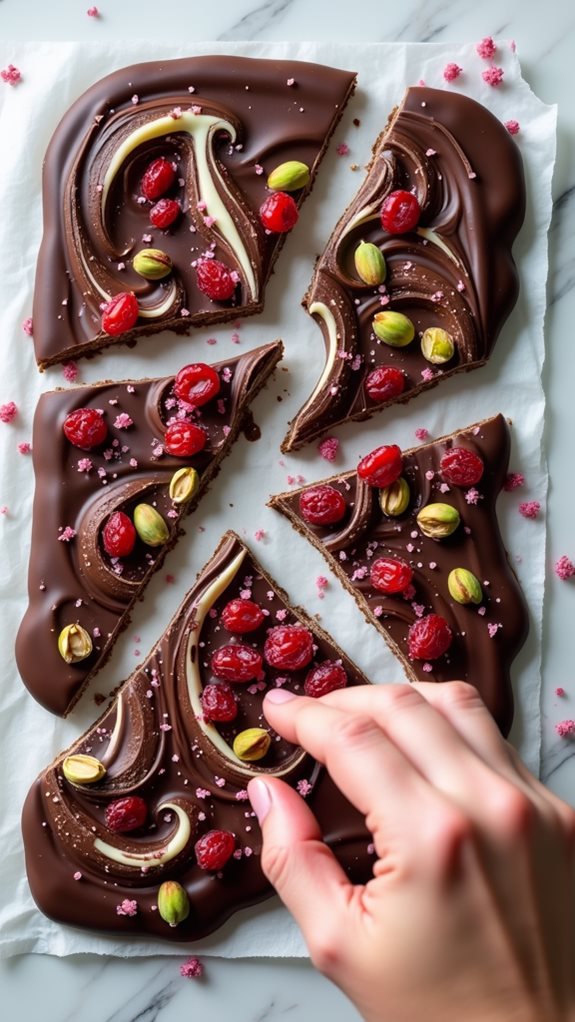
Now that your bark has reached the perfect firmness, you'll need to transform it into manageable serving pieces. Remove the baking sheet from the refrigerator and carefully peel the parchment paper away from the chocolate. If it's resistant, let it sit at room temperature for 1-2 minutes to prevent the bark from shattering too finely.
For the most attractive presentation, you'll want to create irregular, organic shapes rather than precise cuts. Start at one corner and apply firm, controlled pressure with your hands to break the bark into pieces approximately 2-3 inches wide.
Don't worry if some pieces break smaller – variety adds to the rustic charm. If you're having trouble breaking the bark, you can use a sharp knife to score guidelines on the surface first, then break along these lines.
As you break the pieces, immediately transfer them to a serving platter or storage container, handling them by their edges to avoid leaving fingerprints on the decorated surface.
If you're planning to gift the bark, consider arranging the pieces in paper candy cups to prevent them from sticking together and maintain their pristine appearance.
Final Thoughts
Making Sweetheart Chocolate Bark proves that elegant homemade treats don't require professional expertise or fancy equipment. With just a few quality ingredients and some attention to detail, you'll create a confection that's both visually stunning and delicious.
The combination of dark and white chocolate creates an impressive marbled effect that's sure to impress your loved ones.
Remember that chocolate bark isn't just for Valentine's Day – you can adapt this recipe throughout the year by changing up your toppings and color schemes. Don't be afraid to experiment with different chocolate varieties, such as milk chocolate or ruby chocolate, and try seasonal ingredients like crushed candy canes for winter or colorful sprinkles for birthdays.
You'll find that the basic technique remains the same, making this a versatile recipe to keep in your collection.
When you're ready to share your creation, consider packaging pieces of bark in cellophane bags tied with ribbon for a thoughtful homemade gift.
You'll discover that this simple yet sophisticated treat becomes a go-to recipe for special occasions, celebrations, and whenever you want to show someone you care.