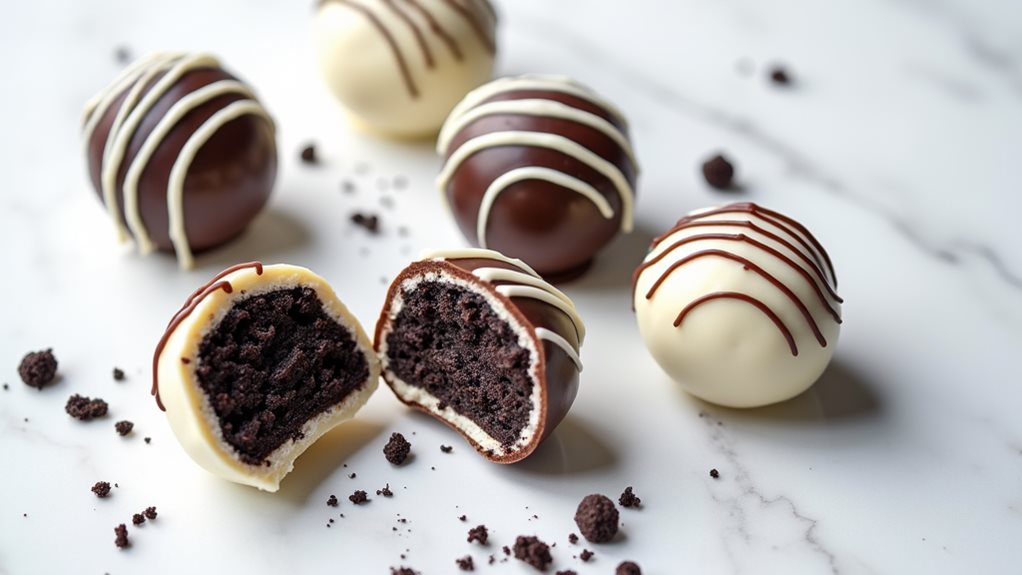
You've probably eaten a thousand different desserts in your lifetime, but none quite compare to the simple elegance of Oreo truffles. These bite-sized confections transform America's favorite cookie into something altogether more sophisticated, combining crushed Oreos with cream cheese and a shell of tempered chocolate. While they've only been around since the early 2000s, they've quickly become a staple at parties, holiday gatherings, and Pinterest boards everywhere. If you're wondering what makes these treats so special and why they've captured the hearts of both home bakers and dessert enthusiasts, you'll want to discover their fascinating journey from simple cookie hack to beloved confection.
Key Takeaways
- Oreo truffles are no-bake confections made by mixing crushed Oreo cookies with cream cheese and coating them in melted chocolate.
- The basic recipe requires only three main ingredients: Oreos, cream cheese, and chocolate for coating.
- Process involves crushing Oreos, mixing with cream cheese, rolling into balls, dipping in chocolate, and refrigerating until firm.
- Store truffles in an airtight container in the refrigerator for up to 4 days to maintain freshness and texture.
- Various coatings and toppings can customize truffles, including white chocolate, dark chocolate, sprinkles, or crushed Oreos.
History
Oreo truffles' origins can be traced back to home bakers experimenting with the classic sandwich cookie in the early 2000s. What began as a creative way to transform ordinary Oreos into something more sophisticated quickly gained traction through food blogs and social media sharing platforms, where bakers would showcase their innovative decorating techniques and flavor variations.
You'll find that these treats gained significant popularity between 2005 and 2010, when recipe websites began featuring them as an easy, no-bake alternative to traditional chocolate truffles. The simple combination of crushed Oreos and cream cheese proved to be a winning formula that even novice bakers could master.
As their popularity grew, you'd see them appearing at holiday gatherings, birthday parties, and wedding receptions, often decorated to match specific themes or celebrations.
The evolution of Oreo truffles has continued with bakers introducing various adaptations, including different Oreo flavors, coating options, and decorative techniques. While the basic recipe remains largely unchanged, you'll now find countless variations that have helped establish these treats as a modern dessert classic.
Recipe
Oreo truffles are a decadent no-bake dessert that transforms ordinary cookies into elegant confections. The combination of crushed Oreos and cream cheese creates a rich, smooth filling that's enrobed in melted chocolate for a professional-looking finish that belies its simple preparation.
These bite-sized treats strike the perfect balance between the familiar comfort of Oreo cookies and the sophistication of traditional chocolate truffles. While they require no baking, the process of rolling, dipping, and decorating allows for creative expression, making them ideal for special occasions or gift-giving.
Ingredients:
- 24 Oreo cookies (1 standard package)
- 8 oz (226g) cream cheese, softened
- 16 oz (450g) white chocolate chips
- 8 oz (225g) semi-sweet chocolate chips
- 2 tablespoons (30ml) vegetable oil
Place Oreos in a food processor and pulse until finely crushed. Mix crushed cookies with softened cream cheese until thoroughly combined. Form mixture into 1-inch balls and arrange on a parchment-lined baking sheet. Freeze for 30 minutes.
Divide vegetable oil between two microwave-safe bowls containing white and semi-sweet chocolate chips. Melt chocolates in 30-second intervals, stirring between each, until smooth. Dip frozen balls in melted chocolate using a fork, allowing excess to drip off. Return dipped truffles to parchment paper and refrigerate for 1 hour until set.
For optimal results, bring cream cheese to room temperature before mixing to ensure a smooth filling without lumps. When melting chocolate, avoid any contact with water as it will cause the chocolate to seize. If chocolate becomes too thick for dipping, add small amounts of vegetable oil to thin it out.
Store finished truffles in an airtight container in the refrigerator for up to one week, though best consumed within 3-4 days for peak freshness.
Cooking Steps
You'll start by crushing the Oreo cookies into fine crumbs and mixing them thoroughly with softened cream cheese until you've created a uniform mixture.
Next, you'll shape the mixture into one-inch balls, place them on a parchment-lined baking sheet, and freeze them for thirty minutes to firm up.
Finally, you'll coat each frozen ball in melted chocolate of your choice, return them to the parchment paper, and refrigerate until the chocolate shell has completely set.
Step 1. Crushing Cookies Into Crumbs
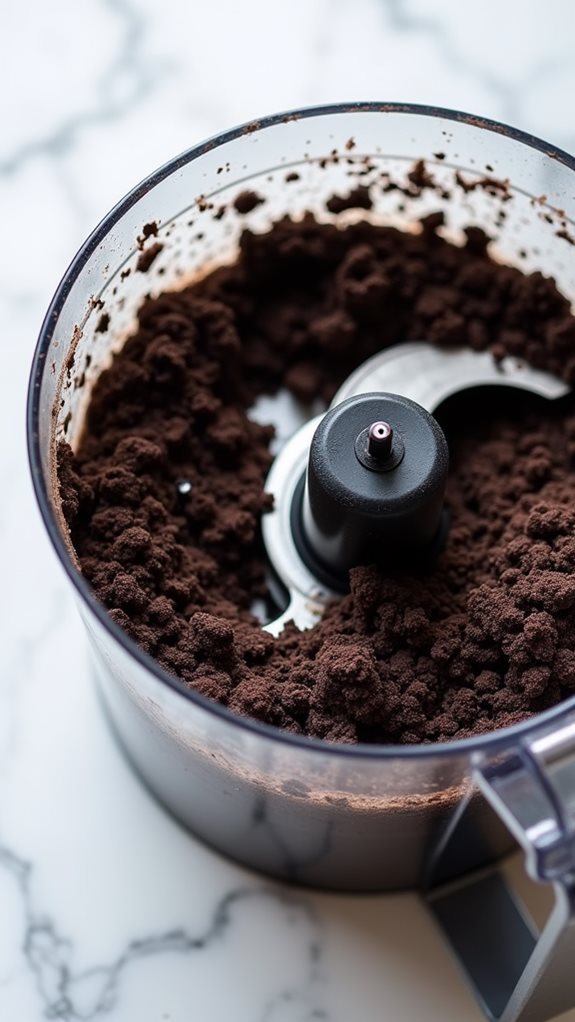
Breaking down the cookies into fine crumbs marks the first crucial step in creating these truffles. You'll need to ensure your Oreos are crushed into a consistently fine texture, as this directly affects the smoothness of your finished truffles.
While you can crush the cookies manually using a zip-top bag and rolling pin, a food processor yields the most uniform results. If you're using a food processor, break each cookie into quarters before adding them to the bowl. Pulse the cookies in short bursts until they've reached a fine, sand-like consistency, making sure no large chunks remain.
You don't need to remove the cream filling first – it'll incorporate naturally during the crushing process. If you notice any cookie pieces sticking to the sides of the processor, stop and scrape them down with a spatula before continuing.
For those using the manual method, place the cookies in a heavy-duty plastic bag, squeeze out the air, and crush them with a rolling pin using firm, even pressure. Work methodically from the center outward until you've achieved a uniform texture throughout.
Step 2. Mix With Cream Cheese
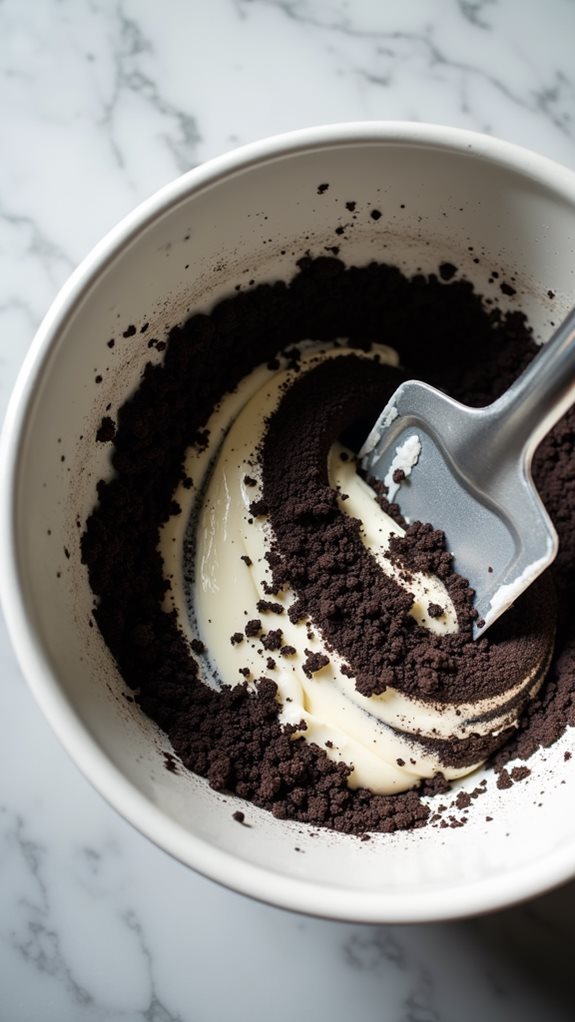
Once you've prepared your cookie crumbs, it's time to blend them up with the softened cream cheese. Take your room-temperature cream cheese and add it to the bowl of Oreo crumbs, ensuring you're using the full 8 ounces for proper consistency.
Using a sturdy spatula or electric mixer, combine the ingredients until they're thoroughly incorporated, with no white streaks of cream cheese remaining visible.
As you mix, you'll notice the texture becoming increasingly uniform and slightly sticky. Don't worry if it seems too thick at first – continue mixing until you achieve a dense, moldable consistency that resembles chocolate play dough.
If you're using a stand mixer, you'll want to stop occasionally to scrape down the sides of the bowl, ensuring every bit of cream cheese and cookie crumb gets properly incorporated.
The final mixture should hold together easily when you pinch it between your fingers but shouldn't be so soft that it sticks to your hands excessively. This perfect balance will make the next step of rolling the truffles much easier and ensure your finished treats have the ideal texture.
Step 3. Rolling Dough Into Balls
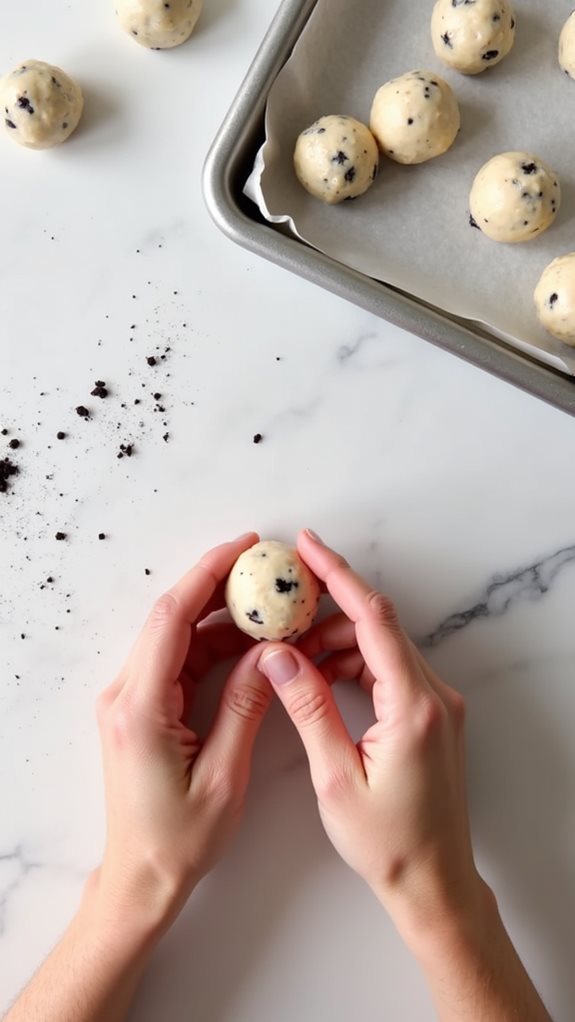
Steady hands are essential for rolling the Oreo-cream cheese mixture into perfectly portioned truffle balls. You'll want to scoop about 1 tablespoon of the mixture for each truffle, ensuring consistent sizing that'll result in evenly balanced treats.
If you're finding the mixture too sticky to work with, try chilling it in the refrigerator for 15-20 minutes before rolling.
Place a sheet of parchment paper on your baking sheet while you work, and keep your palms clean between rolls to maintain smooth, pristine surfaces on your truffles. As you form each ball, use a gentle rolling motion between your palms, applying even pressure to create a perfectly round shape.
You'll know you've achieved the right consistency when the balls hold their form without slumping or sticking excessively to your hands. If you're planning to make multiple batches, you can speed up the process by using a small cookie scoop to portion the mixture before rolling.
Once you've shaped all your truffles, arrange them on the parchment-lined baking sheet with small spaces between each one to prevent sticking.
Step 4. Coating in Melted Chocolate
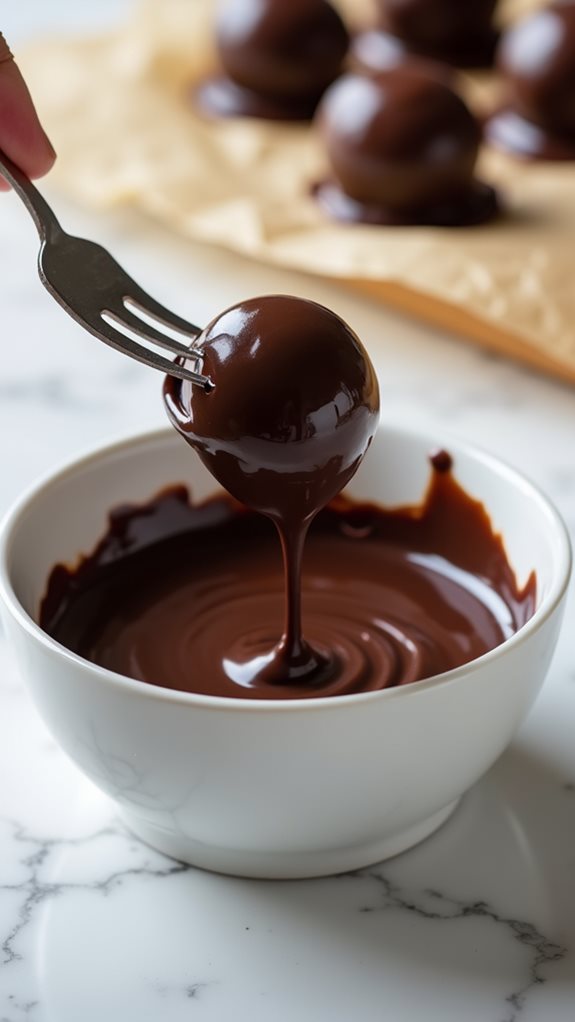
The melting process requires careful attention to achieve the perfect chocolate coating for your truffles.
Begin by dividing your chocolate chips into two bowls – white chocolate in one and semi-sweet in another. Add one tablespoon of vegetable oil to each bowl, as this will help create a smoother consistency and prevent the chocolate from becoming too thick or brittle when it sets.
Heat each bowl of chocolate in the microwave at 30-second intervals, stirring thoroughly between each session. You'll want to continue this process until the chocolate is completely smooth and free of lumps.
Once melted, work quickly with your frozen truffle balls. Using a fork or dipping tool, submerge each ball into your chosen chocolate, ensuring it's fully coated. Gently tap the fork against the bowl's edge to remove excess chocolate, then carefully slide the truffle onto parchment paper.
If you're adding any decorative toppings, sprinkle them on immediately before the chocolate sets. For a professional finish, you can drizzle contrasting chocolate over the truffles or add a sprinkle of crushed Oreos while the coating is still wet.
Step 5. Refrigerate Until Set
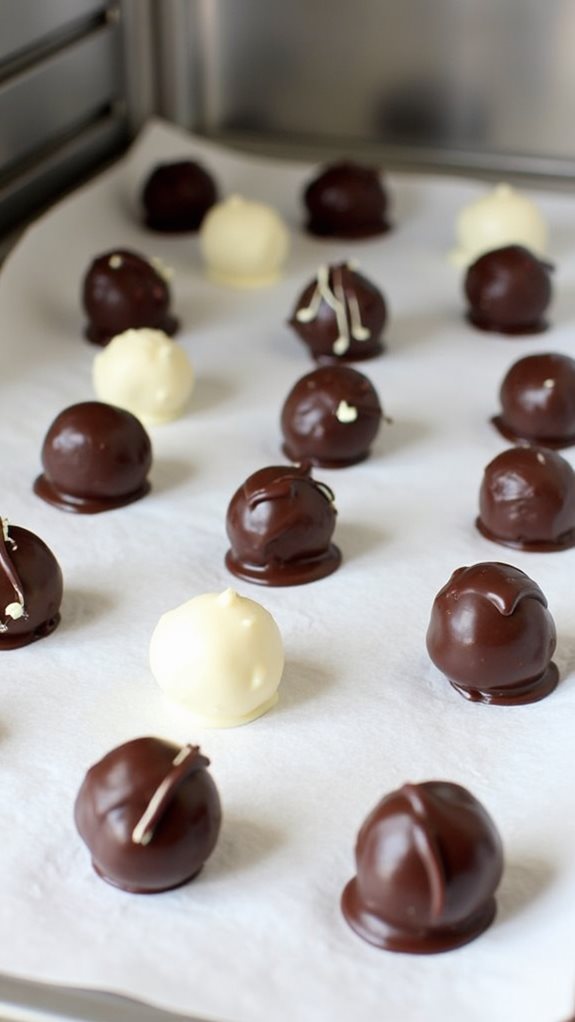
After coating your truffles in chocolate, proper refrigeration becomes crucial for achieving the perfect texture and appearance.
Place your dipped truffles back onto the parchment-lined baking sheet, ensuring they don't touch each other, and transfer them immediately to your refrigerator. You'll need to let them chill for approximately one hour, though you might want to check them after 45 minutes by gently touching the surface to test if the chocolate has completely set.
During the refrigeration process, the chocolate coating will transform from glossy and wet to a firm, matte finish that won't stick to your fingers.
It's important not to rush this step, as properly set chocolate will result in truffles that are easier to handle and more visually appealing. While you're waiting, you can clean your workspace and prepare an airtight container lined with parchment paper for storage.
Once the chocolate has fully hardened, you'll notice the truffles easily lift from the parchment paper without leaving any residue. At this point, you can transfer them to your prepared storage container and keep them refrigerated until you're ready to serve.
Final Thoughts
Undoubtedly, you'll find Oreo truffles to be a crowd-pleasing dessert that's both impressive and approachable for home bakers of any skill level. The combination of crushed Oreos, cream cheese, and chocolate coating creates an indulgent treat that's perfect for special occasions, holiday gatherings, or whenever you're craving something sweet and satisfying.
Remember that practice makes perfect when it comes to achieving a polished look for your truffles. Don't be discouraged if your first few attempts at chocolate coating aren't flawless – with time, you'll develop a technique that works best for you.
You'll also discover that these truffles are incredibly versatile, allowing you to experiment with different chocolate coatings, decorative toppings, and seasonal variations. Consider making them with different Oreo flavors, such as mint or peanut butter, to create your own unique combinations.
While the basic recipe is straightforward, you can elevate your truffles with creative garnishes like sprinkles, cookie crumbs, or drizzled chocolate. Just remember to store them properly in the refrigerator to maintain their shape and texture until serving time.