You've likely heard of Beef Wellington, but have you encountered its plant-based cousin, Vegan Mushroom Wellington? This elegant dish has been gaining popularity among those seeking a sophisticated meat-free alternative for special occasions. It's a culinary creation that combines the earthy richness of mushrooms with the flaky indulgence of puff pastry, resulting in a centerpiece that's both visually stunning and deliciously satisfying. Whether you're a committed vegan or simply curious about expanding your culinary horizons, this dish offers an intriguing blend of flavors and textures that might just change your perception of plant-based cuisine. But what's the story behind this innovative recipe?
Key Takeaways
- Vegan Mushroom Wellington is a plant-based alternative to traditional Beef Wellington, featuring mushrooms wrapped in puff pastry.
- Key ingredients include mixed mushrooms, vegan puff pastry, olive oil, soy sauce, and fresh thyme.
- The dish is prepared by sautéing mushrooms, wrapping them in pastry, and baking until golden brown.
- Cooking time is typically 25-30 minutes at 400°F (200°C), with visual cues indicating doneness.
- It's an elegant, versatile dish suitable for special occasions and can be customized with different mushroom varieties.
History
The origins of Vegan Mushroom Wellington can be traced back to the early 2000s, when plant-based cooking began to gain mainstream popularity.
As more people sought alternatives to traditional meat-based dishes, innovative chefs and home cooks started experimenting with classic recipes. They aimed to create plant-based versions that could rival their meat counterparts in taste and presentation.
The original Beef Wellington, a luxurious dish featuring beef tenderloin wrapped in puff pastry, served as the inspiration for this vegan adaptation.
Chefs recognized that mushrooms, with their meaty texture and umami flavor, could serve as an excellent substitute for beef. They began crafting recipes that combined various mushroom varieties with herbs and seasonings to mimic the rich flavors of the classic dish.
Over time, Vegan Mushroom Wellington evolved into a staple of plant-based holiday menus and special occasions.
Its popularity grew as more people embraced flexitarian diets and sought out meat-free options.
Today, you'll find numerous variations of this dish, each with its own unique blend of ingredients and techniques, making it a versatile and beloved vegan centerpiece.
Recipe
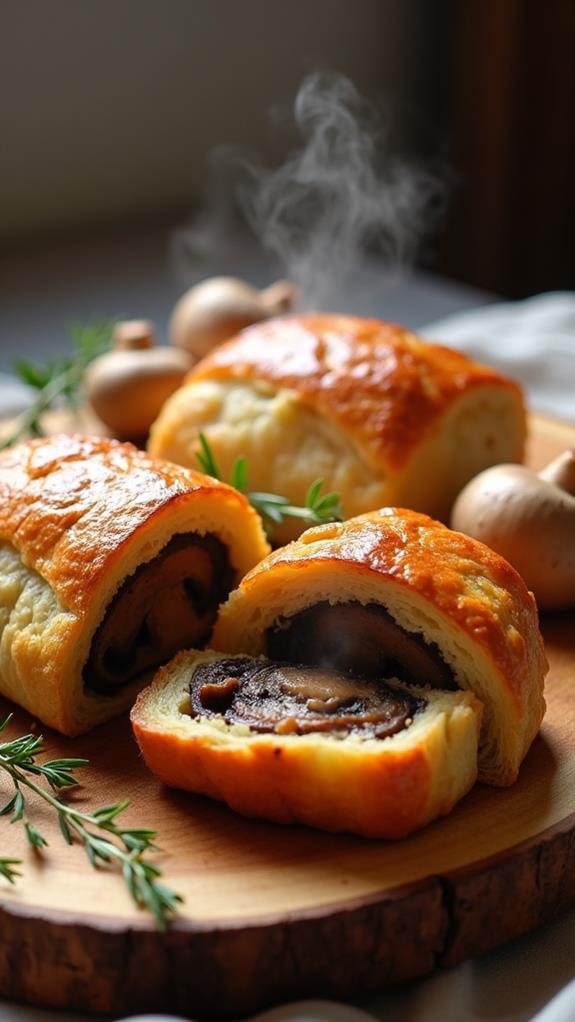
Vegan Mushroom Wellington is a delicious and elegant plant-based alternative to the classic beef Wellington. This recipe transforms simple ingredients into a stunning main course that's perfect for special occasions or holiday dinners. The combination of savory mushrooms and flaky puff pastry creates a satisfying texture and flavor profile that even non-vegans will appreciate.
This simplified version of the dish uses just five key ingredients, making it accessible for home cooks while still delivering impressive results. The earthy mushrooms are enhanced with savory soy sauce and aromatic thyme, all encased in a golden, crispy pastry shell. The result is a show-stopping centerpiece that's sure to impress your guests and satisfy your taste buds.
- 1 pound (450g) mixed mushrooms, chopped
- 1 sheet vegan puff pastry
- 1/4 cup (60ml) olive oil
- 2 tablespoons (30ml) soy sauce
- 1 tablespoon (15ml) fresh thyme leaves
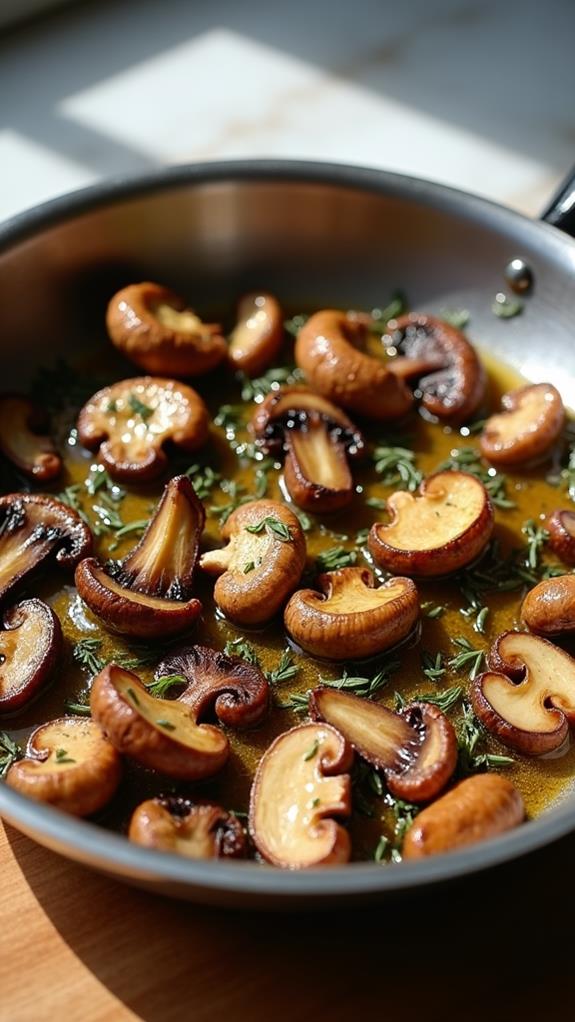
Preheat the oven to 400°F (200°C). Heat olive oil in a large skillet over medium heat. Add chopped mushrooms and cook for 10-12 minutes until golden brown. Stir in soy sauce and thyme, then remove from heat and let cool.
Roll out puff pastry on a lightly floured surface and place cooled mushroom mixture in the center. Fold pastry over the filling, sealing edges with water. Place Wellington seam-side down on a baking sheet and bake for 25-30 minutes, until pastry is golden brown and crispy.
For best results, ensure that excess liquid is drained from the mushrooms before adding them to the pastry to prevent a soggy bottom. You can brush the top of the pastry with a mixture of plant-based milk and a pinch of salt for a golden, shiny finish.
Allow the Wellington to cool for 5-10 minutes before slicing to help it maintain its shape when serving. Experiment with different mushroom varieties to create unique flavor combinations and textures in your Vegan Mushroom Wellington.
Cooking Steps
To create your Vegan Mushroom Wellington, you'll begin by preheating your oven to 400°F and sautéing the mushrooms until they're golden and fragrant.
Next, you'll carefully roll out the puff pastry and wrap it around the cooled mushroom filling, ensuring a tight seal.
Step 1. Preheat Oven to 400°F

Before diving into the preparation, you'll want to preheat your oven to 400°F (200°C). This crucial step ensures your Vegan Mushroom Wellington cooks evenly and achieves that perfect golden-brown crust.
While your oven heats up, you'll have time to prepare the other ingredients and assemble your Wellington. It's important to allow your oven enough time to reach the desired temperature. Most ovens take about 15-20 minutes to preheat fully, so plan accordingly.
If you have an older oven, you might want to give it a few extra minutes to ensure it's hot enough. For even more precise results, consider using an oven thermometer to verify the temperature.
Once your oven is preheated, you'll be ready to bake your Wellington for 25-30 minutes. The high temperature will help create a flaky, crisp exterior while cooking the mushroom filling thoroughly.
Step 2. Sauté Mushrooms Until Golden
With the oven preheating, it's time to focus on the star of this dish: the mushrooms.
Begin by heating 1/4 cup of olive oil in a large skillet over medium heat. While the pan warms up, chop your mixed mushrooms into bite-sized pieces.
Once the oil is shimmering, add the chopped mushrooms to the skillet. You'll want to cook them for about 10-12 minutes, stirring occasionally.
As the mushrooms cook, you'll notice they release their moisture. This is exactly what you want – it's concentrating their flavor.
Keep cooking until the liquid has evaporated and the mushrooms turn a beautiful golden brown color. At this point, they'll have a rich, earthy aroma that fills your kitchen.
Now, it's time to add some extra flavor. Stir in 2 tablespoons of soy sauce and 1 tablespoon of fresh thyme leaves. These ingredients will complement the mushrooms' natural umami taste.
Once everything's well combined, remove the skillet from the heat and let the mixture cool. This cooling step is crucial, as it prevents the puff pastry from becoming soggy when you assemble your Wellington.
Step 3. Roll Out Puff Pastry

The next crucial step in creating your Vegan Mushroom Wellington involves the puff pastry.
Begin by removing the pastry from the refrigerator and letting it sit at room temperature for about 10 minutes. This will make it more pliable and easier to work with.
Once it's ready, lightly dust your work surface with flour to prevent sticking.
Carefully unroll the puff pastry sheet, taking care not to tear it. If it's folded, gently unfold it.
Using a rolling pin, roll out the pastry to create a rectangle approximately 12 inches by 14 inches. This will ensure you have enough pastry to wrap around your mushroom filling.
As you roll, apply even pressure to maintain a consistent thickness throughout. If the edges start to crack, simply press them back together with your fingers.
Remember, the goal is to create a smooth, even surface that will bake into a golden, flaky crust.
Once you've achieved the desired size and shape, you're ready to add your cooled mushroom filling and proceed with assembling your Wellington.
Step 4. Wrap Filling in Pastry
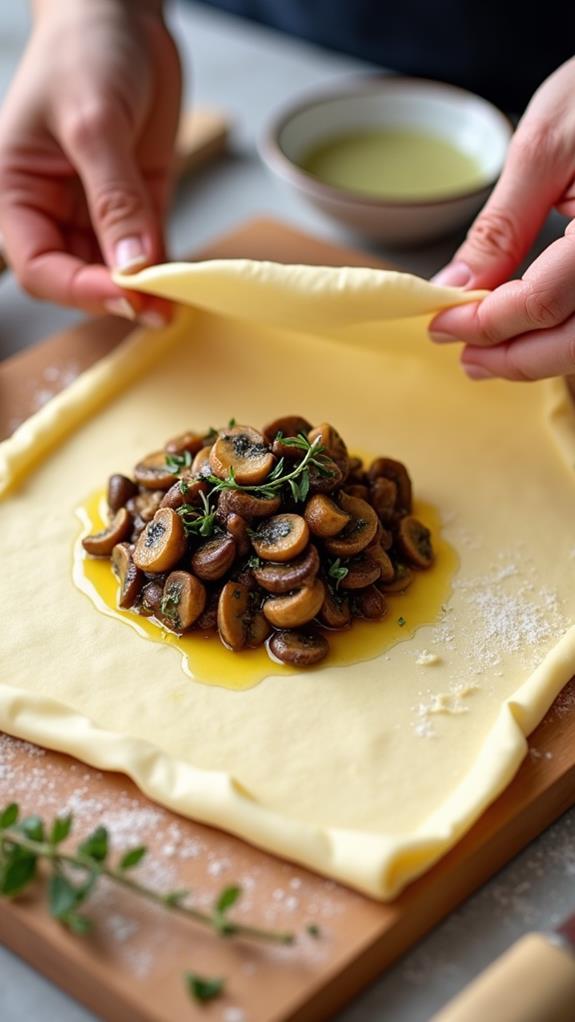
Now that you've rolled out your puff pastry, it's time to wrap up your mushroom filling. Begin by spooning the cooled mushroom mixture onto the center of the pastry, leaving a generous border around the edges.
Carefully fold one side of the pastry over the filling, then bring the opposite side up and over to meet it. Gently press the edges together to seal, creating a neat seam along the top of your Wellington.
Next, fold the short ends of the pastry under the Wellington, tucking them snugly to ensure no filling escapes during baking. Use your fingers to crimp the edges, creating a decorative pattern that will also help seal the pastry.
If you'd like, you can use any leftover pastry to create simple designs on top of your Wellington.
Before baking, brush the entire surface with a mixture of plant-based milk and a pinch of salt. This will give your Wellington a beautiful golden sheen.
Step 5. Bake Until Golden Brown
Baking your Vegan Mushroom Wellington to golden-brown perfection is the final step in creating this show-stopping dish. Place your carefully wrapped Wellington on a baking sheet, seam-side down, and slide it into a preheated 400°F (200°C) oven. As it bakes, the puff pastry will begin to rise and turn a beautiful golden color.
Keep a close eye on your Wellington as it cooks. After about 25 minutes, you'll notice the pastry becoming flaky and crisp. If you want to ensure an even more golden finish, you can brush the top with a mixture of plant-based milk and a pinch of salt before baking. This will give your Wellington a glossy, appetizing appearance.
The Wellington is done when the pastry is uniformly golden brown and feels crisp to the touch, typically after 25-30 minutes.
Once it's out of the oven, resist the urge to cut into it immediately. Let it rest for 5-10 minutes; this will help the filling set and make slicing easier. Your patience will be rewarded with a beautifully presented, delicious vegan centerpiece.
Final Thoughts
From start to finish, this Vegan Mushroom Wellington offers a delightful culinary experience.
You'll find that the combination of earthy mushrooms and flaky pastry creates a satisfying main course that's sure to impress your guests.
As you slice into the golden-brown crust, you'll reveal layers of savory filling that'll tantalize your taste buds.